OMC Cobra 5.7 engine install question

ab59

Ensign
Joined
May 10, 2017
Messages
982
unclear about OMC 5.7 engine alignment

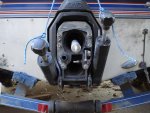
I have just set the engine back in the boat and got the front mount bolts started but not tight. Although I have watched many several videos on this I'm not clear on what needs to be done. I have the engine alignment tool and when inserted and removed leaves pretty much an even spline marks around the end of the tool but it is not in the middle of the gimble but off the the bottom. Also , the tool is not easy to insert or remove . The videos all say if the spline marks are even then it is correctly aligned but it seems to me that the tool should also be in the center of the gimble when correctly lined up and easy to insert and remove as well. Aren't all three positions and conditions necessary fo correct alignment or is the even spline marks the only requirement ?
 

bruceb58

Supreme Mariner
Joined
Mar 5, 2006
Messages
30,610
If it's not easy to insert and remove, it's hitting the top or bottom first.

I would insert until it starts getting hard(not fully inserted) and then pull it out look at the marks.
 

bruceb58

Supreme Mariner
Joined
Mar 5, 2006
Messages
30,610
Is this a new gimbal bearing? If so, full insert the tool and give it a wack in all 4 directions with a rubber mallet. This makes sure the gimbal itself is rocked into a neutral position.
 

ab59

Ensign
Joined
May 10, 2017
Messages
982
Ok , for what ever reason after sitting overnight I now get heavy spline marks on the top of the tool and not an even marking all around. I was really hoping that since I made the new wood the same height as the old that I would not have to worry about the up and down because one of the adjusting bolts for up and down is frozen to the upper half of the mount and did not come loose when I hit it several times with a 2 lb double jack. That was after soaking with wd-40 . guess it is coming out and getting the heat wrench.
This is the old bearing , I did not install a new one.
 

ab59

Ensign
Joined
May 10, 2017
Messages
982
I think that I already know the answer to this question but I have been wrong more than once . Yesterday afternoon with the " help " of my brother and law we set in the engine into my Starcraft . I ran the cherry picker and my help was in the boat . When we got the engine set in the boat and very close to in place I asked my help twice if the rear square nuts were lined up and in place and was told that yes he saw that they were perfect. We called it a day soon after and when I checked today there is a gap at both the rear mounts between where the slotted mount is and the bottom half of the mount that has the stud and square nut.
Was he rite , is it in place even having a gap because I think that there should not be any gap at all and should lay flat against the lower mount, trapping the sqare nut under the groove and holding it in place.
I have rolled the picker back into place and am about to pick the engine back up again but thought i would ask before I lift the engine again . I am working alone today so don't need to make extra work for myself unless needed.
thanks
 

bruceb58

Supreme Mariner
Joined
Mar 5, 2006
Messages
30,610
If you have heavy marks on the top the forward mount needs to come down.
 

bruceb58

Supreme Mariner
Joined
Mar 5, 2006
Messages
30,610
These are the instructions I use:
  1. Once you have the engine height close enough to fully insert the tool without force, then you can start working on setting the proper alignment.
  2. Take your time, getting it close enough to insert the tool the first time can sometimes be the hardest (most frustrating) part.
  3. Coat the end section of the tool (the smallest diameter area) with a light coat of grease and then insert it fully into the coupler.
  4. Without turning the tool, pull it straight out and look at the depth of the teeth marks in the grease.
  5. If the teeth marks in the grease are deep on the top side and shallow on the bottom side of the tool then your motor is too high.
  6. If the marks in the grease are deeper on the bottom than on the top then your motor is too low.
  7. Adjust the engine height accordingly.
  8. Keep checking the depth of the marks in the grease until they are equal in depth on top and bottom.
  9. Sometimes as little as 1/8th of a turn on the adjusting nut can be the
    difference between being properly aligned, and just having it "close"
  10. Lightly Grease the splines on the shaft (and on the coupler if you can) with
    Spline grease prior to assembly.
 

ab59

Ensign
Joined
May 10, 2017
Messages
982
Thanks 58 -will use this info to line up as soon as I figure out if the engine is sitting rite on the back mounts .
 

kenny nunez

Captain
Joined
Jun 20, 2017
Messages
3,390
If the large stainless flat washers are seated in the their respective locations the rear has to be correct. When I had my shop we sometimes would lift and lower the engine with a the chain fall to the front of the engine to get the alinment then set the adjustment . Then maybe 1 turn on the lower nut to compensate for the compression of the mount while checking the spline marks.
 

ab59

Ensign
Joined
May 10, 2017
Messages
982
Kenny n--I can work with that , thanks for that bit of knowledge I needed it. This engine appears to be way to high and since there are two pieces of 3/4" and on piece of 1/2" plywood under the mtr mounts I am going to try to remove the 1/2" and see if the alignment is close , one side is really froze up . I may have to replace it if the heat wrench wont brake it loose .
thanks---AB
 

Scott Danforth

Grumpy Vintage Moderator still playing with boats
Staff member
Joined
Jul 23, 2011
Messages
50,845
replace the froze up mount. a torch is the tool you use to remove it. the elastomer in the mount base wont take the heat.
 

ab59

Ensign
Joined
May 10, 2017
Messages
982
Ok, will forget about heating it till it's red to brake it loose and find a good mount. Have been several for sale around here and have a source for parts and will give him a call
By the way Kenny n--that trick worked great and made the job go quickly and easily , thanks again .
thanks----a.b.
 

ab59

Ensign
Joined
May 10, 2017
Messages
982
I got the mount freed up today by splitting the nut with a grinder , hacksaw and cold chisel , it was a lot of work but it is now serviceable and installed along with the engine alignment . Scott Danforth -- glad you spoke up about the torch although I was going to run water on the base where the rubber is I think it was a much better choice to keep the torch out of it all together, thanks.
The spline marks on the end of the tool look even all around and can slide easily into the coupler except for the last couple of inches but the marks seem evenly placed so I guess it is rite. It is a little firm the last couple of inches both in an out.
bruceb58-- All you guys have made this much less painful and just want to say thanks to all.
Got a long way to go but it is a good sight to see this engine in the boat and ready to hook up the wires etc.
 
Top