1985 Bayliner Capri 1950 redo - updated 09/25/08

shinallb

Cadet
Joined
Sep 15, 2008
Messages
9
Hello all. I am new to this forum, and for all intents and purposes I am new to boating as well. I grew up less than a mile from a large recreational lake, and my family had a boat, but I was a child then. I have longed to get back to the lake, but college, career, marraige, and a new home took priority.

Just recently I came across what appeared to be a good deal on a 1985 Bayliner Capri 1950 open bow. I spoke with the owner who was selling on order to buy a larger cuddy, or so he said. He agreed to take me out on the lake so that I could really get a feel for the boat and it's condition.

At first glance the exterior was in superb condition given its age. The original gel coat has minimal oxidation, and very few checks and scratches. The interior, however, was a nightmare. The carpet didn't match (what was there) and he was in the midst of doing a terrible job replacing the upholstery. I did not feel any soft places in the floor. The previous owner siad he had replaced the floor just this year. The boat did have two new laydown seats from a 2000 or so Bayliner in near mint condition. He also had a new bimini that he hadn't installed yet. I felt confident that I could update the upholstery in an acceptible manner. I am very picky.

In the water, the boat ran great. The boat has a 4 banger Volvo with a Penta outdrive I/O combination. It started right up, no smoke, no squeeling, no objections to be mentioned. Seemed to be in excellent shape mechanically.

All things considered, I felt like the boat was acceptible, and we struck up a deal. I towed the boat home feeling proud, as I had finally bought a boat.
The first task that I took to was to pull up the carpet so that I could get an idea as to what I would be up against in replacing it...here is where it goes bad very quickly. After pulling up the carpet, I wasn't very impressed with his job replacing the floor. I knew I could do much better. I decided to pull up his marine grade plywood to find the rear half of the boat is soaked and rotted.

Here is where you guys come in. I'm a handy guy, and there isn't much that I can't fo or figure out. I'm a Mechanical Engineer by trade and degree, and my expertise is in the commercial wood-working business. I know that the stringers and floor have to be replaced and glassed in, but where do I start?

The foam and stringers in front of the captain's seats are dry as a bone (I drilled into them to verify), but somewhere along the base of those seats it gets very wet, and eventually, rotten. If at all possible, and it may not be, I'd like to replace the floor and stringers in the rear half only, and leave everything from the glovebox / helm forward intact. Is this feasible? I'm not feeling overwhelmed yet, but I'm not far from it. What is the best way to cut out the glassed in portion of the floor to access the wet foam? How do I remove the foam?

I'm a member on several other forums, and if this one is like the others, I know you guys will want pictures. Here goes.

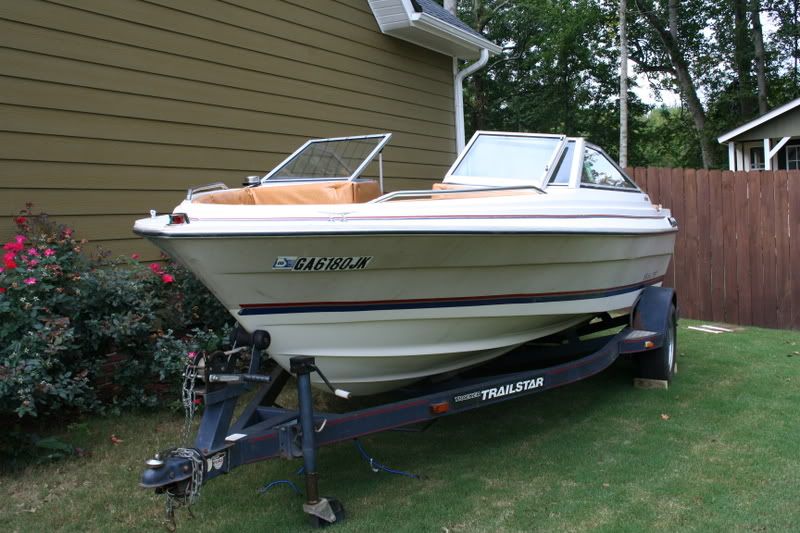
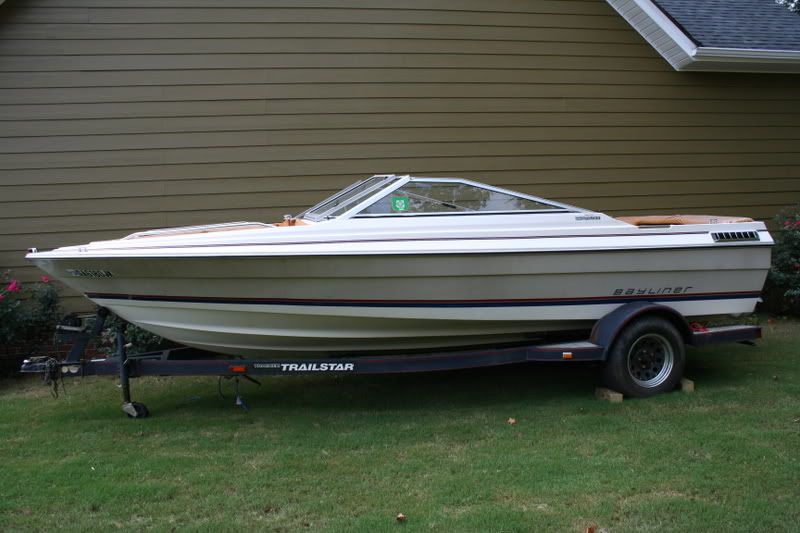
Looks great from the outside.
IMG_0568.jpg


IMG_0569.jpg


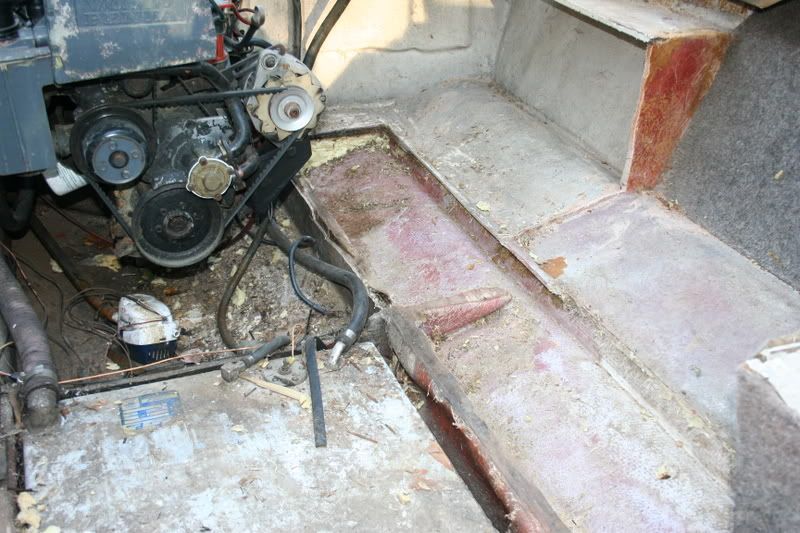
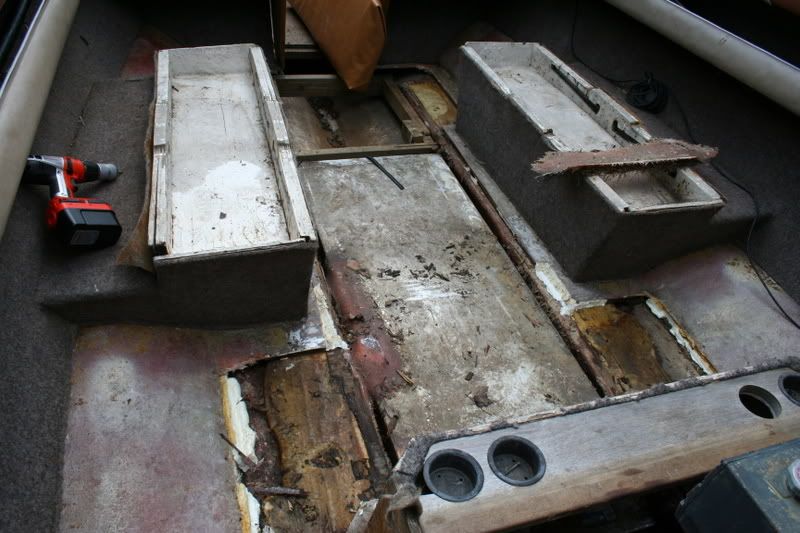
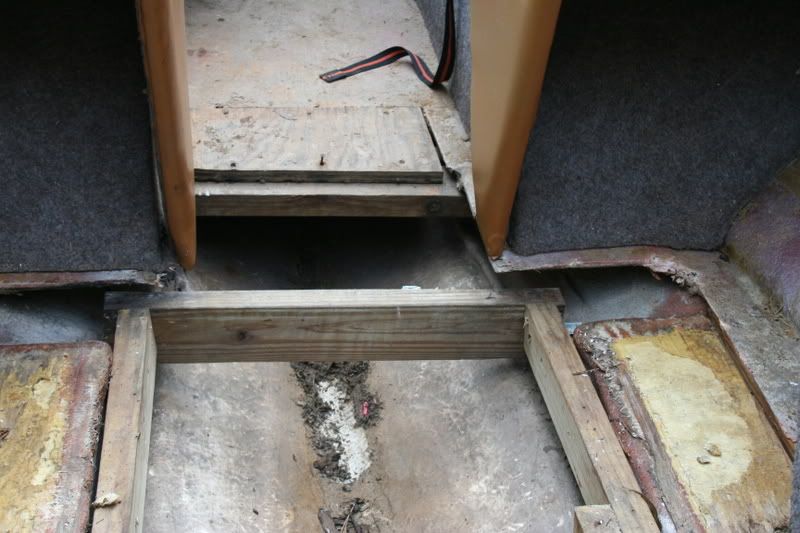
The inside is a disaster. I've already pulled some of the floor and seats.
IMG_0570.jpg


IMG_0571.jpg


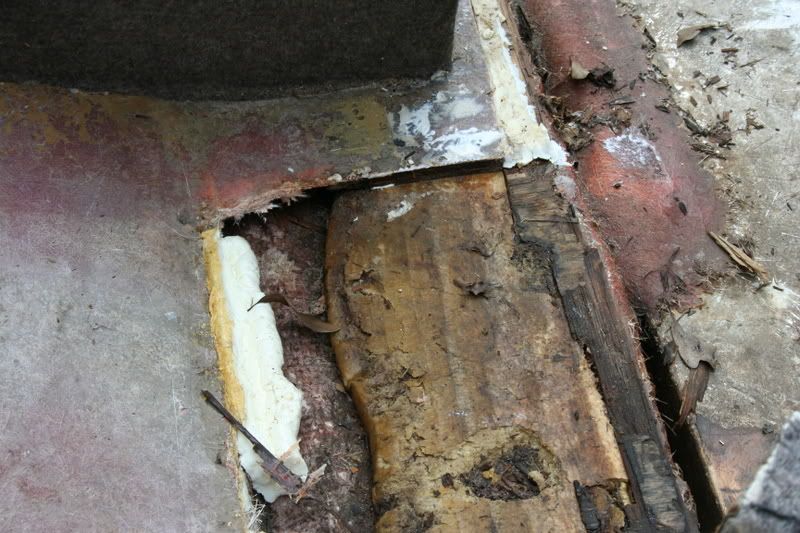
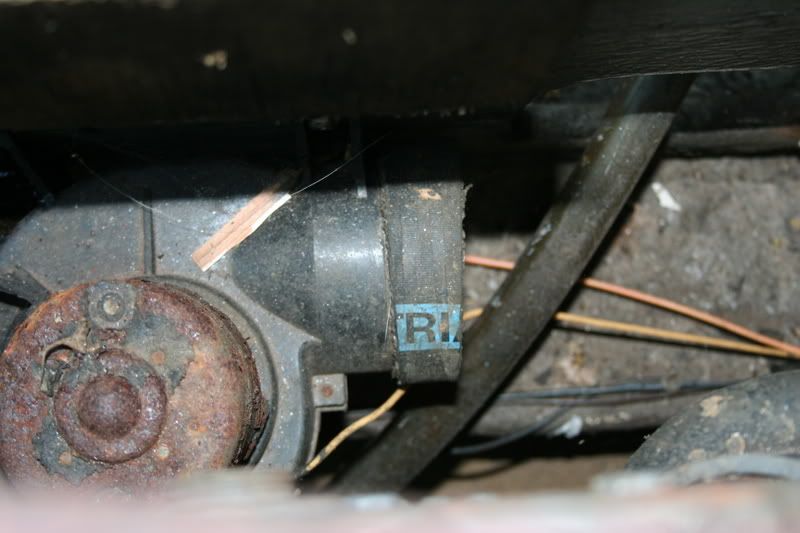
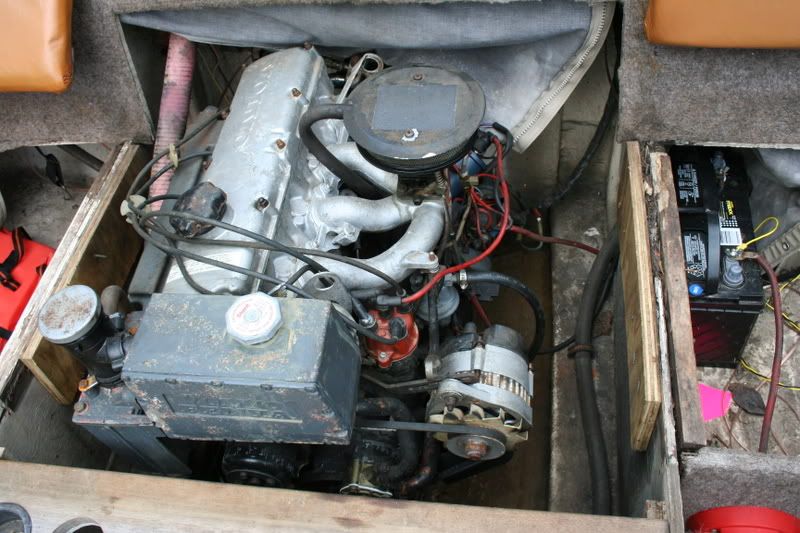
The engine runs great, and this area seems dry on top, but I suspect the foam underneath is soaked. The transom is dry and pretty solid.
IMG_0572.jpg


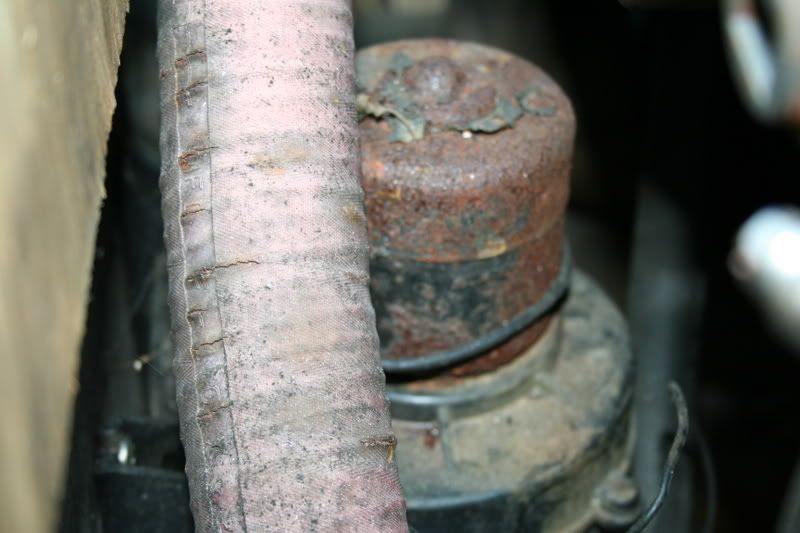
This foam is totally dry and hard, as are the stringers. I'd really REALLY love to only remove from the seats back if possible. At some point the previous owner boxed in the area between the stringers where it is dry in order to add some support to the floor behind it.
IMG_0573.jpg
 
Last edited:

oops!

Supreme Mariner
Joined
Oct 18, 2007
Messages
12,932
Re: help replacing foam and perhaps stringers

Re: help replacing foam and perhaps stringers

hi.....welcome to i boats.......

there is a lot of capris being done and have been done on this forum....so youll get lots of help.....your back ground will either help or make you over engineer everything....:D

the first thing, is to read the safety basics sticky at the top of the forum.
a member here cut the tip of his finger off the other day.

as far as where to start and where to stop....start where its dry....go thru the wet...and stop when its dry again.....the easyist way to take the floor out is with a circ saw.....set the depth as thin as you can and still get the deck cut out.

after the whole deck is out......(you can leave a 3 or 4 inch lip if you choose).........there are many ways to remove foam......(a really carpy job)
one way is with a wide blade pick axe....dont go deep and pick axe your hull apart....just use the wide end and go shallow....it comes out in a jiffy.

once its all cleaned out.....just replace what was there.....the foam in b-liners is structural....so it needs to be replaced......but you are a long way away from that right now.

one thing i noticed in your pics....is that the po layed the deck over the old one.....im wondering if your walkthru windsheild is currently fitted correctly or if it is wider at the top.....you will have to watch that when you install the new deck....

also the po used dimnentional lumber for tank supports.......not the best...but it will do......but they are un protected.......the will need to be glassed over or they will rot in a few years and you will be doing it all over.

the guys on this site really know there stuff......your in good company....post lots of pics...and we can walk you right thru this project.

cheers
oops
 

shinallb

Cadet
Joined
Sep 15, 2008
Messages
9
Re: help replacing foam and perhaps stringers

Re: help replacing foam and perhaps stringers

Thanks oops...I've been reading on here for about a week now, including the sticky, and I read the thread where someone cut the tip of his finger off. Ouch! I've also read most of your posts...very impressive.

You are correct, the PO used 2x4s to box in a section under the floor. That will be coming back out. Currently the windshield closes perfectly and the gaps look even. The PO did lay plywood (what a waste of good marine grade) over the existing floor, but not throughoutthe whole boat. It seems to be that he only layed it over where he knew it was rotted. That is how I found the rot to begine with; there was a "step" under the carpet from the different levels of flooring, and I didn't like the look or feel of it.

Funny thing about the situation (not really) is that I asked specifically about the foam and stringers before I bought the boat. He said they were dry and in great shape. Oh well, live and learn.

This will be a winter project for me so progress will be slow, but I do intend to document the rebuild.

It will in no way compare to most of the rebuilds I've read about here, but it will be done correctly and will last. Most importantly it will be safe.

Thanks for your response.
 

oops!

Supreme Mariner
Joined
Oct 18, 2007
Messages
12,932
Re: help replacing foam and perhaps stringers

Re: help replacing foam and perhaps stringers

each resto here is equally important and impressive as any other one....its the joy of the owner when he gets the craft on the water for the first time...

search "core sample".....there are some neat tricks to see if the foam is wet
 

seven up

Petty Officer 1st Class
Joined
Jun 4, 2006
Messages
275
Re: help replacing foam and perhaps stringers

Re: help replacing foam and perhaps stringers

of course you have a respirator and spare filters as well as face and ear protection
 

jcsercsa

Captain
Joined
May 21, 2007
Messages
3,401
Re: help replacing foam and perhaps stringers

Re: help replacing foam and perhaps stringers

of course you have a respirator and spare filters as well as face and ear protection

great point seven up !! home depot has a respirator for 25 bucks !!!

And your in great hands with my good buddie ooops !! were all here to help all we can , so keep then pics comming , and ooops is so right each boat is important here !!! I just got done with a 76 glastron tri-hull , well not done but its getting there !!

So welcome and lets see somemore !! John
 

shinallb

Cadet
Joined
Sep 15, 2008
Messages
9
Re: help replacing foam and perhaps stringers

Re: help replacing foam and perhaps stringers

Update....

I've got the port side of the deck completely removed, and most of the foam is out of the way. The wood is completely soaked through, but the foam has only been wet through the top half inch or so, then it is totally dry. Kinda odd. Oh, and I cannot tell you how much ***** it sucks removing all of the nasty rotten plywood and fiberglass. It truely has to be experienced to understand.

I wore a respirator, long sleeve shirt, jeans, and long socks, but I still itch everywhere.

In my haste to get in the shower, I neglected to take any pictures. I'll update with pictures after I do the starboard side.
 

jcsercsa

Captain
Joined
May 21, 2007
Messages
3,401
Re: help replacing foam and perhaps stringers

Re: help replacing foam and perhaps stringers

hahaha arent we having fun now !!! lol sorry just had to !! sounds good looking forward to seeing them pics !! john

PS dont wash them cloths in your washing machine !!
 

ezmobee

Supreme Mariner
Joined
Mar 26, 2007
Messages
23,767
Re: help replacing foam and perhaps stringers

Re: help replacing foam and perhaps stringers

Nice looking boat with a solid powerplant. Definitely worth the effort you're putting into it. Good luck with your project.
 

shinallb

Cadet
Joined
Sep 15, 2008
Messages
9
Re: help replacing foam and perhaps stringers

Re: help replacing foam and perhaps stringers

Yesss. More progress tonight; more trouble found as well. One step forward, two steps back I guess.

I've got all of the deck removed that needs replacing - basically from the rear of the bow all the way to the transom. I also have all of the wet foam out of the port side of the boat.

I am only removing the lower section of deck and foam, as the upper section is dry. I still have to pull the tank. Man, I really need to learn the jargon.
IMG_0574.jpg


Unfortunately, I verified what I already assumed to be true: the transom is rotted as badly as the deck. This brings several questions to mind. The first of which is, can this be repaired, and am I capable of doing it myself? I have no means of pulling the engine and drive at my place, which means that I'll have to move the boat to a buddies garage for the transom repair. My garage is full of cars and motorcycles, and I don't have an engine hoist. This also will slow down my progress...my buddy will want to help out, but he ends up talking too much, and offering too much Guiness.

Also, while poking around, I came to wonder how the engine is mounted in the boat? There does not appear to be any motor mounts. Witchcraft? Black magic?

There appears to be something that resembles a plastic turbo bolted to the box around the engine, but it isn't connected to anything. What is this, and where does it go? We ran the boat before I bought it, and it wasn't connected then, but I know it goes to something. There was at one time a rubber hose running to it, but it's been cut.
IMG_0579.jpg

IMG_0578.jpg


Finally, there is also what looks a little like a coil on the motor, but it also isn't connected to anything. Again, the boat ran without it, but this has to go somewhere. Viewed from the side:
IMG_0580.jpg


My plan has been to leave the fiberglass stringers in place, but epoxy and glass new stringers directly to them running on their outside. I figure this will be much easier, and should be just as strong. Not sure what to do about the transom though.

Thanks again for any help here.
 

shinallb

Cadet
Joined
Sep 15, 2008
Messages
9
Re: 1985 Bayliner Capri 1950 redo - updated 09/25/08

I hope the mods don't mind, I retitled the thread for better search-ability. I think I just did the English language a disservice.

Any ideas on the two components mention above? I've still got no clue.

Also, how well would it hold up if I were to glass in a new transom over the old one? I'd of course be relying on the PB and PL adhesive, as well as the glass and resin to hold tight to the old transom.

I'm just afraid that pulling the engine and drive might be beyond my ability. Rebuilding the transom would be no trouble, but I've got to get to it first.
 

Wildman_fab

Seaman Apprentice
Joined
Sep 14, 2008
Messages
30
Re: 1985 Bayliner Capri 1950 redo - updated 09/25/08

Yes that is an old coil, who knows why they moved it to the other side under the manifold??? Might want to check and seeif they did a 'pertronix' setup in the distrubtor, might have come with a more powerful coil. And the 'turbo' thing tucked into the engine compartment may be a blower? its toughto see from the pics.

In my option if you can rebuild a deck then you can probly do a transom. It is just a bit more work but like you said because you gota pull the motor. How far do you want to get into this project? how long are you planning on keeping it?
 

shinallb

Cadet
Joined
Sep 15, 2008
Messages
9
Re: 1985 Bayliner Capri 1950 redo - updated 09/25/08

Thanks Wildman_Fab...it looked like a coil to me, but I'll have to check to see if there is a pertronix setup. I'll try to get better pictures of the blower/turbine looking item. The fuel hose is currently in the way, but the tank has got to come out soon anyway.

As far as the transom goes, I am fully capable of building a new one. My problem lies in pulling the engine. I don't have a hoist, and I'm a one man band right now.

I'd like to think that I'll keep the boat for three to five years, then buy something bigger. For now, I want it to be safe and nice appearing in and out, but I also would love to be out on the water.
 

DrCox

Petty Officer 2nd Class
Joined
Sep 4, 2008
Messages
134
Re: help replacing foam and perhaps stringers

Re: help replacing foam and perhaps stringers

There appears to be something that resembles a plastic turbo bolted to the box around the engine, but it isn't connected to anything. What is this, and where does it go? We ran the boat before I bought it, and it wasn't connected then, but I know it goes to something. There was at one time a rubber hose running to it, but it's been cut.
IMG_0579.jpg

QUOTE]

heyas, to answer your question on what this is, I am 99% sure its a blower motor. The large rubber hose that is cut should have been attached to a vent port. That one I believe is to remove fuel vapors from inside the engine compartment. I have all the hoses, let me see if I can dig up a picture that can help you, I will PM if I get one that shows it all intact and hooked up.

Cheers!

-DrCox
 

shinallb

Cadet
Joined
Sep 15, 2008
Messages
9
Re: 1985 Bayliner Capri 1950 redo - updated 09/25/08

You guys are awesome! A picture would be really helpful too.
 
Top