1988 Marlin Ski Magnum overhaul

ridesapaint

Seaman Apprentice
Joined
Nov 30, 2008
Messages
40
Re: Back to work on sanding and grinding

Re: Back to work on sanding and grinding

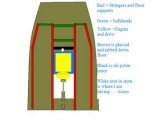
Im not sure about regulations about above or below deck rubber you mention. I would think twice about going without foam between stringers. If you are using the two part foam that expands and sticks to everything if it touches stuff (i am pissed i forgot what its called), I think it would be better below deck, then shave smooth the top and fiberglass cloth over it to seal it in. done right you wont need to use plywood for the decks, but very labor intensive. if the compartments are sealed, and the foam is sealed under the deck, the only way to get it wet is to put a hole in the hull. you can also create drains under the foam and put drain plugs in it, but then it will take forever to get her in the water.
you are close to the end and cutting corners is very tempting. i have been doing body work on my truck i thought would take a week, and a month later im not finished with the cab, let alone fenders, hood, doors, etc. i have a few more sheet metal things to cut out of the cab and replace before paint, and i have thought about just slapping bondo on stuff... not good thinking at this point.
hang in there, do it right even if it takes a week or two longer. you will feel much better about it.
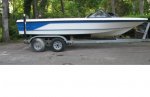
i did take my boat camping this week to arizona. had a very nice time cruising the nice lakes.
how do you get a picture on here?
 

proshadetree

Lieutenant Commander
Joined
Jul 19, 2008
Messages
1,887
Re: Back to work on sanding and grinding

Re: Back to work on sanding and grinding

When you look at flotation above deck you would have to fill the hull to have the amount of flotation found under most decks.Truck load of foam per boat Is average.Great work so far.Hope your enjoying a cold one on water soon
 

J. Mark

Petty Officer 1st Class
Joined
Sep 3, 2008
Messages
303
Re: Back to work on sanding and grinding

Re: Back to work on sanding and grinding

My decks are mostly in and are plywood coated with 2 coats of epoxy. The top will be tabbed abd covered with a layer of 3 oz cloth for a smooth finish.

The reason for not using foam isn't to save time or cut corners. Level flotation in the event of a hull breach is the goal. I don't want the boat floating upside down.

My calculations are that 18 cubic feet of foam would keep the boat afloat fully swamped. Currently there is foam under the bow and with the foam I can add above deck, I'll get close to the needed amount. If I find deflection in the hull or deck, I can go back and add the 2 part urethane foam at a later date.

under deck foam is a potential rot promoter. I'm doing what I can to minimize water intrusion below deck, but water will find it's way in regardless of what is done to prevent it.I had considered sheet foam, but I decided to try and get all the foam above deck if I can.
 

J. Mark

Petty Officer 1st Class
Joined
Sep 3, 2008
Messages
303
Re: Back to work on sanding and grinding

Re: Back to work on sanding and grinding

Bruised a couple of ribs a few weekends ago so I've been working slow. If I can start the engine in the next week I'll be way behind schedule, but happy.

If a moderator sees this can you please change the title of the thread to something like

"1988 Marlin Ski Magnum overhaul"

I tried to change the title but no luck. I am trying to keep all my project posts here, but the title is misleading (note for future project posts/posters)
 

proshadetree

Lieutenant Commander
Joined
Jul 19, 2008
Messages
1,887
Re: Back to work on sanding and grinding

Re: Back to work on sanding and grinding

dude hope your alright.Rest up and let those things heal for a week or so.Boat will still be there
 

J. Mark

Petty Officer 1st Class
Joined
Sep 3, 2008
Messages
303
Re: Back to work on sanding and grinding

Re: Back to work on sanding and grinding

IT'S ALIVE!

Though I am not quite ready to permenantly install the fuel tank I went ahead and put it in temporarily today and after 10 moths of work the engine fired without a single adjustment after enough cranking to fill the lines and carb.

Oil pressure was 80 pounds at 1000 rpm cold and dropped to the mid 60's warm and after adjusting idle down to 600 rpm.

Tach worked, alternator is charging, temp on the hose stayed below 140.

I was losing steam on the overhaul, but this really energized me.

The new edelbrock carb tuned out easily and transmission engages smoothly and vibration free.

I have a few minor water leaks, but nothing I can't manage tomorrow.

As soon as my ribs quit aching I'll be skiing behind this bad boy!
 

Mark42

Fleet Admiral
Joined
Oct 8, 2003
Messages
9,334
Re: Back to work on sanding and grinding

Re: Back to work on sanding and grinding

Well that IS good news. Getting a little closer every day. Like you said, sometimes making a mile stone really gets you excited to continue working the project. It helps me to set simple goals that can be met every weekend so I feel like I'm always moving forward and not floundering.

Keep on keeping on!


BTW, if you want the title changed, send a PM to Bob, and he can do it. They might not see your request in the thread.
 

proshadetree

Lieutenant Commander
Joined
Jul 19, 2008
Messages
1,887
Re: Back to work on sanding and grinding

Re: Back to work on sanding and grinding

Trust me there is nothing like hitting the water on a boat you have blood sweat and tears in.Had mine out yesterday and it so rocked.Im not the fastest thing in the water and not the prettiest but Ill almost bet I was the proudest.
 

J. Mark

Petty Officer 1st Class
Joined
Sep 3, 2008
Messages
303
Re: Back to work on sanding and grinding

Re: Back to work on sanding and grinding

Well I am slowly whittling down my list of things to do before the boat is ready for the water. That is actually surprising as every time I go to the list and take off the completed work, I come up with a half dozen things to add.

Current dilema

Rear center section of floor. I will need to access the drive shaft coupler, the shaft log (to adjust or repack as necessary), and the rudder shaft (To grease it) from time to time. Initially I had thought to just make the center section removable. The engine cover is hinged to this part as well.

If I ever had to pull the engine this set up would allow me to do it with just a few access holes cut off to the sides of the engine mounts to access the bolts.

The alternatives I have considered included

1) putting this section down with a less than permanent adhesive (not sure what, but maybe just plain caulk?) and not glassing the seams.

2) screwing the section down without any adhesive (the panel edges would be glassed over and I would liberally apply epoxy to pre drilled holes and use a dab of 5200 on the screws)

3) permanently attaching the piece but adding a long access door down the middle of it.

Not sure if you can visualize so I used paint to try and make it understandable.
 

Attachments

  • Boat.jpg
    Boat.jpg
    11.3 KB · Views: 1

J. Mark

Petty Officer 1st Class
Joined
Sep 3, 2008
Messages
303
Re: Back to work on sanding and grinding

Re: Back to work on sanding and grinding

those won't work for my application as the center section at issue would attach to the top of the stringers. There is a similar product that works great for this

http://www.rtlfasteners.com/RC/q.html

Drill the wood, reseal with resin after inserting and removing insert, reinsert before resin is completely cured and you have a strong water tight anchor. Or let the resin cure and add a dab of 5200 if you prefer

If I decide to anchor the whole section as one removable piece I would use these.

With the center section of deck glued to the stringers with PL and then glassed into the rest of the deck with a access hatch, boat would be a a little stiffer though, I just don't know itf it is enough to justify the extra work.
 

J. Mark

Petty Officer 1st Class
Joined
Sep 3, 2008
Messages
303
Re: Back to work on sanding and grinding

Re: Back to work on sanding and grinding

Does it ever end?

I started my overhaul back in October. My goal was to put the boat in the water by Memorial Day Weekend. As my project progressed, it just snowballed and as much as I did, there was always something unanticipated.

I missed my self imposed deadline, but I did get the rebuilt engine started Friday and was very happy to find that everything I have done so far seems to be right with the exception of a minor water leak that I'll deal with soon.

I've rebuilt and installed the 350 engine, had the velvet drive resealed and tested, had the prop rebuilt, replaced the stringers, bulkheads, floor supports, transom and deck (still have two pieces to glue in and then tab and glass it though) replaced the carburetor, new hardware, new ski pylon bracket, new fuel fill, speedometer tubes, hour meter, new hoses, new transmission cooler and lines, impeller, exhaust risers, mufflers exhaust hose, new shaft log and stuffing box and many more things I can't even keep up with.

I've bought new seats for most of the boat, new switches and circuit breakers, fuel line, fuel pump, bilge vent hose, bilge vent covers that are waiting to be installed.

Surprisingly, I've used less epoxy than expected so far (about 3 1/2 gallons) even though all the wood was coated on both sides and with two coats on the underside. I am using a very light glass on the deck once it is tabbed in so I am hoping 2 more gallons will be enough.

I have used at least 10 large tubes of PL Premium Construction adhesive and have one or two more to go and a large package of Marine Tex.

The top of the boat down to the waterline has been wet sanded and buffed and is looking great. All the lettering has been removed. Below the water line marine tex repairs are waiting for the final sanding when I pull the boat off the trailer (at which time the trailer bunks will be moved, recovered and the rear cross brace will have a hoop welded in) and then I'll put on the keel guard

I have an anchor, life vests, fire extinguisher, throw float and still need a few other things to keep in the boat. (tool box, spare impeller and belts, misc tools and hardware . . .

I am finally starting to see light and am setting an on the water date of July 4th (though I hope to be on the water for testing in about two weeks.)

But as I see things approaching completion . . . I am starting to see more things I want to do like

Remove the rubrail, tighten the hull to deck joint and reseal it, replace the rubrail insert (which has about 10 screws in it right now) build new side panels that go from the gunnels to the deck, install a stereo, wakeboard tower and so on and so forth. (including possibly adding two part foam under the deck as I second guess myself over and over again)

This is an addiction, but is it one that we even want to cure?

I am ready to get on the water- I can go without the rear seats or the side panels or even getting the underside of the hull perfect

(I suppose If I put the cluster back in place and put the steering wheel on I could put it in the water as is and test it, but I really want to get those switches changed out first)

Anyway, I know I owe you some pictures and when I can get it all cleaned up I'll add some pictures to the thread.

As to the budget . . . I have put in between 5 and 6K above the purchase price and have less than a thousand to go. I will have a boat when complete that might be worth the money I spent on the overhaul/restoration, but I will never get back what I paid for the boat . . . and that is okay, because I intend to get 10+ years of use out of the boat.
 

chrishayes

Senior Chief Petty Officer
Joined
Apr 9, 2009
Messages
691
Re: Back to work on sanding and grinding

Re: Back to work on sanding and grinding

For what its worth, you are doing a wonderful job and really, there is nothing like the knowledge that you have a "new" boat, built by yourself. You cant put a price tag on that! Keep at it, and just think, next year at this time you will be bored and miss having something that takes up your time(and money).
 

Mark42

Fleet Admiral
Joined
Oct 8, 2003
Messages
9,334
Re: Back to work on sanding and grinding

Re: Back to work on sanding and grinding

Ummmmm. No, it never ends. Thats the fun!!!

I started my hard top in September 07 and missed two finish deadlines already. Now I believe I have a realistic chance of making July.

Keep it up, you will be happy when you're done.
 

J. Mark

Petty Officer 1st Class
Joined
Sep 3, 2008
Messages
303
Re: Back to work on sanding and grinding

Re: Back to work on sanding and grinding

some long overdue pictures of the work in progress- I think it is safe to say nothing is complete though LOL
 

Attachments

  • IMG_1153.JPG
    IMG_1153.JPG
    82.8 KB · Views: 1

J. Mark

Petty Officer 1st Class
Joined
Sep 3, 2008
Messages
303
Re: Back to work on sanding and grinding

Re: Back to work on sanding and grinding

and another couplr followed by a question
 

Attachments

  • boat profile.JPG
    boat profile.JPG
    32.7 KB · Views: 1
  • IMG_1151.JPG
    IMG_1151.JPG
    37.2 KB · Views: 1
  • IMG_1155.JPG
    IMG_1155.JPG
    35.3 KB · Views: 1

J. Mark

Petty Officer 1st Class
Joined
Sep 3, 2008
Messages
303
Re: Back to work on sanding and grinding

Re: Back to work on sanding and grinding

Now for the question

I am trying to add a vent to the fuel tank as I have changed fuel fills to a non vented type due to the lack of availability of fills with 2" hose compatibility.

So here is what I cooked up

I used a brass 1/2 "T" a short brass nipple and a 3/8ths reducer and ran the fuel pick up right down the center and still had enough length to hit the bottom or the tank. I taped the threads with yellow teflon tape for gas.

Obviously I haven't installed the tank yet but wonder if there is anything wrong with my solution.
 

Attachments

  • IMG_1157.JPG
    IMG_1157.JPG
    42.2 KB · Views: 0

J. Mark

Petty Officer 1st Class
Joined
Sep 3, 2008
Messages
303
Re: Back to work on sanding and grinding

Re: Back to work on sanding and grinding

Well I tackled the wiring today and made substantial progress. I need one more circuit breaker and to run new wires to my bow light and the electrical will be done. Should knock it out tomorrow afternoon and get the dash screwed back down and the steering wheel reinstalled.

Next step is tabbing the deck and putting a layer of glass down.

After that I put in the gas tank, new gas lines, blower hoses in the rear and finish the interior at least enough to get on the lake for some testing.

There are still a dozen minor things I need to do along the way, but I made noticeable progress this weekend even though my kids helped (okay, they didn't help, they hovered and asked about everything and why but that was fun too.)
 

Mark42

Fleet Admiral
Joined
Oct 8, 2003
Messages
9,334
Re: Back to work on sanding and grinding

Re: Back to work on sanding and grinding

Oh man, the boat is gorgeous! What a polishing job!

The vent looks like it will work, and I didn't see anything int he CG regs that say the vent and feed can't be combined.

I want to have my boat ready for the 4th also. I hate to rush things, but I realize that I got to hustle if I want it done on time.
 

88BLiner

Petty Officer 2nd Class
Joined
Mar 22, 2009
Messages
172
Re: Back to work on sanding and grinding

Re: Back to work on sanding and grinding

I wish I could help you with your question on the fuel tank vent, I do not know very much about that. But I do know that is a sweet looking boat.
 
Top