First rebuild - '89 Campion Allante 185 - Stringers, Deck, Transom

AShipShow

Lieutenant Commander
Joined
Jul 8, 2016
Messages
1,803
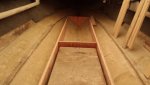
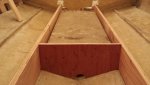
YUP... My Bayliner was the same as well. The bow area seat boxes were fully supported by foam, again, to make their process easier, cheaper, and faster (what!? bayliner? cheap?!)...

All the parts were probably pattern cut or CNC cut, preassembled, dropped in the hull, tabbed in, and then they could foam the whole thing in one shot since all the cavities were connected.

i agree with all the other recommendations (make a full size deck first, and build on top... It will also make your hull stronger. Its pretty self explanatory, but I have some videos over on my youtube channel of building the seat boxes on top of the deck for my bayliner... (link to channel is in my sig).
 

steve_h7

Chief Petty Officer
Joined
Sep 16, 2018
Messages
401
Thanks Austin,
On the roller I was really having trouble with the "bubble buster" one but between keeping it cleaned with Acetone and I also purchased a little bigger diameter roller, it's working a lot better. I look forward to giving it a try on the stringers.
And thanks Jared... I always enjoy your videos so I'll go back and check how you did your boxes too. :thumb:

Today I used the string method to record the measurements every 6" for the stringers so I'll get some more plywood tomorrow and start splicing a couple layers together to make my 12' long boards. :)
 

kcassells

Fleet Admiral
Joined
Oct 16, 2012
Messages
8,739
null


Here's another Iboat read with pics for joining stringers. I prefer the pic above.

https://forums.iboats.com/forum/boat...ice-a-stringer

http://boatbuilder-tips.blogspot.com/2013/02/joining-plywood-butt-joints.html
 

AShipShow

Lieutenant Commander
Joined
Jul 8, 2016
Messages
1,803
If I ever decide I hate my free time again and do another boat, one of the main things I would do different is the stringers... i used 2x material so i could get full length in one piece cuz i never liked the look of the joints like shown above.. it looks like a nightmare to glass.

What i would do it use 2 layers of 1/2 inch ply laminated together to a 1 inch thick piece. Then you can stagger any joints by several feet so it's super strong and no ugly blocks to glass around.
 

steve_h7

Chief Petty Officer
Joined
Sep 16, 2018
Messages
401
Thanks Kevin, more great reading... and they are purdy. :D
But I had planned on doing it like Jerrod said since I'd like to have 1" wide stringers and since I need them 12' long I'd read a post from WOG that I could alternate 4' and 8' pieces, something like this drawing (the black is 8' pieces, the red is the 4' pieces) which sounds like what Jerrod was describing.
Thanks again for all the input!
 

Attachments

  • photo310398.jpg
    photo310398.jpg
    2.7 KB · Views: 0

sopwithcamel74

Petty Officer 1st Class
Joined
Aug 15, 2018
Messages
203
Yup that Woodonglass is DA Man! Absolutely correct!
Another option is to simply add a bulkhead and divide the space to your liking.

This (breaking it up with bulkheads) is what I've committed to. It may change when crunch time (and the inevitable second-guessing every decision) arrives, but it makes the most sense for what I have planned.
 

AShipShow

Lieutenant Commander
Joined
Jul 8, 2016
Messages
1,803
At the end of the day, it doesn't much matter if you break up with bulkheads or do one long stringer... The important part is that you have a structure that is easy to glass because if its not, you are going to struggle with it and end up with a bad laminate... The wood of the stucture is for the most part acting as a form for the fiberglass that just gets left in. With a sufficient laminate, the wood is only providing a small amount of stiffness to the hull where most is coming from the glass/resin composite. A lot of newer boats have abandoned wood and use a purely fiberglass stringer system that just gets injected with structural foam to add to the stiffness.
 

steve_h7

Chief Petty Officer
Joined
Sep 16, 2018
Messages
401
So I got the stringers constructed and cut along with the bulkheads and I put the tank back in to double check I had enough clearance for it and it looks like I've got plenty. But looking at the tank and remembering how the factory had it installed I have a question... there was a small space under the support board and under it was completely clogged with wet wood and goop. When I put it back in should I glass that support board so there's no space between the hull and the board? If I do that it seems like the water would collect right in front of the board. The tank has tabs to attach it to the board and it automatically makes a gap between the board and the tank... is that alone enough to allow water to make it to the bilge? I've seen other people use rubber strips between that board and the tank... since mine has tabs that lift it slightly off the board, do I need anything else between the tank and board?

Thanks!
 

Attachments

  • photo310655.jpg
    photo310655.jpg
    251.1 KB · Views: 2
  • photo310656.jpg
    photo310656.jpg
    259.6 KB · Views: 2
  • photo310657.jpg
    photo310657.jpg
    249.1 KB · Views: 2
  • photo310658.jpg
    photo310658.jpg
    226.8 KB · Views: 2

kcassells

Fleet Admiral
Joined
Oct 16, 2012
Messages
8,739
I can't grasp the situation but the neoprene strips keep the base off the floor and allow air flow. That should definitely happen. The tank base should rest upon the neoprene, otherwise you could have issues with the tank when its filled getting convoluted.
 

steve_h7

Chief Petty Officer
Joined
Sep 16, 2018
Messages
401
Sorry for making it so confusing, but after looking at frisco boater's video again (and again, and again, and... :)) I'm pretty sure I see how I'm suppose to do this. I just wasn't sure if the goal was to leave a gap under the board under the tank for water to move or if it was suppose to go on top of that board and under the tank itself. Frisco's looks to have the tank sealed and a cavity maintained under the board to allow water to flow to the bilge so that's what I'll try and do. When I tore everything apart initially the area under the tank board was so plugged the water could no longer pass under it and make it to the bilge.
 

kcassells

Fleet Admiral
Joined
Oct 16, 2012
Messages
8,739
That area is called a "Coffin" whereas the tank is in it's own containment. Plenty of discussion about the subject.
 

steve_h7

Chief Petty Officer
Joined
Sep 16, 2018
Messages
401
That area is called a "Coffin" whereas the tank is in it's own containment. Plenty of discussion about the subject.

lol, I was following along during the whole sealed vs. not for tanks but my situation didn't really apply since the tank is IN the bilge area so sealed isn't even an option, but an interesting debate.
I'm curious if most just depend on the area made between the hull and the tank support board bottom to carry the water or does anyone run something like a dedicated half PVC pipe under the board to carry it?
 

sopwithcamel74

Petty Officer 1st Class
Joined
Aug 15, 2018
Messages
203
The two schools of thought seem centered on 1) never allowing the contents of the tank area to mix with the bilge and subsequently the water you're boating in, and 2) avoiding any trapped water from remaining trapped by providing egress to the bilge.

I plan on using a yet undecided upon mechanism to allow water to drain from that area into my bilge. You'll hear a million different viewpoints from a million different sources... As always, consider a few options but decide on what makes the most sense for you.

Good progress, btw... Keep it going!
 

Chris51280

Ensign
Joined
Jan 24, 2018
Messages
932
Mine is designed the same way. I had a drain from the ski locker to the bilge. However, the pathway was foamed and the water was trapped rotting the wood. I will keep it the same way foaming under the tank board and will just run 3/4 piping that will seperate everything
 
Top