1998 Mercruiser 5.7 TBI Backfiring Under Load & Loss of Power

nola mike

Vice Admiral
Joined
Apr 22, 2009
Messages
5,587
I really want to see compression numbers. Rough idle in a 5.7 makes me think you're misfiring or dropping cylinders. At idle I'd also putting a timing light on each plug lead to make sure they're all firing consistently
 

98BaronMag

Cadet
Joined
Jun 2, 2025
Messages
15
Well folks, I think we've identified a major problem here. Did a compression test today and the results are as follows. Cylinder numbers are basic chevy 350 pattern.
Cyl 1 200psi
Cyl 3 185psi
Cyl 5 190psi
Cyl 7 195 psi
Cyl 2 198 psi
Cyl 4 35 psi
Cyl 6 0 psi
Cyl 8 200 psi
Seems like we're looking at at least a partial teardown, but I'd like some ideas as far as common causes of these types of issues and what I'm looking at as far as tear down/repair...or if the situation seems so severe repair isn't really feasible. Thanks
-Marcus
 

ESGWheel

Senior Chief Petty Officer
Joined
Aug 29, 2015
Messages
727
Looks like a blown head gasket, perhaps from an overheat in the past…

You are looking at pulling the heads at a minimum and if you have led a good life you are only doing head gasket replacement (needs to be marine). Pull the heads and post lots of pics of your findings…
 

98BaronMag

Cadet
Joined
Jun 2, 2025
Messages
15
Sounds good. I plan to drain the oil when I get back to it and check for water. Then I'll start engine disassembly. Might be a week or so before I can get back to the project, but I'll keep you all updated once I get there.
 

nola mike

Vice Admiral
Joined
Apr 22, 2009
Messages
5,587
Sounds good. I plan to drain the oil when I get back to it and check for water. Then I'll start engine disassembly. Might be a week or so before I can get back to the project, but I'll keep you all updated once I get there.
Might want to blow some air in the cylinders to see where your leak is occurring, although the head is coming off regardless. Did you pull the valve covers to make sure all the valves are functioning in those cylinders?
 

98BaronMag

Cadet
Joined
Jun 2, 2025
Messages
15
Alright, I got back to it today. Removed everything in the way and removed the valve cover and exhaust manifold. Cranked it to verify full/proper motion. Everything seemed in order. Then, I removed wiring and distributor and pulled the intake manifold and the starboard side head. Head gasket had a large gap between cylinders 4 and 6 - right where I'm having low/no compression. I also noticed a rather large amount of rust chips in the coolant passages of the head and somewhat less in the block. Is there a procedure to clean those passages out? Also, is resurfacing absolutely necessary or potentially avoidable before reinstalling the head and new gasket? Pictures of block, head, head gasket, and coolant passages to follow.
 

Attachments

  • 20250612_174421.jpg
    20250612_174421.jpg
    3.5 MB · Views: 8
  • 20250612_174426.jpg
    20250612_174426.jpg
    3.5 MB · Views: 8
  • 20250612_174435.jpg
    20250612_174435.jpg
    4.4 MB · Views: 8
  • 20250612_174440.jpg
    20250612_174440.jpg
    4.6 MB · Views: 7
  • 20250612_174536.jpg
    20250612_174536.jpg
    1.7 MB · Views: 7
  • 20250612_174539.jpg
    20250612_174539.jpg
    2.2 MB · Views: 7
  • 20250612_174556.jpg
    20250612_174556.jpg
    1.5 MB · Views: 7
  • 20250612_174600.jpg
    20250612_174600.jpg
    1.7 MB · Views: 5
  • 20250612_174609.jpg
    20250612_174609.jpg
    1.5 MB · Views: 5
  • 20250612_174648.jpg
    20250612_174648.jpg
    1.3 MB · Views: 8

ESGWheel

Senior Chief Petty Officer
Joined
Aug 29, 2015
Messages
727
How far you have to go depends on how much damage there is. To determine that need to clean the heck out of the head and block surfaces. From there can better determine is the blown head gasket caused any erosion between those two cylinders necessitating resurfacing. It does not look like it did fm pics, but need to clean them up to really tell. Assuming no erosion then need to determine if flat. This requires a machinist straight edge like this link. Lay it across the various matings surfaces like the heads and intake manifold looking for warpage. See this video for how to on heads (link); similar for block. And if all good, can go the extra step to see if any cracks with DYI dye penetrant test.
 

ESGWheel

Senior Chief Petty Officer
Joined
Aug 29, 2015
Messages
727
Follow up: you are already probably aware, but stuff all the cylinders and other holes, ports with paper towels / rags to protect getting the scrapings in places you do not want them. And no power or other tools that can remove the base metal. :)
 

98BaronMag

Cadet
Joined
Jun 2, 2025
Messages
15
I apologize for such time passing before I updated you folks. I replaced the head gasket and reassembled. Compression test after reassembly showed Cyl 4 (previously at 35 psi) now at 190. seemed to fix that. Cyl 2 and 8 at previous numbers. Cyl 6 still at 0. I put a small amount of oil in the cylinder and retested...no difference. Playing with valve timing ( both intake and exhaust valve rockers backed off about 1 turn) yielded the best compression at 90 psi. This leads me to think some overheat event blew the head gasket and potentially tuliped a valve as well. Ran and retimed the engine and just had it out to test this past weekend. Large increase in power and runs much smoother/quieter than before. Planning to remove head again this fall and look at replacing that cylinder's valves if that makes sense to you folks. It seems to run fine, but I'd like to squeeze all the power I can out of it.
 

ESGWheel

Senior Chief Petty Officer
Joined
Aug 29, 2015
Messages
727
Got it running > great! At least you can enjoy the rest of the season.

How far you go depends on what you want to do and get out of the boat. While its an older boat, you have only had it one year. Does it accomplish what you were hoping for? In other words, do you plan on keeping it for 5 years or more?

If yes, I would do a complete head rebuild on both. You can save some bucks by doing the disassembly / assembly yourself which could be fun and allow you to add to your tool collection J Stepping up in cost would be to have the shop do the rebuild. Or an option (may even be cheaper than shop rebuild) is to get reconditioned heads > these are rebuilt already and a bolt on and go.

If you want to do it on the downlow, the pull head and test value sealing with acetone and act on what you find but only at a minimum.
 

Scott06

Admiral
Joined
Apr 20, 2014
Messages
6,979
I apologize for such time passing before I updated you folks. I replaced the head gasket and reassembled. Compression test after reassembly showed Cyl 4 (previously at 35 psi) now at 190. seemed to fix that. Cyl 2 and 8 at previous numbers. Cyl 6 still at 0. I put a small amount of oil in the cylinder and retested...no difference. Playing with valve timing ( both intake and exhaust valve rockers backed off about 1 turn) yielded the best compression at 90 psi. This leads me to think some overheat event blew the head gasket and potentially tuliped a valve as well. Ran and retimed the engine and just had it out to test this past weekend. Large increase in power and runs much smoother/quieter than before. Planning to remove head again this fall and look at replacing that cylinder's valves if that makes sense to you folks. It seems to run fine, but I'd like to squeeze all the power I can out of it.
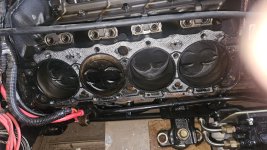
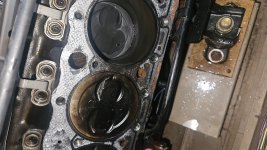
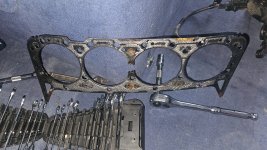
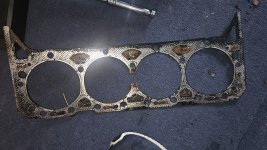
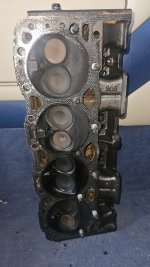
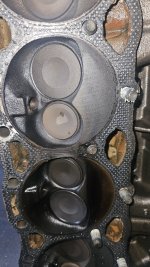
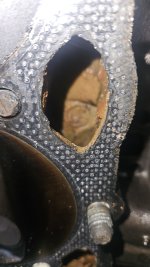
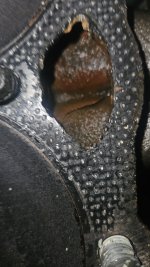
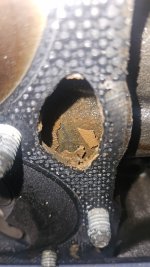
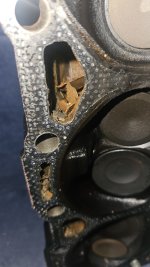
Verify valve adjustment on 6 is not too tight as that could cause valve to hang open .
 

98BaronMag

Cadet
Joined
Jun 2, 2025
Messages
15
@Scott06 I think valve timing was at spec when I had 0 psi. Backing off almost a turn on both valves (and incurring a slight bit of lash) seemed to yield the best result at about 88 psi. Backing off more turns on the intake valve could get me up to 93 psi or so, but the rocker was very loose and I thought it a poor idea to run in that condition. Backing off the exhaust valve rocker more than one turn made no difference in compression but any less than one turn off and compression drops to 0 nearly instantly. @ESGWheel I love the boat. I know it won't be a speed demon even in peak condition, but it does what I want it to do very well. I think I need to look into different prop options and things like that, but I'd like to wait until I have it running as well as I want. I'm liking the last option you provided, but I'm going to have to look into what exactly the acetone test method entails. I was leaning towards valve issue because 0 psi has to indicate a very large leak. I don't see how changing the valve timing would decrease the severity of a large leak anywhere other than valve sealing.
 

Scott06

Admiral
Joined
Apr 20, 2014
Messages
6,979
@Scott06 I think valve timing was at spec when I had 0 psi. Backing off almost a turn on both valves (and incurring a slight bit of lash) seemed to yield the best result at about 88 psi. Backing off more turns on the intake valve could get me up to 93 psi or so, but the rocker was very loose and I thought it a poor idea to run in that condition. Backing off the exhaust valve rocker more than one turn made no difference in compression but any less than one turn off and compression drops to 0 nearly instantly. @ESGWheel I love the boat. I know it won't be a speed demon even in peak condition, but it does what I want it to do very well. I think I need to look into different prop options and things like that, but I'd like to wait until I have it running as well as I want. I'm liking the last option you provided, but I'm going to have to look into what exactly the acetone test method entails. I was leaning towards valve issue because 0 psi has to indicate a very large leak. I don't see how changing the valve timing would decrease the severity of a large leak anywhere other than valve sealing.
Correct only way the valve adjustment can affect compression is if the rocker nut is too tight it keeps the valve off the seat. Have seen that many times, obviously backing it off helped but not completely ? Maybe valve is tuliped which changes the valve length making it longer.

always best to have heads checked out and valve job done if needed when off.
 

ESGWheel

Senior Chief Petty Officer
Joined
Aug 29, 2015
Messages
727
An acetone test is checking for leaking valves by using a light liquid, like acetone or diesel fuel. Some use gas, I do not recommend that. Its simply pulling the head, leaving the valves installed with their springs and pouring the acetone in the port and looking to see is it leaks. Here is a vid I found on doing this link.

Glad u love the boat. So, I if I am reading this correctly, you want to get this back running as best as possible but with least cost as possible for now and continue to have fun and try to prop the boat for best outcome. Then when have time and some extra cash, do the needed research, plan for and then dig in for a more proper rebuild. If yes than here is the low down on the down low:
  • Pull just the head with the issue
  • Clean off any carbon build up as best as can
  • Do the acetone test and for any valve that is leaking do the needed repair. This can be as simple as lapping in the same valve, or in the case of that no. 6 cyl valve it may need a new one and again lap it in assuming seat not cracked. Will need to get a valve spring compression tool. Look up lapping on Google for how to.
  • Redo test, and see if improved, if not, more lapping
  • Install head and go.
Again, the above is real old school and will not be the same as a proper rebuild but should get up and running better than what you currently have.

Let us know how it goes and good luck!
 
Top