I didn't want to restore this 1997 Islander this summer

Fj40fiji

Seaman
Joined
Sep 13, 2024
Messages
52
I did make it to the lake last weekend, man there were a lot of boats! I went to a lake I used to go to with friends when we would go tubing and sporting around in my friends’ 21’ Tahiti mini day cruiser with a 454 and Berkeley jet. I haven’t fished there just because there are other lakes around that I like to fish at, and this one is really the sport boat/ wake boarding/ jet ski scene.

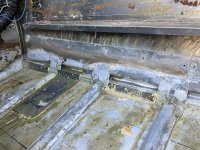
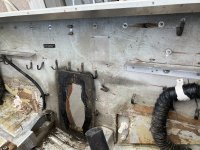
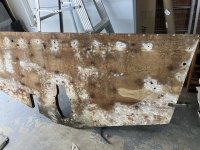
I only found 4 more rivets leaking- it took a solid twenty minutes before there was enough water coming in to identify them. So tonight I got my last rivets bucked in. It’ll be Sunday before I can work on it again, so I hope to get through the small amount of work I need to do with the marine Tex, and then start going over seams and heads with gluvit, then on to building!
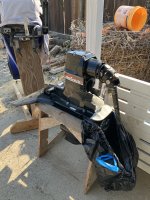
Also: I found an upholstery shop two towns over that sold the contact adhesive for the vinyl.
 

Fj40fiji

Seaman
Joined
Sep 13, 2024
Messages
52
I got the last of the carpet out today, spent a bunch of time using some citrus paint stripper I had to get the stuck carpet bits out. Worked okay with a two hour soak and pressure washing. I also took the bolster pads off the gunwhale in the cockpit and the inner transom panel off. This boat is pretty stinking stripped now.

It got hot before I had a chance to start on gluvit. It’s only about 20-30% humidity here in the summer and we get into the 90s every day, and can have weeks of 105+, so I have to find the early morning opportunity to get things like that done. I don’t have to wait long for them to set up and dry though!
This hull doesn’t drain well on a good day, and in the event I took on any more water I really want to put a pump in the cabin. If I use a screw in access cover like I have for the deck over the fuel tank I have about 5” to the bottom of the hull, so I should be able to mount on of the little all in one type units, Atwood or something.
I’m looking for in out here- I think I should plumb it to its own outlet port. I think the aft port is too far for these little guys to push water. I could run it through the starboard side right behind the cuddy at the same height below the tub rail as the original. Is there a reason not to? Should I use or do I need a check valve?
I am also upsizing the one in the aft of the boat and will need a bigger outlet. If I wanted to use my current (new this year) bilge pump as an aux/back up, maybe mounted a little higher- is it a bad idea to use a Y fitting to a single outlet? Again- check valves?
The OEM port is only about 9” down from the rub rail, so does not have a full foot of air gap/ loop above the outlet.
 

Fj40fiji

Seaman
Joined
Sep 13, 2024
Messages
52
One more project I am trying to get done in this round- I have a 15hp kicker on the Port side, I am looking for a configuration where I can get both batteries on the Starboard side to get a little more balanced. They are group 27 and 9 months old, and don’t fit side by side, and there isn’t room in the compartment to rotate them. I think I can get on in the original location and then build a custom panel and access door and get the second one below it, where I could pull out the jump seat and access the battery. Other than being a big job for potentially small reward, is there any big drawback?
 

Fj40fiji

Seaman
Joined
Sep 13, 2024
Messages
52
Here is a major factor in why I don’t want to fix this boat right now. I can’t really work passed about 11 am on it, since I am doing this in my driveway. This is a mild summer though, we often don’t even get cool nights. It’s not unusual to stay over 100 passed midnight and never get below 85-90 degrees. It’s great weather for boating in the mountains.
 

Attachments

  • IMG_1292.png
    IMG_1292.png
    1.2 MB · Views: 3

redneck joe

Supreme Mariner
Joined
Mar 18, 2009
Messages
12,147
Yeah same here but we have humidity....


We've averaged about 112 degrees feels like temp. Finally got down to three guests this morning, they are off to Portland to visit mom's side of the family this week and all i need to do is rivet down the last section of flooring and head out for a shakedown run.

I started tearing out 4 march.
 

Fj40fiji

Seaman
Joined
Sep 13, 2024
Messages
52
I got Gluvit on the main seam of the bow, sides, hull and transom except under the engine. I only got about half the other rivets in the boat before I ran out. Second can was ordered last week but not going to be here till next week.
 

Fj40fiji

Seaman
Joined
Sep 13, 2024
Messages
52
As I dismantle this boat, all the damage seems to originate on the inside, very few if any rivets seem to have worked themselves loose. The leaks near the keel all appear to be from water sitting in the bilge, wicking down around the rivets and corroding the edges of the hole till it could drain.
I realized there was probably more corrosion than I thought behind the floor supports so I resumed drilling rivets this morning. With the supports removed I could see a tell tale brown water line, like was on the outside of my first 14’ aluminum boat, but on the inside.
I’m pretty sure this boat sat one or more winters unattended and collecting water.
I really didn’t want to pull the engine and drive to get to the transom, but I don’t think this job will “done” if I don’t. It’s not soft, but there is obvious corrosion on the inside of the skin.
 

Attachments

  • IMG_1299.jpeg
    IMG_1299.jpeg
    3.5 MB · Views: 0

Fj40fiji

Seaman
Joined
Sep 13, 2024
Messages
52
Love overcharging an almost dead battery and the acid spurts out and gets to aluminum hull rivets.
I don’t see anything that looks like evidence of that. There is an aluminum bracket the holds up a piece of 3/8” ply wood that makes the shelves for the batteries, the PO just had foot man loops and strap screwed to that to secure the batteries, there is no significant corrosion on those brackets and no staining on the plywood.
 

Fj40fiji

Seaman
Joined
Sep 13, 2024
Messages
52
So I went to pull the engine at a buddy’s house using his gantry. It was about 10” short of clearing the transom, so I couldn’t remove the engine from the boat, but I turned it around and set it forward about 2’ on blocking, tied it down to the stringers and brought it home to continue transom disassembly like this:
 

Attachments

  • IMG_1323.jpeg
    IMG_1323.jpeg
    2.3 MB · Views: 2

Fj40fiji

Seaman
Joined
Sep 13, 2024
Messages
52
Before I pulled the drive yesterday, I recycled one of my forward decks into this stand:
 

Attachments

  • IMG_1320.jpeg
    IMG_1320.jpeg
    2 MB · Views: 1
  • image.jpg
    image.jpg
    2.4 MB · Views: 1

Fj40fiji

Seaman
Joined
Sep 13, 2024
Messages
52
It’s not sturdy enough for serving the drive on it, but it keeps it of the ground for storage. I may brace it up a little, it’d be nice to have a proper stand next time I replace my my sea water impeller.
Also in the back ground is an out board stand I built two years ago, I needed a place to put an engine for a few days and didn’t want to expend anything for it- I had access to these scraps and only pulled two measurements and made a handful of cuts to throw it together. It’s been pretty handy, would be worth making a little more permanent.
 

Fj40fiji

Seaman
Joined
Sep 13, 2024
Messages
52
It wouldn’t really be a boat restoration otherwise.
 

Attachments

  • image.jpg
    image.jpg
    3.9 MB · Views: 1
  • IMG_1331.jpeg
    IMG_1331.jpeg
    2.8 MB · Views: 1

Fj40fiji

Seaman
Joined
Sep 13, 2024
Messages
52
Can anyone verify that the “super structure” of this boat uses 5/32” rivets? I’m 99% convinced but not certain I’m not obstructed by my ignorance.

Also, if you need to know how the panel above the transom is held on an islander, you can infer from these holes:
 

Attachments

  • IMG_1332.jpeg
    IMG_1332.jpeg
    1.7 MB · Views: 0
Top