Rivergator
Petty Officer 1st Class
- Joined
- May 7, 2013
- Messages
- 240
A few days ago I got around to replacing the gimbal bearing in my Alpha One Gen1 drive. I have the alignment shaft and installment tools that came with it, but had a big problem to use it up to now, because it asks me to drill a hole through the shaft and mount the bearing install tool at a very specific, precise location on the shaft. This is a very bad design and idea (IMHO). Unless you are properly equipped with the right tools and skills to do that, it will most likely fail. Either the holes don't line up or you may make a mistake when measuring the precise location on the shaft where to drill the hole for the tool for your particular boat. There's got to be a better and more fool proof way to do this and there is:
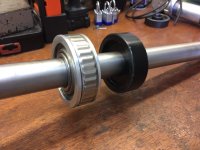
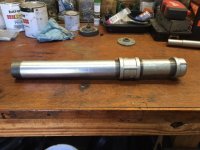
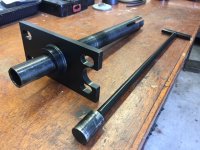
Do not mount the bearing install tool on the alignment shaft. Do not use the alignment shaft as a ram rod to seat the bearing. Instead use the alignment shaft as a non-moving rail, as a guide to properly align and seat the bearing. Put the bearing install tool on the shaft followed by the bearing (pic. A) and now you insert the alignment shaft all the way into the coupler. If your drive shaft to coupler alignment is what it should be the alignment shaft will be pretty much centered. Now you need a piece of galvanized pipe 1.5" inside diameter by 18" long with an end cap (pic. B). (Mine is split because I had the 12" piece already. Zoro.com is a good place to get this stuff. Best prices). Now you slide the pipe over the alignment shaft (pic. C) and slap the end of it a couple of times with the palm of your hand to allow the bearing to get started on the bearing seat in the housing. Now the bearing is perfectly lined up and solidly held in place by the coupler in front and the start of bearing itself in the rear. All it took now was 5 or 6 good hits with a 5# sledge hammer and that bearing slipped into place like it was waiting for it. It is good practice to put bearing in the freezer for a few days prior. After that I pulled out the alignment shaft which was fairly easy, telling me that my drive shaft to coupler alignment was good. Btw. the best gimbal bearing removal tool is this one here in my humble opinion. (pic. D)
PROS: No drilling of the alignment shaft, No accidental banging against the end of the coupler because of incorrect positioning of install tool, No messing up of threaded hole for eye bolt at the end of alignment shaft, No stress on bearing or housing because of misalignment when hammering, tool can be used on other boats.
CONS: None except about $25 for the pipe and cap from Zoro