WalleyeGuy11
Cadet
- Joined
- May 22, 2018
- Messages
- 13
Hi there everyone, my last post wasn't necessarily worded correctly to provoke the knowledge that I need to acquire to get me over a couple speed bumps in my dream fishing boat build. I apologize in advanced because this post is extremely long winded, and very detailed.
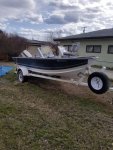
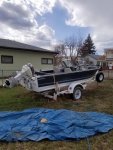
I recently purchased my first boat, it is a 1988 Starcraft, and I believe the model is a sfm160, please correct me if that's wrong. It had a few soft spots in the floor and I decided to replace it. While tearing out the carpet 3 soft spots turned into a completely rotten floor, which lead me to this wild hair idea of completely redoing my boat. I have since in the last week completely gutted the boat, and also have to replace the transom. Once I get all of the aluminum clean on the inside, I plan to spray the entire inside with rustoleum rubber wet patch sealer, I've read a few pieces on the web where a couple people have done this, but they never did give any feedback on how it turned out.
So the seed was planted to build a boat that would suit all of my fishing needs, and I wanted to implement a couple ideas that I have gathered over the years whilst fishing with my dad's friends who are very avid walleye fisherman, and primarily fish Fort Peck reservoir in Montana.
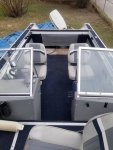
Since this is only a 16ft boat, the first thing I need is more room in the cabin or deck area where the passengers will sit, the first thing that came to mind is moving the dash consoles forward 13 to 15 inches, I also want to raise them up a few inches because I am a fella that walks around at 6'1". Doing this would require a longer steering cable, and possibly longer control cables for the motor. I may just leave the engine controls where they were or only move them forward a few inches since there is a small amount of slack to play with, this would leave me room to mount another engine control lever between the dash and primary throttle for a kicker motor in the future. But looking at steering cables on the web, would it be okay to get one that is longer than it needs to be? Or is this an instance where it needs to an exact fit?
Moving the dash forward will obviously make the bow platform smaller. I plan to raise the bow up a few inches so it sits right below the rub rail. This area (in my head at least) will primarily be used for storage, sporting a battery box for my trolling motor battery and also 1, or possibly 2 storage boxes below the deck. It will rarely be used as a spot for fishing except for the off occasion it's being used as a casting platform to pitch crank baits toward the shore. My buddies I've brought this up to are not very taken with the idea. One in particular saying I will regret this decision, because he believes that that's where I will want to sit while fishing. The addition of some small hand rails is a possibility. Has anyone done this? I would really like to see some pictures of this.
---- By the way, my trolling motor is one of the newer remote control Minn Kotas that does not have a foot pedal.
Also on the subject of more room, I plan to redesign the splashwell, to shorten it, and narrow it to make it look and perform like a more modern splashwell. I plan to build a stern storage area/casting deck. I plan to have 1 box in it to hold 2 batteries and my oil tank, I already have a 28 gallon livewell that I would like to put in it across the front of the motor, and possibly 1 more dry storage box on one side or the other. I have seen multiple custom built rear decks on boats, there has been a few threads on here that have helped exponentially in figuring out how to build it. I plan on constructing a frame out of 1 1/4" angle aluminum, and covering the frame with plywood. My question about this, is how would I go about attaching the frame to the hull? Is it possible to drill through the hull from the outside (above the water line) and rivet the aluminum to it? If that is the case. Which type of sealant would be best? 5200?
Also, which would be the best route to go about doing this to allow access to the bilge?
Another thing I would like to do is add more support to the floor, and hull. This goes back to drilling and riveting through the hull. I've seen a few people rivet braces across the bilge channel going up the center of the boat. And while we are on this topic, is it a good idea to put foam in this area? Possibly rivet aluminum strips across it almost all the way to the bottom of the boat, and lay DOW foam down?
Speaking of DOW foam, I have 15 sheets of the stuff and plan to replace the old blown in foam with it, and also fill in every possible void while constructing the front and rear decks. Which would be the best way to go about shaping this foam to fit under the floor and fitting snug and close to the floor?
Now on to the floor. I plan on using exterior grade 1/2" plywood with multiple coats of helmsman spar urethane. I understand that marine plywood is the best but I'm kinda on a budget trying to nickel and dime this build, with quality being a number one priority. In theory, I will have enough aluminum support under the floor that 1/2" will be strong enough to hold up to 3 or 4 bigger fellas, having 4 people in this boat will be a very rare occasion. Now, I plan on covering the floor (and other areas of the boat) with a product called "Kilz" Over Armor textured wood and concrete resurfacer. It says that it is impervious to mold, mildew, and rot when used on wood, and is a waterproofing sealant material. It has numerous reviews that are extremely positive.
I had an idea, to put multiple coats of helmsman on the wood, predrill holes for 3/4" rivets so that the holes themselves would be sealed, installing the floor bare, riveting it to the aluminum, and then coating it with the Kilz over armor as one whole piece, this in turn would cover all the rivets and seams. Instead of costing the 3 individual pieces and then installing them. I also had an idea to use either 5200, or some other marine caulking to seal the gap around the outline of the floor to the aluminum hull. I'm not sure if this is a good idea or not.
One more thing I need direction and advice on, is the construction of side panel storage (between the dash and the rear casting deck/storage area) I would very much like to have a rod locker capable of storing 4 or 5 rods on the port side, and on the starboard side I would like to build basically the same thing, except it would be storing oars and other miscellaneous equipment. If possible maybe a rod or two. I need ideas on not only how to design these storage areas and fasten them to the floor and hull (possibly the gunnel?) And make them sealed to the environment, but I also need help with figuring out what type of materials to use.
1/4" plywood with stone aluminum backing strips running vertical was the only thing that came to mind, but I need other opinions on this issue.
One more issue when it comes to construction/restoration, is the replacement of the carpet on top of the gunnels. I have already drilled out all the rivets and removed the inner aluminum trim from the rub rails/gunnels and removed the carpet, but am now at a stand still with no idea on how or what to replace the carpet with. I would like to avoid having to remove the outer piece of aluminum trim that holds the rubber weather stripping type material.
Unless, this is an easier task than I've made it out to be. How difficult is it to actually remove this trim piece and rubber strip, and then reattach it?
I would really like to be able to strip all the gunk and carpet glue residue and have a clean piece of aluminum to attach whatever it is that is going to replace the carpet.
In a perfect world the top of the gunnels/rub rails would be diamond plate, but that would get awful expensive awful quick. So another idea I had was to again use 1/4" plywood, rivet it on top of the aluminum, and coat it with the same Kilz over armor. Another possibility was to glue a solid grey colored linoleum. This matter has me absolutely stumped.
Another kind of off topic question I have is electrical. I'm assuming I am going to have to run 3 batteries. I am very confused when it comes to wiring and electrical issues, so please correct me if I am wrong, or give me a thumbs up if I've got the right idea.
I'm assuming that I'm going to have 2 batteries in the rear, connected to each other, and those 2 will power my motor and other electrical components, fish finder, bilge pump, lights ect.
and have 1 battery in the front to power the trolling motor on it's own independent circuit.
I am really wanting to add a stereo system with either 2 or 4 speakers and some interior LED lighting.
While I've got the boat gutted, I would like to replace all of the 30 year old fuel lines, including the fill hose, vent line, and the line going to the engine. Where is the best place to find these lines? Local auto parts store?
I am also on the fence about how many seats I would like in the passenger area, I'm thinkin 3, or 4, like I said earlier, it would be a very rare occasion if 4 people were in the boat. I would love to hear some input on 3 or 4 seats in a 16ft boat.
The whole idea behind this modified rebuild is storage and extra room. With some more modern touches and creature comforts to make the most out of every fishing trip.
If you've stuck with it this far I greatly appreciate it. I've spent countless hours in the last 2 weeks searching every corner of the internet for this very specific information, and have asked many people and even local marine shops with absolutely zero luck in getting any answers.
Again I apologize for the extremely long and very particular post, but I'm in crucial need of help.
Thank you so very much for all that take the time to read this, and i am grateful for any information you have.
Thanks again, you all have a great day, and may you all have safe and happy boating!
I recently purchased my first boat, it is a 1988 Starcraft, and I believe the model is a sfm160, please correct me if that's wrong. It had a few soft spots in the floor and I decided to replace it. While tearing out the carpet 3 soft spots turned into a completely rotten floor, which lead me to this wild hair idea of completely redoing my boat. I have since in the last week completely gutted the boat, and also have to replace the transom. Once I get all of the aluminum clean on the inside, I plan to spray the entire inside with rustoleum rubber wet patch sealer, I've read a few pieces on the web where a couple people have done this, but they never did give any feedback on how it turned out.
So the seed was planted to build a boat that would suit all of my fishing needs, and I wanted to implement a couple ideas that I have gathered over the years whilst fishing with my dad's friends who are very avid walleye fisherman, and primarily fish Fort Peck reservoir in Montana.
Since this is only a 16ft boat, the first thing I need is more room in the cabin or deck area where the passengers will sit, the first thing that came to mind is moving the dash consoles forward 13 to 15 inches, I also want to raise them up a few inches because I am a fella that walks around at 6'1". Doing this would require a longer steering cable, and possibly longer control cables for the motor. I may just leave the engine controls where they were or only move them forward a few inches since there is a small amount of slack to play with, this would leave me room to mount another engine control lever between the dash and primary throttle for a kicker motor in the future. But looking at steering cables on the web, would it be okay to get one that is longer than it needs to be? Or is this an instance where it needs to an exact fit?
Moving the dash forward will obviously make the bow platform smaller. I plan to raise the bow up a few inches so it sits right below the rub rail. This area (in my head at least) will primarily be used for storage, sporting a battery box for my trolling motor battery and also 1, or possibly 2 storage boxes below the deck. It will rarely be used as a spot for fishing except for the off occasion it's being used as a casting platform to pitch crank baits toward the shore. My buddies I've brought this up to are not very taken with the idea. One in particular saying I will regret this decision, because he believes that that's where I will want to sit while fishing. The addition of some small hand rails is a possibility. Has anyone done this? I would really like to see some pictures of this.
---- By the way, my trolling motor is one of the newer remote control Minn Kotas that does not have a foot pedal.
Also on the subject of more room, I plan to redesign the splashwell, to shorten it, and narrow it to make it look and perform like a more modern splashwell. I plan to build a stern storage area/casting deck. I plan to have 1 box in it to hold 2 batteries and my oil tank, I already have a 28 gallon livewell that I would like to put in it across the front of the motor, and possibly 1 more dry storage box on one side or the other. I have seen multiple custom built rear decks on boats, there has been a few threads on here that have helped exponentially in figuring out how to build it. I plan on constructing a frame out of 1 1/4" angle aluminum, and covering the frame with plywood. My question about this, is how would I go about attaching the frame to the hull? Is it possible to drill through the hull from the outside (above the water line) and rivet the aluminum to it? If that is the case. Which type of sealant would be best? 5200?
Also, which would be the best route to go about doing this to allow access to the bilge?
Another thing I would like to do is add more support to the floor, and hull. This goes back to drilling and riveting through the hull. I've seen a few people rivet braces across the bilge channel going up the center of the boat. And while we are on this topic, is it a good idea to put foam in this area? Possibly rivet aluminum strips across it almost all the way to the bottom of the boat, and lay DOW foam down?
Speaking of DOW foam, I have 15 sheets of the stuff and plan to replace the old blown in foam with it, and also fill in every possible void while constructing the front and rear decks. Which would be the best way to go about shaping this foam to fit under the floor and fitting snug and close to the floor?
Now on to the floor. I plan on using exterior grade 1/2" plywood with multiple coats of helmsman spar urethane. I understand that marine plywood is the best but I'm kinda on a budget trying to nickel and dime this build, with quality being a number one priority. In theory, I will have enough aluminum support under the floor that 1/2" will be strong enough to hold up to 3 or 4 bigger fellas, having 4 people in this boat will be a very rare occasion. Now, I plan on covering the floor (and other areas of the boat) with a product called "Kilz" Over Armor textured wood and concrete resurfacer. It says that it is impervious to mold, mildew, and rot when used on wood, and is a waterproofing sealant material. It has numerous reviews that are extremely positive.
I had an idea, to put multiple coats of helmsman on the wood, predrill holes for 3/4" rivets so that the holes themselves would be sealed, installing the floor bare, riveting it to the aluminum, and then coating it with the Kilz over armor as one whole piece, this in turn would cover all the rivets and seams. Instead of costing the 3 individual pieces and then installing them. I also had an idea to use either 5200, or some other marine caulking to seal the gap around the outline of the floor to the aluminum hull. I'm not sure if this is a good idea or not.
One more thing I need direction and advice on, is the construction of side panel storage (between the dash and the rear casting deck/storage area) I would very much like to have a rod locker capable of storing 4 or 5 rods on the port side, and on the starboard side I would like to build basically the same thing, except it would be storing oars and other miscellaneous equipment. If possible maybe a rod or two. I need ideas on not only how to design these storage areas and fasten them to the floor and hull (possibly the gunnel?) And make them sealed to the environment, but I also need help with figuring out what type of materials to use.
1/4" plywood with stone aluminum backing strips running vertical was the only thing that came to mind, but I need other opinions on this issue.
One more issue when it comes to construction/restoration, is the replacement of the carpet on top of the gunnels. I have already drilled out all the rivets and removed the inner aluminum trim from the rub rails/gunnels and removed the carpet, but am now at a stand still with no idea on how or what to replace the carpet with. I would like to avoid having to remove the outer piece of aluminum trim that holds the rubber weather stripping type material.
Unless, this is an easier task than I've made it out to be. How difficult is it to actually remove this trim piece and rubber strip, and then reattach it?
I would really like to be able to strip all the gunk and carpet glue residue and have a clean piece of aluminum to attach whatever it is that is going to replace the carpet.
In a perfect world the top of the gunnels/rub rails would be diamond plate, but that would get awful expensive awful quick. So another idea I had was to again use 1/4" plywood, rivet it on top of the aluminum, and coat it with the same Kilz over armor. Another possibility was to glue a solid grey colored linoleum. This matter has me absolutely stumped.
Another kind of off topic question I have is electrical. I'm assuming I am going to have to run 3 batteries. I am very confused when it comes to wiring and electrical issues, so please correct me if I am wrong, or give me a thumbs up if I've got the right idea.
I'm assuming that I'm going to have 2 batteries in the rear, connected to each other, and those 2 will power my motor and other electrical components, fish finder, bilge pump, lights ect.
and have 1 battery in the front to power the trolling motor on it's own independent circuit.
I am really wanting to add a stereo system with either 2 or 4 speakers and some interior LED lighting.
While I've got the boat gutted, I would like to replace all of the 30 year old fuel lines, including the fill hose, vent line, and the line going to the engine. Where is the best place to find these lines? Local auto parts store?
I am also on the fence about how many seats I would like in the passenger area, I'm thinkin 3, or 4, like I said earlier, it would be a very rare occasion if 4 people were in the boat. I would love to hear some input on 3 or 4 seats in a 16ft boat.
The whole idea behind this modified rebuild is storage and extra room. With some more modern touches and creature comforts to make the most out of every fishing trip.
If you've stuck with it this far I greatly appreciate it. I've spent countless hours in the last 2 weeks searching every corner of the internet for this very specific information, and have asked many people and even local marine shops with absolutely zero luck in getting any answers.
Again I apologize for the extremely long and very particular post, but I'm in crucial need of help.
Thank you so very much for all that take the time to read this, and i am grateful for any information you have.
Thanks again, you all have a great day, and may you all have safe and happy boating!