


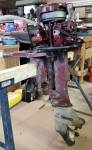
I tracked down and bought my grandfather's '57 7.5hp seahorse! I'm digging in with hopes it can be brought back to life. First time working on an outboard and I've read 50+ good posts on this site, yet questions are piling up. Probably deserves multiple posts (?) but here's where I'm at. All suggestions welcome.
Overall condition seems ok. Probably stored in unheated garage for 30 years, and not run in the past 20, but freeze plug isn't popped out and it looks clean under the case.
I checked compression (dry) after pulling plugs and squirting in some WD-40. Both cylinders around 60-65psi. I know that's low but hoping it may rebound with Seafoam if it got back running.
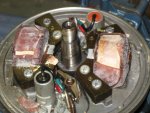
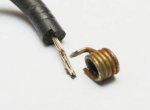
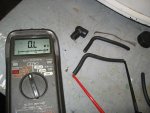
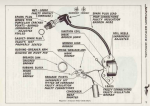
Spark in upper cylinder only. I pulled coils and found that flywheel appears to have chewed off the insulation on each primary wire. Despite that, the ohm readings across primary and secondary wires all read around 4.3. I taped over the exposed wire and reinstalled but still no spark. Checked spark plug wires for continuity and the lower cylinder wire is definitely broken somewhere.
The lower unit is not original. My dad seems to recall that it was damaged in the 60s and grandpa replaced it with one off a different motor. Any way to identify these? I couldn't find numbers on the case, but it seems to fit up fine. Color is either white, or has a hint of light green - either way not the red that came with '57s. I know impeller and seal kit is recommended.
I pulled apart the carb and threw it back together with a rebuild kit. It had been rebuilt previously and the head on one of the needle jets was dicey, but I think it reassembled ok.
I also rebuilt the pressure gas tank seals and replaced the fuel hose. The o-rings in the fuel connector are rotted and spit gas under pressure, so I have replacement o-rings but no special tools. So far 'easy diy' youtube has been unhelpful - it's like those guys make the repair before making the video, so their parts pop apart so easy, ha. I'm considering soaking the whole connector in carb cleaner for a couple days to soften the o-ring for picking it out (I know bad idea), since all other pieces and springs seem to be metal...
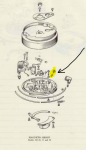
Finally, the pull start. First, it doesn't grab well, whether you ease into the pull or give it a few quick tugs. I've checked the pawl and it's keeper spring and it's not greased, seems stiff. Any ideas? Second, a full pull only spins the flywheel 2 1/4 times…worn out recoil spring? Or someone didn't wind it up right?
So now what? I think the motor has enough promise and sentimental value to invest my time and money. I see tune-up kits available online at maxrules, individual parts at marineengine. Tempted to go all-in, but I'm not terribly amazing with mechanics and experience with old mowers says that old seals and parts sometimes work best until they're tampered with.
Grandpa was not a wealthy guy but he loved fishing like nothing else and that's something I sure inherited. Would love the chance to get this back on the water… Thanks for your advice!
-Brent

Overall condition seems ok. Probably stored in unheated garage for 30 years, and not run in the past 20, but freeze plug isn't popped out and it looks clean under the case.
I checked compression (dry) after pulling plugs and squirting in some WD-40. Both cylinders around 60-65psi. I know that's low but hoping it may rebound with Seafoam if it got back running.
Spark in upper cylinder only. I pulled coils and found that flywheel appears to have chewed off the insulation on each primary wire. Despite that, the ohm readings across primary and secondary wires all read around 4.3. I taped over the exposed wire and reinstalled but still no spark. Checked spark plug wires for continuity and the lower cylinder wire is definitely broken somewhere.
The lower unit is not original. My dad seems to recall that it was damaged in the 60s and grandpa replaced it with one off a different motor. Any way to identify these? I couldn't find numbers on the case, but it seems to fit up fine. Color is either white, or has a hint of light green - either way not the red that came with '57s. I know impeller and seal kit is recommended.
I pulled apart the carb and threw it back together with a rebuild kit. It had been rebuilt previously and the head on one of the needle jets was dicey, but I think it reassembled ok.
I also rebuilt the pressure gas tank seals and replaced the fuel hose. The o-rings in the fuel connector are rotted and spit gas under pressure, so I have replacement o-rings but no special tools. So far 'easy diy' youtube has been unhelpful - it's like those guys make the repair before making the video, so their parts pop apart so easy, ha. I'm considering soaking the whole connector in carb cleaner for a couple days to soften the o-ring for picking it out (I know bad idea), since all other pieces and springs seem to be metal...
Finally, the pull start. First, it doesn't grab well, whether you ease into the pull or give it a few quick tugs. I've checked the pawl and it's keeper spring and it's not greased, seems stiff. Any ideas? Second, a full pull only spins the flywheel 2 1/4 times…worn out recoil spring? Or someone didn't wind it up right?
So now what? I think the motor has enough promise and sentimental value to invest my time and money. I see tune-up kits available online at maxrules, individual parts at marineengine. Tempted to go all-in, but I'm not terribly amazing with mechanics and experience with old mowers says that old seals and parts sometimes work best until they're tampered with.
Grandpa was not a wealthy guy but he loved fishing like nothing else and that's something I sure inherited. Would love the chance to get this back on the water… Thanks for your advice!
-Brent


") )
)