1963 Lone Star Cruise Liner outboard

Joined
May 8, 2019
Messages
8
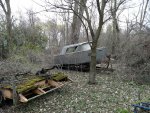
i saw this boat off in the woods recently, its been there for 30 plus years.

My grandfather was a oldsmobile dealer back in the sixties and this boat looked familar. Not the same boat but just like it. Decided to take on my first restoration project after the 80 year old woman who owned it sold it to me.

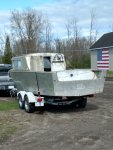
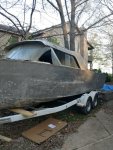
Just got it home and tore out all the wood parts and old styrofoam. Easy enough so far.

looking for advice on a multitude of things, for starters;

1. port side cabin windshield is broke and needs to be replaced. Where does one go for that ?

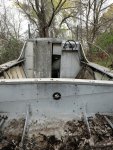
2. The previous owner had stripped the paint of almost everything above the chine, is it safe to use a wire brush on a grinder to get the paint below the waterline off?

3. Is brasing the seams below the waterline that leak advisable?

4. I want to doll this right up so I intend on painting it red and white, some of the old white paint is chalky ...can I just scuff it up and paint over it?'

any help would be appreciated
Baygazer1952
 

Attachments

  • photo313223.jpg
    photo313223.jpg
    988.8 KB · Views: 5
  • photo313224.jpg
    photo313224.jpg
    393.9 KB · Views: 5
  • photo313225.jpg
    photo313225.jpg
    751.7 KB · Views: 5

matt167

Rear Admiral
Joined
Sep 27, 2012
Messages
4,214
it's a tinny, so weld any holes. inspect/ replace/ reseal rivits as needed. I would use a fine wire wheel and for sure remove all old/ failing paint. Use an etch primer. As for the windshield, there are a couple companies that re make windshields if you send them in
 

jbcurt00

Moderator
Staff member
Joined
Oct 25, 2011
Messages
25,184
Its built w rivets, welding and brazing shouldnt be a 1st choice...

esp not @ seams, they have a sealant in them that is likely to contaminate the repair when heated and fail even further. Many shops wont weld near a seam, let alone IN one....

Coat-it and GluvIt are intended for use INSIDE the hull, not the exterior.

Paint stripper(s) and elbow grease not a wire wheel.

Most wire wheels and grinders abraid the aluminum and scar it requiring further removal to achieve a smooth paintable surface.

You'll have to find a glass shop to remake a tempered glass pane or DIY a plastic windshield: plexi, acrylic, lexan....

Total paint removal is preferred by some to ensure an undamaged hull (cracks near rivets & etc)

Others scuff chalky paint til its a good base for primer and paint, making sure to prep and prime (SelfEtch/ZincChromate) bare spots that show the bare aluminum before priming.
 
Joined
May 8, 2019
Messages
8
Thank you Gentlemen, I appreciate the advice.

Makes sense to use the "strip eze on "the bottom paint if there is a sealant in the seams.

Regarding the transom:

It appears I will have to drill out rivets and peel up the gunwale where it meets the transom to fit a new wood plate in place.
Hopefully I will only have to d othat on the one side as I am thinking I can angle in the opposite side of the wood plate without doing the trauma to both sides.

The small remaining pieces of the old transom that did not crumble into must measure 1 & 3/8" I am going to assume that originally it was 1 & 1/2' and dried out to the smaller dimension? 1 / 3/8 seems a weird size.
I plan on gluing two 3/4 " pieces of marine plywood to make the right thickness of unless someone has better advice.
 

matt167

Rear Admiral
Joined
Sep 27, 2012
Messages
4,214
transom is generally 1 1/2" thick. You can use 2 3/4" thick slabs laminated together or you could do 3 lamination's of 1/2" to get more plies. You don't need marine grade. Good quality exterior is good enough for a transom. ABX, ACX, BCX or even CCX. CDX sheathing though I don't know as I would go that low and BCX is easy enough to find
 

TommyRocker

Seaman
Joined
Jun 15, 2012
Messages
60
When I did my last transom I went overboard on CoreLite Board (similar to Coosa) and in hindsight I wished I'd just used 3/4 exterior grade ply with epoxy. The original lasted 60 years and I have no reason to believe exterior grade ply in epoxy wouldn't last longer. I'd probably just get bcx on my next boat.
 

Scott Danforth

Grumpy Vintage Moderator still playing with boats
Staff member
Joined
Jul 23, 2011
Messages
51,128
nice looking find, mind if I come aboard?
 
Joined
May 8, 2019
Messages
8
Thanks again, You guys are great, its the first time in a forum, what a great resource.
I restored the lightkeepers home on Big Charity Island Saginaw Bay, Lk Huron Michigan in 2003. this is my first boat restoration. see charity island dot com.

glad to not have to spend money on Marine grade plywood.
attached is a pic of port side where I just learned the boat was hit by a car going down the road on its way to the Detroit Boat show some 30 years ago.
It looks like the previous owner took a 1.5 ft x 6 ft piece of aluminum with some sort of expoxy then riveted in place.
From what I have been reading I should drill out the rivets, remove the old epoxy then weld this piece back on. the inside looks great, ribs seem fine.
 

Attachments

  • photo313365.jpg
    photo313365.jpg
    163.7 KB · Views: 6

jbcurt00

Moderator
Staff member
Joined
Oct 25, 2011
Messages
25,184
From what I have been reading I should drill out the rivets, remove the old epoxy then weld this piece back on. the inside looks great, ribs seem fine.
Reading? Reading where?

See my post above re:welding. Same advice applies to this large patch panel as well.

Remove patch, yes, if it can be done w/out doing further damage

Remove epoxy, yes, if it can be done w/out further damage

Weld? Wouldn't be my 1st choice, esp @ seams.....
 

sphelps

Supreme Mariner
Joined
Nov 16, 2011
Messages
11,484
Climbing aboard ! I can’t help much knowing very little about tin boats .. But I love seeing these old classics get restored !
:)
 
Joined
May 8, 2019
Messages
8
I meant regarding the rivets, I was reading and watching online, drill them out, remove them, take off the aluminum patch
and sand off the epoxy, most of it is caking off in chuncks, its has totally lost its bond on the patch. There is a local boat repair that may be able to re rivet the patch back on on.
 
Top