1974 Starcraft Supersport rebuild

Joined
Feb 17, 2014
Messages
12
Hello All,
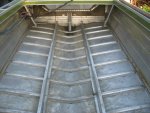
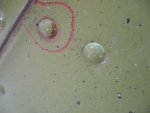
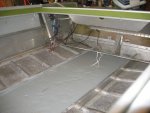
I own a 1974 Starcraft Supersport that was given to me by my father-in-law about 10 years ago- after the barn that it had been stored in for 15 years finally collapsed on top of it. It came out relatively unscathed- a broken windshield and a broken transom mount on the 65 Evinrude. I found a used transom mount, changed the water pump and spark plugs. It has run like a top ever since. The hull is in good shape with no obvious leaks. Over the last 10 years the seats and floor have deteriorated to the point where a complete re-fit of the interior is in order. I have been a member of this forum for the past year and have learned many useful things. I have completed the tear-down and would now appreciate some advice on how to fasten the new floor to the existing aluminium stringers. My question is this: The holes drilled in the stringers for the original rivets are not drilled consistently in the centre of the stringer, so it will be hard to accurately drill through the plywood to re-use the original rivet hole. Should I drill new holes through the new plywood floor and into the stringer? Also- the original floor was 1/2". Should I consider going up to 5/8" or 3/4"?
 

GA_Boater

Honorary Moderator Emeritus
Joined
May 24, 2011
Messages
49,038
Welcome, Park.

Forget about trying to reuse the original holes in the stringers. It's impossible to align. Just drill new and rivet or screw down the new floor.

An SS has 2 stringers. 1/2" ply as SC used is probably fine. The extra 1/4" when using 3/4" messes up the console placements and the windshield doesn't line up well with the added 1/4". I'm not sure about with 5/8"

How is the transom.? Usually when the floor goes, the transom is in the same boat. Well, it is, but I mean rotted of course.

Pics are the price of admission to the Starmada, ya know. :D
 
Joined
Feb 17, 2014
Messages
12
I have pics to post but the rules page says that a new member has to make 3 posts before pic uploads are allowed- and I don't see the camera icon on the toolbar described in the Photo Upload tutorial. Will give it a try. I think the transom is OK. I will take some pics tomorrow and post for your opinion.
 

GA_Boater

Honorary Moderator Emeritus
Joined
May 24, 2011
Messages
49,038
I keep forgetting about the 3 post pic thing. :blue:. We'll wait a day for pics. Gives time for the ink to dry on the membership card. :joyous:
 
Joined
Feb 17, 2014
Messages
12
View of the hull facing the stern and a close-up of one of the offset holes in a stringer.
 

Attachments

  • IMG_4871.JPG
    IMG_4871.JPG
    135.6 KB · Views: 7
  • IMG_4875.JPG
    IMG_4875.JPG
    192.4 KB · Views: 19

GA_Boater

Honorary Moderator Emeritus
Joined
May 24, 2011
Messages
49,038
Terminology time.

The first pic shows the stringers running down the center, fore and aft. The second pic is the end of one of the ribs.

On the ribs, I marked the center of the rib on the side wall so I could drill in the center of the rib instead of off to one side like yours.

If you are using Photobucket, you can click on IMG code of a pic, which copies the code and then paste it in the message. You end up with a nicely sized photo/
 

dozerII

Admiral
Joined
Oct 25, 2009
Messages
6,527
Welcome to the Starmada, 5/8 ply is a great choice for the decking, it is considerably more solid than the 1/2 in and does not cause issues with the consuls. As GAB said don't worry about the old holes in the stringers, just drill new. I would recommend fastening the new deck down with large flange 3/16"blind rivets in the 3/4 to 1 inch grip range
 
Joined
Feb 17, 2014
Messages
12
Thank you to GA for correcting me on the terminology. As you can see, I am a newbie. Where do you guys source the rivets? Would Home Depot carry the correct type?
 

Tnstratofam

Commander
Joined
Aug 18, 2013
Messages
2,679
Looks like your on your way to getting her back in shape. I'll be tagging along if you don't mind. On the transom if you have any dark or wet wood especially around any through hull fittings now is the time to change it. You will also want to inspect the splash well and knee brace for cracks.
 

Watermann

Starmada Splash of the Year 2014
Joined
Jan 12, 2013
Messages
13,827
:welcome: to the Starmada Park,

The rib end holes for attaching the decking are no worry like said drill new holes. For rivets to reattach the decking, the grip range (length) is depending on what you choose for plywood thickness and the covering. If using 1/2" or 5/8" for decking then you'll want the grip range of .625 - .875. http://rivetsonline.com/aluminum-aluminum-mandrel-w-large-flange-head.html

Replace the rivets that hold the stringers to the ribs, I can tell they're loose because of the dark area around the rivets seen in your pic below. You can locally source the regular domed head 3/16" .250 grip range rivets for that but making a big order online softens the shipping charges some.

Before moving to the deck replacement be sure that transom has already been replaced if not, being 41 year old plywood it's not sound at all. Look over the attachment points of the knee brace for any cracking too.

fetch
 
Joined
Feb 17, 2014
Messages
12
I decided to check all of the rivets below the waterline while I am waiting for the MG plywood to come in. I am an NDT technician by trade, so I did a variant of a type of non-destuctive testing commonly known as Liquid Penetrant Inspection (LPI). Some of you may be familiar with this method. It is used to detect surface cracking in non-magnetic materials such as aluminium and stainless steel. In this case, I sprayed the penetrant around all of the rivets on the inside (IMG_4885). After about 20 minutes, I inspected the outside of the hull, looking for evidence of red dye seeping through loose rivets. I found about 8 rivets with dye indications on the outside. As can be seen in IMG 4887 & 4892 the red penetrant shows up very well against the lovely shade of avocado green on the hull. What I didn't expect, however, was to find several dye indications away from the rivet holes.(IMG 4891,4895). These small perforations in the hull are all within 2 feet of the bow. My guess is that they may be the result of cyclic metal fatigue. I assume that replacement of all of the affected rivets is required. What method would you recommend to seal the small (<1/16") perforations in the hull?
IMG_4892.JPG IMG_4885.JPGIMG_4895.JPG
 

Attachments

  • IMG_4891.JPG
    IMG_4891.JPG
    92 KB · Views: 3
  • IMG_4887.JPG
    IMG_4887.JPG
    123.8 KB · Views: 3

Watermann

Starmada Splash of the Year 2014
Joined
Jan 12, 2013
Messages
13,827
Now that's what I call a bloody leak test! :thumb:

You may just be able to re-buck the leaking rivets without replacing them.

So on the pin holes, a bunch of us have faced those and the best way to give good advice is to clean the area on the inside to bare AL where the holes are and post up a some pics. I'm pretty sure it's not a fatigue issue more of a corrosion from something that is against the AL that shouldn't be. I had a bunch of them on the port side of my Chief and other guys have had them on the bottom under some type of "sealant repair" made by a PO of the boat.
 

g0nef1sshn

Lieutenant
Joined
Feb 24, 2015
Messages
1,291
I had few pin hole leaks through the hull. It was from pitting on the inside. I cleaned the areas, drilled through it, and put a 5200'd goobered pop rivet in there. Plugged tight and not structural fix so they shouldnt go anywhere.
 
Joined
Feb 17, 2014
Messages
12
Pro-C- The penetrant is classified as a water-washable penetrant. That means that it contains an emulsifier that causes the penetrant to break down when it is washed off with water- much like dish soap breaks down grease. I should point out that while the red dye in the penetrant usually does not stain a metal that it is applied to, I noticed that a bit of color was left behind around the ribs- absorbed by some type of coating or dirt adhered under the ribs. I am not concerned about it in this instance, as it will all be under the new floor. Watermann- after looking at the holes today with a magnifying glass, I agree, it looks more like pin-hole corrosion. I didn't see any on the inside, so it may be under the ribs. I will have a closer look tomorrow. I have seen a product referred to as "Gluv-It". Is this some type of sealer? Also- has anyone had any experience repairing these areas with aluminium TIG welding?
 
Joined
Feb 17, 2014
Messages
12
No Title

Greeting to all members of the Starmada. After a too-long hiatus, I am back on the SS re-build. Here is what what I have accomplished so far:
1. Repaired the pin-hole leaks with a marine epoxy sealant.
2. Attached several magnesium anodes to prevent corrosion in the future.
3. Installed enough rigid foam board to provide about 1000 lbs of buoyancy.
4. Installed floor. It has 2 coats of spar varnish on the bottom & edges and Dek-master vinyl topside. We fastened the plywood with the rivets, as recommended. It feels really solid. See attached pics.
5. Next on my list is to add a casting deck in the bow.

Thanks to all of you for your advice. Should have some more accomplished in a week or two.:happy:
 

Attachments

  • photo246829.JPG
    photo246829.JPG
    164.7 KB · Views: 14
  • photo246830.JPG
    photo246830.JPG
    197.5 KB · Views: 6
Top