1978 Tahiti

tomahawk715

Cadet
Joined
Apr 1, 2019
Messages
13
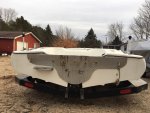
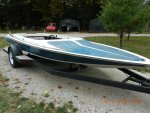
So I made one of those poor life choices—-see photo

Just couldn’t resist as I’m a sucker for a sexy body.

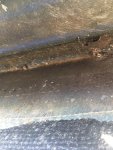
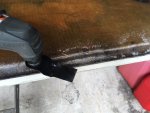
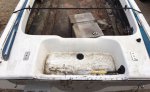
Well the package was 250 due to the missing interior and less than solid transom. The rest of the boat seems very solid. I can’t find any other soft spots—clearly I haven’t torn into it and one never knows.

Ive restored a lot of cars-body sheet metal motors. I used to be a finish carpenter building cabinets and counters. This is my first boat project. It’s a personal project not for profit. Watched Friscoboaters videos on the Carlson restoration. Splitting the cap etc.

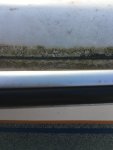
My first issue I see—doesn’t appear this boat is two parts. The cap is glassed to the body. Anyone have one of these? I can’t see how I would tear into the transom without separating them. Thoughts?
 

Attachments

  • photo310090.jpg
    photo310090.jpg
    225.9 KB · Views: 0

Scott Danforth

Grumpy Vintage Moderator still playing with boats
Staff member
Joined
Jul 23, 2011
Messages
50,479
I believe the hull is cored

Lots and lots of work to restore a cored hull

To answer your question....a saw
 

sphelps

Supreme Mariner
Joined
Nov 16, 2011
Messages
11,475
The cool factor is really high on this one ! :pop2:
‘Have you checked under the rub rail for a joint to separate ?
 

tomahawk715

Cadet
Joined
Apr 1, 2019
Messages
13
I have yet to pull the rub rail. I was evaluating it today and looking from the inside it appears the cap and body are glassed together. I’m not opposed to cutting them apart if that’s the “best” way to approach this issue. I can find no deterioration except the transom area. I’ve probed with a pick and a hammer.

I can see playwood wood in the transom and the deck inside. Both are glassed in. Actually it’s looking like everything is plywood cored?

I am not inclined to attack the transom from the outside by cutting in. I had hoped to pop the cap to get at it from the inside.

1st thought—cut through entire seam on cap and pop it. Glass it back on. I’m going to have to repaint anyway.

2nd thought-saw out back three foot of cap at seam and then along rub rail line.
 

tomahawk715

Cadet
Joined
Apr 1, 2019
Messages
13
I can also clearly see the rub rail is pop riveted to the hull as I can see the backside of the rivets.
 

tomahawk715

Cadet
Joined
Apr 1, 2019
Messages
13
So checked behind the rub rail today—as you can see there is a dividing line/cut between the hull and cap behind the rub rail. I can stick a razor blade in it until I hit what I believe is the fiberglass tabing inside. Soooo I’m back to believing if I run a cutting wheel around it I can pull the cap. The thought has occurred to me however that they could have some sort of molded lip on the inside to help it sit on the main hull. I may attempt some probing cuts inside if possible to see what’s behind the tabbing.
 

Attachments

  • photo310124.jpg
    photo310124.jpg
    1.7 MB · Views: 0
  • photo310125.jpg
    photo310125.jpg
    1.7 MB · Views: 0

tomahawk715

Cadet
Joined
Apr 1, 2019
Messages
13
9b07310c-14a5-4620-84ca-646d042e496d
 

Scott Danforth

Grumpy Vintage Moderator still playing with boats
Staff member
Joined
Jul 23, 2011
Messages
50,479
No, youre hitting the screws.

Pull the rubber from the rub rail (start point is either center transom, or center bow)

Then pull all the screws to remove the rub rail
 

tomahawk715

Cadet
Joined
Apr 1, 2019
Messages
13
Sorry. I meant when I pull the rub rail and stick a razor in the slit behind it it goes down thru the glass and hits something behind it—maybe the glass tabing I can see inside the hull.

I believe I can separate the two by cutting along that line. My concern is maybe there is something on the cap that tabs it to the hull.

It it was super sunny out today (rare in Michigan lately) and looking up in the bow I don’t see anything inside the glass to make me believe it’s core construction. Just see the glass layup.
 

archbuilder

Vice Admiral
Joined
Sep 12, 2009
Messages
5,697
That looks a lot like the way my Sleekcraft is built. It has two hull halves, that were trimmed to fit each other (no overlapping lip) and tabbed together. I was able to access my transom from the inside, however about a 12" long part of the transom cap was damaged. I ground out the old transom from the inside, made an "inner skin" and filled the transom with Seacast from the top. Its expensive but works great, and I didn't have to remove the cap in my case.
 

Buckischloo

Seaman Apprentice
Joined
Feb 8, 2014
Messages
48
That is one sweet boat, I could see myself having the same moment of weakness for such a sexy body. For that money with the trailer, your poor life choice did not hurt you that much. Babes like that are expensive and high maintenance.:)

Once you remove the rub rail you should be able to see how the two pieces fit together and if cutting is involved. In addition to the transom, you are going to want to open up the floor to make sure the sub structure is not rotten. I have opened up a Baja and three Checkmates all of which have had mulch for stringers. These sleek speed boats take a beating so you want to be safe..

As mentioned, if it is a cored hull that will be extra work and cost, but it can be done. I have no experience with cored hulls but am currently working on one. Mine is balsa core and I that is what I am using for replacement. There are other core materials available. Scream and Fly has additional discussions around core material.

That will be one cool boat when done. Perhaps a tower of power hung on the back for complete authenticity.
 

kjdunne

Petty Officer 1st Class
Joined
Sep 22, 2007
Messages
370
A multi tool works well for cutting fiberglass tabbing. If you can access the cap to hull seam from inside, that might do it without too much mess. It looks like a sawzall into the seam from the outside would be a possibility too.
 

Attachments

  • photo310009.jpg
    photo310009.jpg
    115.9 KB · Views: 0

tomahawk715

Cadet
Joined
Apr 1, 2019
Messages
13
I’m pretty much of the opinion the cap has to come off so I can do it correctly. Who knows how far the damage goes in the transom. Plus no easy access to it inside with the cap on. And then I can get a better look at the deck back there. It does have a 16x16 box at the back by the drain. Appears it’s all glassed in. And hammering I find no areas that seem soft. Of course given the transom shape I’m not sure you can get the transom in without tearing into deck.
 

Attachments

  • photo310162.jpg
    photo310162.jpg
    1.2 MB · Views: 0
  • photo310163.jpg
    photo310163.jpg
    1,006.7 KB · Views: 0

tomahawk715

Cadet
Joined
Apr 1, 2019
Messages
13
A multi tool works well for cutting fiberglass tabbing. If you can access the cap to hull seam from inside, that might do it without too much mess. It looks like a sawzall into the seam from the outside would be a possibility too.

I was thinking that same thing—maybe with the rounded half circle blade.

Im going to try inside first grinding. Kind of excavate a bit to make sure I won’t be cutting any locating tabs or lips that may be on the cap. Just seems like there has to be something. Can’t believe the just drop it on?
 

archbuilder

Vice Admiral
Joined
Sep 12, 2009
Messages
5,697
Too bad you cant get from the transom from the inside, tabbing that cap on is going to be chore in the bow. I glassed over the rivet holes from my rub rail and it was a workout! Find someone skinny if you aren't! Lots of work but it pays off in the end. My transom cap was broken almost exactly where yours was, my hull is very similar to yours in most respects. I cut the broken area in the middle of the transom cap out to pour the seacast. I actually flipped my hull over on saw horses and took the transom out that way. It was actually fairly comfortable, siting on a stool, beats rolling around in the hull any day! It also made fitting the inner skin really easy. However you decide to attack it, I am looking forward to the build!
 

archbuilder

Vice Admiral
Joined
Sep 12, 2009
Messages
5,697
You might take a look at my Sleek thread if you haven't. The first several pages show how I was able to did that one. Not sure if it will apply to yours, but might give you some ideas. The link is in my signature.
 

tomahawk715

Cadet
Joined
Apr 1, 2019
Messages
13
You might take a look at my Sleek thread if you haven't. The first several pages show how I was able to did that one. Not sure if it will apply to yours, but might give you some ideas. The link is in my signature.

Thank you for the link!!!! It gives me a lot to ponder. Your hull is pretty darn close to mine and I need the same type of repairs you completed. Only difference is the way my deck joins the transom. Have to grab a pic today.

This is is exactly why I joined this site! As I said I have lots of experience with the mechanics of this (wood working , fiberglass repair etc) but never done a boat. But I’m big on plan plan plan plan then plan then execute. I have to be able envision it before I start.
 

archbuilder

Vice Admiral
Joined
Sep 12, 2009
Messages
5,697
Sleekcraft primarily made jet boats back then. Its funny how close the hulls from the various companies were to each other. Let me know if you have any questions on how I did Miss Morgan.
 
Top