1979 Mercury 115hp Rebuild

mrmotts

Cadet
Joined
Dec 27, 2016
Messages
10
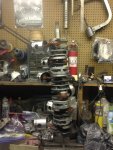
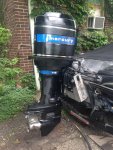
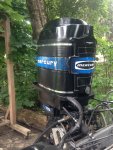
Hi, I've been working on a 1979 1/2 (ADI ignition) tower 115hp for a few years and doing lots of reading on here. Replaced rotted stator, trigger, and switchboxes chasing down ignition issues, cleaned carbs, water pump, fuel pump, re-sealed trim cylinders, and added a voltage regulator and water pressure gauge. Finally got it running pretty good, then it just shut down while WOT on the last ride of the year... luckily it still ran, so I limped it back home and cyl #3 was shot, 0 psi, 128-124 on all others. Spark plugs all looked way too clean, especially #3. Figured I'd pull it apart, find the cause, and try to rebuild it since it's already got a fair amount of new hardware.

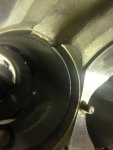
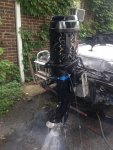
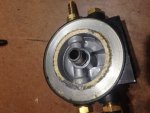
I pulled off the exhaust plates, and the lack of carbon along the lower portions of the inner plate seem to point to water intrusion. I figured maybe it was the lower seal, but when I rested the plates back on the block after cleaning, I could see they were extremely bowed in the center. The bolts were almost too easy to remove, some barely needed heat... perhaps this was the initial point of failure, causing the inner plate to high-center on the block, letting water in. I manged to sand the inner plate down pretty flat, but I have no clue how to mill the middle plate, so I scavenged one from a donor motor which looks pretty good after filling in some minor pitting with JB Weld. I plan to re-seal the assembly using locktite red and following Jeff Grigg's article on water leaks.

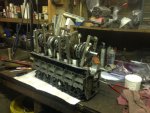
Now I'm ready to have the block mic'ed and bored by a shop. It seems to make sense to spend the $ and do all pistons oversize while it's all apart. Got both top & bottom bearings off the crank for replacement (holy crap the top one was a bear), and I tried to clean up the crank journals the best I could with fine sandpaper (600 to 1500 grit).

I can't seem to upload images so here's a link: http://imgur.com/a/fqcr3

I have some questions since this is my first time inside a block...

1. Does water intrusion seem like the culprit here? Carbs were very clean.
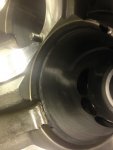
2. The needle cages look pretty bad, I'm guessing these should be replaced?
3. The most daunting task for me seems to be getting the cylinders back inside the block without the compressors. I plan to hang the crank from the ceiling and carefully lower it in one ring at a time... but is there an easier way? Can the crank be installed with the pistons already in the cylinders?
 

Faztbullet

Supreme Mariner
Joined
Mar 2, 2008
Messages
15,931
1) Possible but should have had serious idle problems
2) Just a spacer,,,replace if ya want
3) Rent the compressors or find some late model rods and install pistons then crank. Really inspect the reed blocks as labyrinth seal edges need to be sharp and defined and not flat and brassy. If worn wont idle worth a chit/need advanced timing and dies going into gear. Take a flat tip punch and peen the bleed restrictor's hole shut and then drill out hole with wire drill. Go to link below as have good info on I-line rebuild ...


http://forums.iboats.com/forum/engi...page2?t=288700&highlight=bleed+restricter+mod
 

Chris1956

Supreme Mariner
Joined
Mar 25, 2004
Messages
28,158
You can easily install the pistons into the block, one by one, with just fingers and maybe a screwdriver. After they are all installed, drop the crankshaft over them and using grease install the roller bearings, cages and caps. I recommend you keep the roller bearings in sets for each piston.

This method takes some time, but if you plan to separate the connecting rods from the crankshaft anyway, it is a wash timewise.
 

mrmotts

Cadet
Joined
Dec 27, 2016
Messages
10
Thanks for the info. Hm, the idle really wasn't too bad, I could get it down to around 700 in gear. The only other thing I can think of would be that maybe the timing was off. I felt the block when it went and it didn't overheat. I will ensure I have TDC when re-assembling and check timing. I was planning on replacing the restrictors using locktite and punch, but your solution definitely seems more permanent and failsafe!

If the cages don't matter too much, then I'll keep them as is. I have stored the needles with each corresponding rod.

The reed edges are sharp, but there is some slight mushrooming on one. I'm not sure what is acceptable, as the pics in the factory manual are awful... here's the worst:
http://imgur.com/FjjHxgB.jpg

There are one or two leaves that have a gap a touch larger than spec, but I think I'll keep them on as none are sticking or terribly off.

Chris that's great news, thanks for the heads up - seemed like a logical way to do it but hadn't read of anyone doing it for some reason.
 

JDusza

Ensign
Joined
Apr 21, 2009
Messages
979
Wow! Big job!
Not sure that water would do this. Sounds like lack of water with an over heat in #3. I've rebuilt successfully without boring cylinders. I expect your #3 piston and rings are shot, cylinder walls scarred with aluminum. The V-6 I did had a failed oil pump (VROs are horrible abominations). The PLASTIC worm gear on the crank jumped when the prop hit something. Destroyed it.. I removed built up aluminum on the cylinder wall with muriatic acid (18%). The acid eats aluminum and won't touch the steel cylinder wall. Have neutralizing water on hand and wash cylinder when aluminum is gone. Wear a face shield and rubber gloves. Acid is no joke. New As mentioned, liberally use a pre-start lubricant on connecting rod bearings, crank bearings, etc, ...
Tighten connecting rods and all other to 10% over spec. I went for 33 ft-lb.
Quite successful. Engine rips and has held for several years. The owner is out of his mind pleased.
Good luck.
J
 

Chris1956

Supreme Mariner
Joined
Mar 25, 2004
Messages
28,158
MR, If you have connecting rods bolts and nylon lock nuts, they are reusable. I used a small 1/4" box wrench, which I ground down a bit to fit, to tighten them. I did not torque them, but tightened them evenly, as best I could.

If you have connecting rod bolts, they need to be replaced, with new ones. Your 1979 motor should have the bolts/nuts, I would think.
 

mrmotts

Cadet
Joined
Dec 27, 2016
Messages
10
How you going to torque the rod nuts????

Ah, there's the reason! The idea of grinding down a wrench to get in there is great, but this is where my mechanical experience may fail me: Chris1956 you can probably dial in the torque just by feel, but I'm not sure I'd trust my instinct.. of course I suppose I could practice a bit on some scrap. I'll think about it. It seems so much easier then trying to wrangle that whole assembly in there and probably breaking some rings, then having to start that whole process over.

Yup I have the bolts with the nylon locknuts, which are re-useable.

JDuza, yeah I also have a 1989 110 johnson where the VRO failed and the PO had everything re-bored and went to premix. I really wanted to re-use the pistons on this merc that have decent compression, but I have been reading that the cylinders get out of round and generally need a rebore after so many years. I guess the decision really depends on the machine shop measurements, as I don't have a bore gauge (spent so much $ on tools already!) but I'm prepared to just do it all now while it's apart.
 

Faztbullet

Supreme Mariner
Joined
Mar 2, 2008
Messages
15,931
Being in the service industry for 40+ years and probably built 200+ I-line Merc's and raced/built a few..... I can say I can count on both hands the motors I have found that didn't have cylinder wear. Bore it and enjoy it....
 

buzzm19

Petty Officer 2nd Class
Joined
Dec 14, 2009
Messages
152
I welded a 1/4" socket to a 7/16 boxed wrench about 2 inches back on the wrench ground a little near the boxed end and then could use a 1/4" torque wrench, calculated the length and torqued the bolts down. I did put the pistons in and then the crank worked fine
 

mrmotts

Cadet
Joined
Dec 27, 2016
Messages
10
No Title

Just an update: I found a guy who could do quality blind boring and honing on these motors. As suspected, all cylinders were out of round and worn out. I immediately eyed his ring compressors on the back wall, and wound up giving him some extra $ to dress the crank and drop them into the case, which is great since I wasn't insanely comfortable doing for the first time.

Went with Weisco .020 over, all new bearings and locknuts. We tried to drop the crank in 3 times and after much cursing and wiggling, determined that a defect in the cylinder sleeve was hanging up piston #1. There was a small lip on the edge, and I have no idea how they got the original in there. Since the ring would never touch this edge except during install, he carefully ground the lip down with a small stone, and after that they all dropped in rather nicely with those compressors.

Buttoned the exhaust side up, hi temp red on inner plate with red locktite, hi temp black on the middle and outer jacked with blue locktite, torqued to spec. Upper and lower bearings dropped in pretty good using the oven-heating trick. Carbs rebuilt, impeller changed, fuel pump inspected. New paint and decals, and added another tell tale just for looks.

I added a plastic fuel filter before the pump and could now see that the gas inside looked bubbly/foamy, a sign of an air leak. Indeed, after starting it up it seemed to lean out if I didn't keep priming the bulb. I removed a water separator I installed maybe 2-3 years ago, and under the filter were hard, crusty deposits, I guess these need to be changed out more often.

I took the entire separator out of the system, and fuel does not look foamy anymore. I suspect this may have contributed to a lean condition exacerbated by water intrusion through the exhaust baffles leading to my #3 failure. I'm really glad I caught it now.

It's been idling great on muffs and I'm getting it ready for break in procedure on the lake. It was a long, challenging and pricey adventure, but I'm hoping she will last for a long time.
 

Attachments

  • photo270926.jpg
    photo270926.jpg
    277.5 KB · Views: 1
  • photo270927.jpg
    photo270927.jpg
    252.7 KB · Views: 1
  • photo270928.jpg
    photo270928.jpg
    187.7 KB · Views: 1
  • photo270929.jpg
    photo270929.jpg
    169.2 KB · Views: 1
  • photo270930.jpg
    photo270930.jpg
    368.7 KB · Views: 1
  • photo270931.jpg
    photo270931.jpg
    369.4 KB · Views: 0
  • photo270932.jpg
    photo270932.jpg
    316.1 KB · Views: 1
  • photo270934.jpg
    photo270934.jpg
    262.5 KB · Views: 1

jimmbo

Supreme Mariner
Joined
May 24, 2004
Messages
13,712
Don't forget to double the oil to 24:1 for the first 10 hours
 

Faztbullet

Supreme Mariner
Joined
Mar 2, 2008
Messages
15,931
Dont see where you checked restrictors??? Using those Sizecos make sure you run the engine several, several heat cycles to temper them before any attempt at WOT usage.
 

mrmotts

Cadet
Joined
Dec 27, 2016
Messages
10
Yep I'm running at 24:1, will change plugs out after two tanks.

Yes restrictors were re-done, and yeah I've heard some things about Wisecos heating at a different rate than the cylinders, I think due to them being forged instead of cast. I felt the block constantly during the first few warmups, and it stayed pretty damn cold. But good to know, I'll run it though a bunch of low-mid RPM cycles with cooling off in-between before trying WOT just to stay on the safe side!
 
Top