1983 Starcraft 180SS project

star18

Seaman Apprentice
Joined
Aug 9, 2010
Messages
34
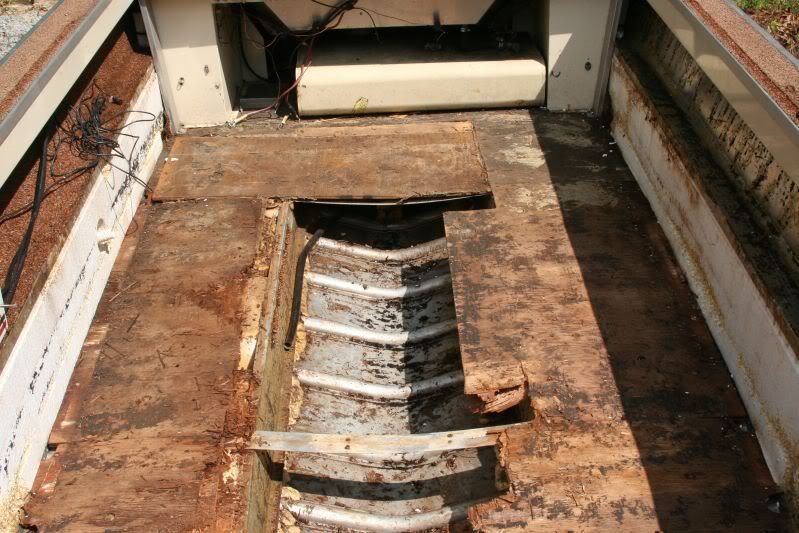
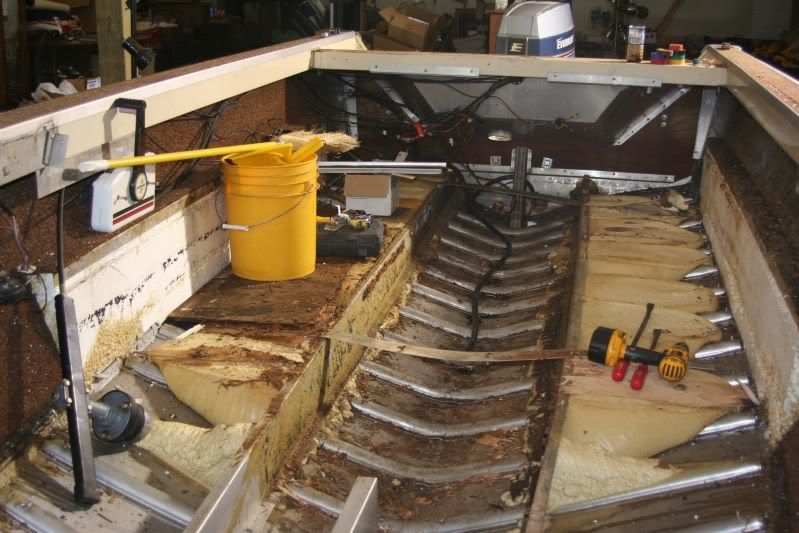
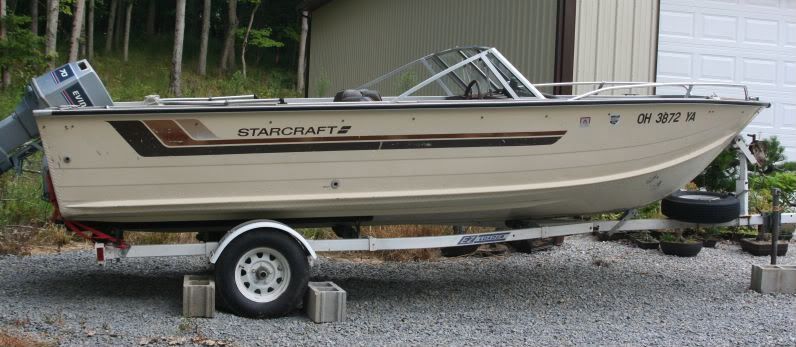
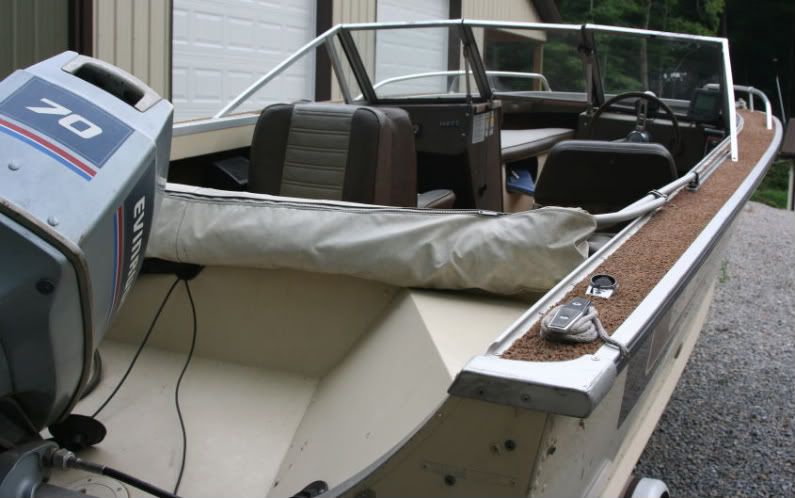
I just picked up my first Starcraft boat yesterday. A 1983 180SS, 18' aluminum V-hull bowrider. The decking is rotten but it came with a great running 70HP Evinrude. I began gutting the interior today. The transom is in good condition. After reading some posts here I put in an order for a gallon of Gluvit. I'm still undecided on what decking material I should use. I want it to last a long time; not just a few years. Anyhow, my first post here and some pics to share.
WS003.jpg

WS004.jpg
 

Huron Angler

Admiral
Joined
Apr 7, 2009
Messages
6,025
Re: 1983 Starcraft 180SS project

Welcome to the club star18, you are in the right place:)

I am very happy with my deck, I used epoxy-sealed 3/4" ext grade ply and covered it with nautolex marine vinyl for a durable grippy surface.

That 70 OMC outboard is a good one. I'm keeping an eye out for a 3cyl Johnnyrude myself:D
 

ezmobee

Supreme Mariner
Joined
Mar 26, 2007
Messages
23,767
Re: 1983 Starcraft 180SS project

Great hull, great motor. Trailer looks pretty good too. Nice find. Welcome to the Starmada. My thread and HA's thread as well as many others should show you exactly how to proceed with your restoration. FYI you WAY overordered the Gluvit. You do a pretty good job on an 18' with a quart.
 

star18

Seaman Apprentice
Joined
Aug 9, 2010
Messages
34
Re: 1983 Starcraft 180SS project

Great hull, great motor. Trailer looks pretty good too. Nice find. Welcome to the Starmada. My thread and HA's thread as well as many others should show you exactly how to proceed with your restoration. FYI you WAY overordered the Gluvit. You do a pretty good job on an 18' with a quart.

EZ: I was up 'til 4am last night reading through your thread. It's so long it's hard to go back and find the info I need. I don't recall seeing what type of plywood you used but I did notice you put several coats of epoxy on it. What type of expoxy did you use for this? I ordered the extra Gluvit to seal the exposed wood (painted) areas of the transom and to possibly use on my decking. I paid $1200 for the SS and want to make a helluva fishing boat out of it.
 

star18

Seaman Apprentice
Joined
Aug 9, 2010
Messages
34
Re: 1983 Starcraft 180SS project

Welcome to the club star18, you are in the right place:)

I am very happy with my deck, I used epoxy-sealed 3/4" ext grade ply and covered it with nautolex marine vinyl for a durable grippy surface.

That 70 OMC outboard is a good one. I'm keeping an eye out for a 3cyl Johnnyrude myself:D

HA: What is the life expectancy of your deck? I've also heard some good things about another product, Advantech, or Home Depot's Home Advantage sheeting that is supposed to be pretty cheap at $25/sheet. Not sure about chancing it though.

Only thing I wish I would've gotten but didn't with the boat was power tilt/trim.
 

ezmobee

Supreme Mariner
Joined
Mar 26, 2007
Messages
23,767
Re: 1983 Starcraft 180SS project

As that's a newer Evinrude (in the grand scheme of things) you can add TnT to it fairly reasonably. $250 should get a you a working used unit off ebay. HA and I both sealed our 3/4" exterior deck boards with 2 coats of epoxy resin. They should last pretty long that way. If you really wanted it bulletproof, add fiberglass to it. I supposed you could use Gluvit to seal wood, it is epoxy but it wouldn't be the most cost effective route I wouldn't think.
 

Huron Angler

Admiral
Joined
Apr 7, 2009
Messages
6,025
Re: 1983 Starcraft 180SS project

Life expectancy of exterior grade plywood sealed with a 2-part epoxy resin:

stored indoors: 20-30+ years
properly stored outdoors: probably 5-10 years at least(this is a total guess)

I ordered my epoxy resin from clarkcraft.com...using gluvit on wood is serious overkill, save it for another aluminum boat hull if you have extra. It has zinc chromate mixed in so it adheres to bare aluminum well, and that's not necessary for plywood.
 

star18

Seaman Apprentice
Joined
Aug 9, 2010
Messages
34
Re: 1983 Starcraft 180SS project

20-30 yrs sounds good to me! I went ahead and ordered a gallon of the epoxy resin from Clark Craft. Thanks for the tips! Also ordered some all-aluminum rivets and a rivet gun off e-bay for some of the interior stringers. I may try the Lowe's decking screws for the decking.

Gutting out the interior is moving along well. I should get most if not all of it done in the next few days then move on to powerwashing the bare aluminum bottom.

Mine has rack & pinion steering; is that anything special or do all the Starcrafts have that?
 

Pugetsound

Lieutenant Commander
Joined
Apr 5, 2009
Messages
1,824
Re: 1983 Starcraft 180SS project

My 1978 16 SS had a rack and pinion. Someone had put a 15 ft cable on a required 13 ft need, changed it, all is good . R/P is a solid set up.
 

jasoutside

Supreme Mariner
Joined
Dec 20, 2009
Messages
13,269
Re: 1983 Starcraft 180SS project

Welcome! Great price on a super rig! The whole package looks Sharp, well done:D
 

fshngho

Lieutenant
Joined
Apr 1, 2009
Messages
1,332
Re: 1983 Starcraft 180SS project

Star, if you follow the steps EZ & HA did in their resto you will get at least 20 yrs of life out of the floor, depending if you cover it or store it in a garage. Leaving a boat outside in the weather for rain, snow, leaves etc, is what destroys the interiors. Concentrate on comfort, functionality, and of coarse reliability. You already have a great start with that nice boat.
 

dozerII

Admiral
Joined
Oct 25, 2009
Messages
6,527
Re: 1983 Starcraft 180SS project

Great boat and great price, it looks like the big sister to my 16 , color sceme and carpet. Welcome to the wonderful world of Starcrafts.
Glen
 

star18

Seaman Apprentice
Joined
Aug 9, 2010
Messages
34
Re: 1983 Starcraft 180SS project

I haven't made as much progress at this point as I'd hoped to. Had to take a day to drive two hours back where I bought it from and take care of the title....then the heat....then the rain....then the heat again today. Some of the exposed aluminum areas were hot enough to fry an egg on! I'm going to have to make room to get it inside the garage in the shade. I knew I was going to have to put it inside after I got it gutted & cleaned...just going to have to do it a little sooner so I can make better progress.
As of now; consoles are removed, front seating area has been removed, and all carpet removed from the decking.

:eek:It looks like there's factory poured foam in the bottom!:eek:
WS020.jpg
 

Huron Angler

Admiral
Joined
Apr 7, 2009
Messages
6,025
Re: 1983 Starcraft 180SS project

Good idea to keep it protected, the gluvit is not UV resistant so it's best to apply it in the garage until the deck is down or it's painted.

Plus you won't be getting 1st degree burns every time you bump the bare hull:D
 

star18

Seaman Apprentice
Joined
Aug 9, 2010
Messages
34
Re: 1983 Starcraft 180SS project

Photo of today's progress. Re-arranged the garage and got it inside. Still mighty hot but not as bad as cooking in the summer sun. Removed the rear corner "boxes" and the foam blocks behind them. Drained and removed the gas tank. Tore up all of the flooring except for a few small rotted pieces stuck to the foam. The foam was factory poured foam and is dry, light, and in good condition. I'm thinking of keeping it in and adding some drain holes through it so it can't trap water. I was able to salvage the pieces of decking with complicated cuts for templates. My boat came with 1/2" decking from the factory.
WS003-1.jpg
 

starcrafter65

Chief Petty Officer
Joined
Jun 9, 2009
Messages
645
Re: 1983 Starcraft 180SS project

Nice project....4 thumbs up here for a Nautolex Vinyl floor - check defender out for that seems to have the lowest price

Keep the pics coming
 

star18

Seaman Apprentice
Joined
Aug 9, 2010
Messages
34
Re: 1983 Starcraft 180SS project

Progress update: Water tested the empty hull today at the lake. No leaks & dry as a bone. Have interior completely gutted and power washed. Main stringers and all pour-in foam was removed. 2-3 coats of Gluvit applied to interior rivets. I'm ready to start re-building the interior. Need to bump-test the bilge and livewell pumps. Ready to start running pump and drain lines to new livewell location and building the rod locker interior beneath the decking. Decking boards are cut; need to dry fit them and layout the new floor plan including seating and rod locker locations. Got a NIB Minn Kota 70lb trolling motor off CL. Got the rod locker & hatch from Great Lakes Skipper. Have seats on order from iboats. Ordered exterior graphics today. Still need to order seat pedestals, carpet, new livewell, etc, etc, etc. Will update with photos when it starts going together.
 

fshngho

Lieutenant
Joined
Apr 1, 2009
Messages
1,332
Re: 1983 Starcraft 180SS project

Looks like you get your first " ATTABOY". You are really moving right along. Don't forget the pics as you go, we live for that stuff.:D
 

star18

Seaman Apprentice
Joined
Aug 9, 2010
Messages
34
Re: 1983 Starcraft 180SS project

Here is the aluminum I used to extend the rear casting deck. I had to move the gas filler tube back. I also filled in the small boxed-in sections with foam before I mounted the decking boards. I laminated two 3/4" sheets of plywood for the decking. The rear extension is about 8" behind the cross-brace. There is also an extension in front of the cross-brace that is 10".
WS006.jpg

I just got the tubes completed for the rod locker today. The tubes are lightweight, thinwall 1-1/4" PVC. I used spray foam and block foam to fill it in. There are two pieces of aluminum underneath with holes cut in them that the tubes are siliconed to. I'll have the capacity to store up to 13 rods from 8' max length to about 10' max length.
WS002.jpg
 

steve`ss

Cadet
Joined
Jul 12, 2010
Messages
12
Re: 1983 Starcraft 180SS project

i like your rod locker, i want to see how you do your floor - thanks
 
Top