1986 Alumacraft Trophy 170 - New Transom Build

Kit_B

Seaman Apprentice
Joined
Sep 21, 2010
Messages
38
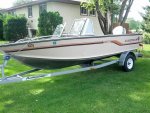
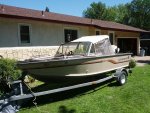
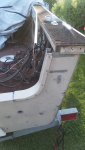
Last summer, I got a good deal on a 1986 Alumacraft Trophy 170.
It was a Craigslist find that the seller had bought at an auction & hadn't put into the water.
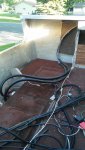
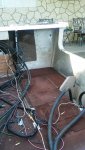
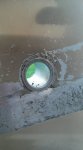
The transom seemed solid, until I got it in the water & the splashwell caulk started to separate.
I knew there was a problem, so I babied it, until I had a chance to work on it.
Yesterday, my 6 year-old son had to stay home from school, sick...
There was my chance.
Since I had some serious time constraints, I didn't take many photos.
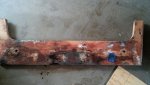
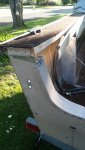
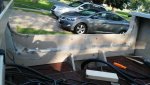
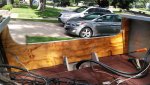
But, the rear of my boat currently looks a little like a banana peel.

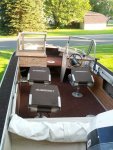
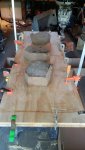
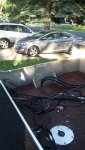
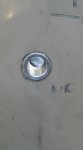
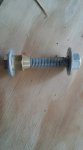
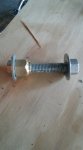
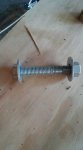
Attached are 3 photos, from before the work started & one of the board I removed.

Hopefully, I can get a few photos of re-assembly, this weekend.
 

Attachments

  • Transom Board - Small.jpg
    Transom Board - Small.jpg
    145.2 KB · Views: 5
  • Trophy 170 - 3 Small.jpg
    Trophy 170 - 3 Small.jpg
    161.8 KB · Views: 4
  • Trophy 170 - 2 Small.jpg
    Trophy 170 - 2 Small.jpg
    209.9 KB · Views: 3
  • Trophy 170 - 1 Small.jpg
    Trophy 170 - 1 Small.jpg
    198.7 KB · Views: 4

Frey0357

Petty Officer 1st Class
Joined
Mar 13, 2014
Messages
313
Hello Kit, welcome to the forum!

Nice boat ya got there! Clean, nice lines, etc...!

As for the transom replacement, I have to recommend that you seal your replacement wooden core prior to installing. Also while re-installing your new transom core, I recommend that you check out the flooring and sub flooring foam to ensure that it isn't wet. Often times these things go hand in hand.

Good luck and keep the pics coming!

Frey
 

Kit_B

Seaman Apprentice
Joined
Sep 21, 2010
Messages
38
Yep...I'll seal the new board in resin & fill holes/re-drill, as well.
The foam appears to be in good shape & isn't waterlogged.
I think the floor was re-done, a few years back & looks pretty good.
I was originally afraid to jump into this project.
After starting it, I can't believe how easy the process is.
 

jbcurt00

Moderator
Staff member
Joined
Oct 25, 2011
Messages
25,138
Yep...I'll seal the new board in resin & fill holes/re-drill, as well.
The foam appears to be in good shape & isn't waterlogged.
I think the floor was re-done, a few years back & looks pretty good.
I was originally afraid to jump into this project.
After starting it, I can't believe how easy the process is.
What kind of resin? Epoxy?
 

Kit_B

Seaman Apprentice
Joined
Sep 21, 2010
Messages
38
After some additional thought, I may just use Old Timer's formula, for the coating...
Old%20Timers%20Wood%20Sealer_1.jpg
 

jbcurt00

Moderator
Staff member
Joined
Oct 25, 2011
Messages
25,138
I like epoxy, but several have used the old timers or straight spar urethane/varnish

Just wanted to make sure you werent using polyester resin w out using fiberglass too.
 

Woodonglass

Supreme Mariner
Joined
Dec 29, 2009
Messages
25,929
If you use the OTR it's IMPERATIVE that If and When you drill holes in your transom that you ALWAYS coat the holes and hardware with a quality sealant. i.e. 5 min epoxy, 3M 4200 etc..
 

Kit_B

Seaman Apprentice
Joined
Sep 21, 2010
Messages
38
No Title

I got around to taking some photos, last night, after gluing the new board.
I didn't have all the clamps I needed, so I had to make do with what was around.
This morning, the board seems extremely solid, despite the less than perfect clamping.


Attachments

  • photo245267.jpg
    photo245267.jpg
    269.7 KB · Views: 6
  • photo245268.jpg
    photo245268.jpg
    347 KB · Views: 7
  • photo245269.jpg
    photo245269.jpg
    388.7 KB · Views: 6
  • photo245270.jpg
    photo245270.jpg
    332 KB · Views: 6
  • photo245271.jpg
    photo245271.jpg
    364.6 KB · Views: 6
  • photo245272.jpg
    photo245272.jpg
    355.6 KB · Views: 6

Kit_B

Seaman Apprentice
Joined
Sep 21, 2010
Messages
38
Should I coat the interior of the aluminum transom skins with anything, before re-assembly?
 

Frey0357

Petty Officer 1st Class
Joined
Mar 13, 2014
Messages
313
I recommend that you clean them really well and look closely for corrosion. If they are not corroded, I recommend that you slip the new transom in, seal the top of the transom cap with some sealer and tack it back in place. Throw the motor back on and off you go!

If they are corroded and there are pitts then I would fill them in with JBWeld and sand smooth. This is what I had to do because not only was my skins corroded but there was holes from the corrosion!

Frey
 

bonz_d

Vice Admiral
Joined
Apr 22, 2008
Messages
5,276
Kit_B Thanks for the link from your PM. Your work looks excellent and that transom looks to be much easier than the one in my Classis 16.

I have used the "Old Timers Formula" in a number of tin boats and have zero complaints. It might not be the 'best" solution but for the money it sure can't be beat. I used it to treat the plywood I put down in a Lund. That was almost 8 years ago now!

Post up some more pictures when you get a chance.
 

Kit_B

Seaman Apprentice
Joined
Sep 21, 2010
Messages
38
No Title

With any luck, I'll be drilling the holes in the new board, tonight.
 

Attachments

  • photo245574.jpg
    photo245574.jpg
    322.3 KB · Views: 4
  • photo245575.jpg
    photo245575.jpg
    387.7 KB · Views: 5

Frey0357

Petty Officer 1st Class
Joined
Mar 13, 2014
Messages
313
Looks good, nice and sealed! You are going to keep the interior transom skin right? I also recommend that you seal up the screws that you put into the transom board, just to keep as much moisture out of that beautiful transom wood.....

Are you replacing the splash drains with metal ones or something else?

Frey
 

Kit_B

Seaman Apprentice
Joined
Sep 21, 2010
Messages
38
No Title

I'll definitely be using all the old aluminum parts & sealing all the screws/bolts/rivets.
I bought some aluminum splashwell drains & I'll be trying to use the bolt-press method, for putting a flange on them.
One slight twist on that is...Rather than using a nylock nut to start the flange, I'll use a flared nut.
The cone should cause the start of the flange.
But...It's only experimental, at this point.
I'm not 100% certain it will work.
 

Attachments

  • photo245576.jpg
    photo245576.jpg
    31.4 KB · Views: 0

Frey0357

Petty Officer 1st Class
Joined
Mar 13, 2014
Messages
313
Kit: I think it will work. I used something similar, and it started the flange and then I had to finish it with a small hammer. If you do this technique, be sure not to overdue the hammer part and it will cause the aluminum to crack.....not exactly sure how I know this, Wait! Yes I know how I know this....:scared:

Frey
 

Kit_B

Seaman Apprentice
Joined
Sep 21, 2010
Messages
38
No Title

Here's a set of photos of the splashwell tubes & the tool I used.
I didn't take photos as I did the work, but I think you'll get the idea.
 

Attachments

  • photo245728.jpg
    photo245728.jpg
    84.4 KB · Views: 4
  • photo245729.jpg
    photo245729.jpg
    54.8 KB · Views: 4
  • photo245730.jpg
    photo245730.jpg
    134.3 KB · Views: 2
  • photo245731.jpg
    photo245731.jpg
    76.2 KB · Views: 2
  • photo245732.jpg
    photo245732.jpg
    99.6 KB · Views: 2
Last edited:

Frey0357

Petty Officer 1st Class
Joined
Mar 13, 2014
Messages
313
Looks good Kit! Did you use sealant around the replacement tubes? If so, which one?

Frey
 

Kit_B

Seaman Apprentice
Joined
Sep 21, 2010
Messages
38
I buttered the holes with a large amount of Loctite PL Marine Fast Cure Adhesive Sealant & made sure it oozed out, as I flared the tubes.
I know many people aren't a fan of that product, but it was the only product available at my local Home Depot or Lowe's that didn't say "Not recommended below the water line" , "Not for continuous submersion", or other similar statements.
In fact, it was the only product at either store that specified use for exactly this purpose.
 
Last edited:

Kit_B

Seaman Apprentice
Joined
Sep 21, 2010
Messages
38
I took the boat out for about an hour last night...
The new transom had no leaks & it was as strong as an ox.
I was very pleased to find that the strength of a new transom seems to help me get on top of the water quicker.
Stupidly, I forgot to install the transom saver before I left the house.
But, I was happy to look in the rear-view mirror & see that the motor didn't really do any bouncing.
I'll use it for trailering, from now on...But, it was good to see that I built a hefty transom that could take a beating.

Now...What do I do with all the spare closed rivets?
 
Top