1992 Force 120 tilt piston/cylinder fix or replace?????

Mytox

Seaman Apprentice
Joined
Sep 16, 2013
Messages
41
Hi guys. This related to a couple other threads I'd started looking for advice on my tilt/trim assbly. I ordered a kit to rebuild the assembly (which includes the five SS screws for the trim cover - good luck finding those in northern Canada) but this note was appended to the description:

[FONT=tahoma,helv,arial]* 1992-1995 Mercury Force engines use proprietary seals on a metric threaded tilt cap. The seals are not available except by having them custom made. This kit will rebuild the trim cylinder but not the tilt or shock[/FONT]

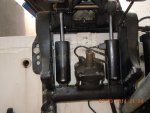
I've also attached a picture of the entire assembly (image from e-bay). I'm wondering about the two tilt cylinders and am wondering if need to replace them after the failure from likely over-pressurizing the system, or can they be serviced?
 

Mytox

Seaman Apprentice
Joined
Sep 16, 2013
Messages
41
I can't seem to upload pictures to this site. Anyway, I now know that it's the tilt piston/cylinder on the right and a shock on the left when looking at the motor from the back. Also, any idea where I can get a socket that fits the SS screw head on the trim cover so I can remove it? The screws on my unit have a multi-hex head.

Thanks....Randy
 

Jiggz

Captain
Joined
Oct 23, 2009
Messages
3,909
The screws on the trim cylinders are 12 points 1/4"-20 bolts. Sears, Home depot and even Lowes has this socket although sometimes it comes in a set. Or you can also get a set at Harbor Freight. Just make sure it is a 12 point socket set with a 1/4".
 

Mytox

Seaman Apprentice
Joined
Sep 16, 2013
Messages
41
Thanks Jiggz. We do have a Home Depot and a Sears outlet (catalogue orders only), and a Canadian Tire. I see Rritt has passed away according to a note I saw, and he's the guy i was hoping was going to respond to my tilt piston/cylinder question. Oh well. I believe I over-pressurized the cylinder resulting in oil blowing by the piston (or so I'm told). Anyone have an idea where I can get a replacement piston/cylinder assuming I need one and this one can't be salvaged?

Thanks again.
 

Jiggz

Captain
Joined
Oct 23, 2009
Messages
3,909
If you can post a pic of the tilt cylinder it can be assessed if it is salvageable or not. Remember, the shock absorber cylinder is identical to the tilt cylinder and can be switched around except for the hydraulic connections. Overpressurizing the tilt cylinder usually damages the cap and associated threads and of course O-rings. Most of these can be replaced using the shock absorber cap and some new O-rings.

As for replacement, search *bay using "Force Tilt and Trim" as your search criteria.
 
Last edited:

Mytox

Seaman Apprentice
Joined
Sep 16, 2013
Messages
41
No Title

I'll try to post a pic. The unit's still attached but I'd like to take both the trim and tilt cylinder/piston assemblies off the motor and bring into the shop. Any tips?
 

Attachments

  • photo202792.jpg
    photo202792.jpg
    72.2 KB · Views: 1

Jiggz

Captain
Joined
Oct 23, 2009
Messages
3,909
Why do you need a shop to do the job? Just exactly what is wrong with the tilt and trim cylinders? Are they not rising or maybe not coming down as required? You mentioned overpressurization damaged the tilt cylinder, but why also bring the trim cylinder? Can you not rebuild the tilt cylinder cap using the shock absorber cap? However, if the reason is because you are not mechanically inclined, basically I would suggest just getting a used working unit from *bay which would cost almost as much as having a shop do the repair the for you. With the *bay purchase at least you end up with some spare parts.
 

Mytox

Seaman Apprentice
Joined
Sep 16, 2013
Messages
41
Hey Jiggz! I meant taking the unit off the motor and bringing it inside to work on:) I'm not beaten yet! I've got everything off and will take some pictures of the parts as well as recap the issues. Thanks very much for your reply, and take heart, I'm willing to give this a shot. I tried drilling one of the sheared bolts on the trim housing and tapped in a screw-out, but the thing won't budge. Those things are welded in. Any advice on the fuzed bolts?
 

Jiggz

Captain
Joined
Oct 23, 2009
Messages
3,909
The trim bolts are hardened stainless 1/4-20 12 points bolts. If you have the unit off the transom, a stripped bolt can be removed either by drilling it out with titanium bits or grinding out the head part and dismounting the top part of the cylinder leaving enough length of the bolt to work it out. You will need to use heat and WD-40 to try to unscrew these ones. Just make sure all O-rings and other seals have been removed before doing so. The worst thing you could end up doing is drilling it out with a larger hole and tapping it with the next size, 5/16" bolt. You can also use stainless allen head screws as replacements.
 

Mytox

Seaman Apprentice
Joined
Sep 16, 2013
Messages
41
Hi there. My saga continues with this old 92 Force engine. Despite a service kit I ordered from e-bay over a month ago being to returned to the US sender by Canadian Customs for some reason, I've managed to find everything I need to complete repairs on the trim unit (replaced broken/welded in stainless steel screws holding the piston cover in place, replaced o-rings), and because I'd removed the tilt and trim assemblies and drained the oil from most of the system, I need to re-install and refill/recharge everything. The oil originally in the unit matched the description for 30 W non-detergent. I assume from other posts that I simply reconnect all fittings (will the motor drop down from fully upright where it is now if all the fittings are connected first? Do I need to leave a fitting disconnected to allow the air in the cylinders to escape?) and with the motor fully lowered and both tilt and trim pistons fully depressed, I simply need to fill the reservoir, cycle the system up until it stops, cycle it all the way back down, add more oil and repeat until the system is fully recharged and operating. The system is apparently self-bleeding during this process.

Does this sound right? Any other tips???
 

pnwboat

Rear Admiral
Joined
Oct 8, 2007
Messages
4,251
All you have to do once everything is assembled is to fill t up, and cycle the Tilt/Trim up and down multiple times to work all the air out.

Be careful when reconnecting the hydraulic lines. It's very easy to cross-thread the fittings, especially on the valve body under the pump.. I start them by hand and make sure they are correctly threaded before I put a wrench on them.

Good luck!
 

Jiggz

Captain
Joined
Oct 23, 2009
Messages
3,909
The system is auto bleeding by cycling it multiple times. However, you can also help in the bleeding the system by not tightening the "lower" fittngs (with the unit in the full upright position) until you see fluid leaks out of the fittings and then tightening them. From there you can cycle it multiple times until it is completely bled which should not take more than two~three times.
 
Top