1994 Genesis Project

NickHansen

Cadet
Joined
Sep 9, 2010
Messages
27
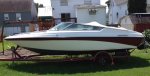
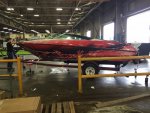
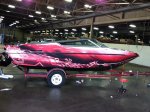
So this is a little late but I'm going to start it now anyway haha. I bought this 1994 Genesis 20.5 about 6 years ago. She was pretty beat up and had some issues. I tore out the motor a few years ago and replaced it with a 383 stroker. I have also replaced the all the flooring in it to already because it was all rotten. So much his year I'm doing some paint work, having it vinyl wrapped, new head unit, amp, and speakers, all new lighting, wakeboard tower, Bimini top, tint out the windows, and I'm going to try to vinyl paint the interior because the vinyls is in great shap it's the white has got dingie over the years. So some photos aren't loading I'll do it from the computer when I get home. Here's a couple though. The first one is the first year I had her and the other two are from yesterday while working on the wrap for it.
 

Attachments

  • image.jpeg
    image.jpeg
    113.9 KB · Views: 0
  • image.jpeg
    image.jpeg
    153 KB · Views: 0
  • image.jpeg
    image.jpeg
    152.7 KB · Views: 0

Woodonglass

Supreme Mariner
Joined
Dec 29, 2009
Messages
25,930
How about the Stringers,Transom and motor mounts? If the Floor was rotten did you core sample them before laying a new floor on top of a potentially rotting substructure? Boats generally rot from the bottom up. Even though the substructure is encapsulated in fiberglass doesn't always mean the wood core isn't rotten. Core sampling is about the only sure way to know.
 

NickHansen

Cadet
Joined
Sep 9, 2010
Messages
27
Yeah i replaced it all. Actually most of it was still decent but once you get into it i find it best to just replace it all.
 

Woodonglass

Supreme Mariner
Joined
Dec 29, 2009
Messages
25,930
You did a total Deck, Stringer, Motor mount and Transom install?? What products and methods did you use. this forum is all about teaching and learning for those who have been there and done that!!!:nod:
 

NickHansen

Cadet
Joined
Sep 9, 2010
Messages
27
Honestly i didn't do much special. Most of what i did i got from here. Basically I gutted her replaced all the stringers, tank, box, and ski hold in the same place they were and fiber glassed it all in. The transom i made a template for be i removed it out of card board then removed the old and replaced it with new. The motor mounts were more of a challenge i guess. I actually used 4 laser levels to get there placement correct. So I attached one to the hull that shot across vertically across the front of both motor mounts. then two on the transom one for each outside edge of the motor mounts and that was so i could ensure proper placement of each. then for the height of the motor mounts a took one more laser level attached it the transom horizontally and used it to measure from the laser line to the top of each mount. then i just took a bunch of other measurements using the laser lines. I left laser where they were attached ripped and ground out what was left then built it back up with layered plywood to the right size, height, and placement leaving it a little smaller to account for the fiber glass adage. Should have taken pictures it would have made more sense. Like i said though i stole 90% of my ideas from this site. I've been a member for awhile just not a big talker i guess.
 

NickHansen

Cadet
Joined
Sep 9, 2010
Messages
27
ive got a several before pics taken right before we did paint and vinyl, i just need to get them off my camera on to my laptop. We should finish with the wrap today and ill bring her to the house. Ill take some better pics tonight and get them on here. The interior is in pretty decent shape, obviously the carpet is was just replaced not to long ago. The seats rest of the interior vinyl is in decent shape. its not cracked or dried out but the color or "brightness" has begun to fade some im going to do a paint job to it even though im still nervous about that. Ill get some pics up this evening.
 

Bayou Dave

Lieutenant Commander
Joined
Dec 13, 2012
Messages
1,780
ive got a several before pics taken right before we did paint and vinyl, i just need to get them off my camera on to my laptop. We should finish with the wrap today and ill bring her to the house. Ill take some better pics tonight and get them on here. The interior is in pretty decent shape, obviously the carpet is was just replaced not to long ago. The seats rest of the interior vinyl is in decent shape. its not cracked or dried out but the color or "brightness" has begun to fade some im going to do a paint job to it even though im still nervous about that. Ill get some pics up this evening.

You are going to paint the vinyl seats? What plans do you have to do that?
 

NickHansen

Cadet
Joined
Sep 9, 2010
Messages
27
You are going to paint the vinyl seats? What plans do you have to do that?

I'm still in the research phase of that. However I think I am going to use the SEM marine vinyl paint, with their vinyl prep and tac free top coat. I'm going to keep the same colors I already have, I think that will be best. I am worried about peeling and/or chipping but if I do the prep perfect I'm hoping ill be okay. Any advice would be GREATLY appreciated
 

NickHansen

Cadet
Joined
Sep 9, 2010
Messages
27
Ok now the issue. I painted the bottom about a month ago. It had been painted black but was faded so I was just going to re do it. I didn't using anti fouling paint because I never keep it in the water long. So I sanded her all down, washed her twice with denatured alcohol, wiped her down with tax cloth, used rustoleum marine primer, then hit with three coats of rustoleum marine paint...... It's been a month and I see all these bubbles forming. It all just peals off with ease and its copper underneath???? It was black before.... So I'm lost I need help!! Lucky for me the wrap stopped where the paint began. So how do I fix this? Liquid strip it and do it again?


Vintage Rider

Seaman
Joined
Mar 6, 2016
Messages
62
I'm no paint expert but it sure looks like something was lacking in the prep stage. The good news is there are a number of experts here who can tell you how to fix it. Love your paint job BTW.
 

Woodonglass

Supreme Mariner
Joined
Dec 29, 2009
Messages
25,930
Was there antifouling paint on the boat before. Some of it contains copper
 

NickHansen

Cadet
Joined
Sep 9, 2010
Messages
27
Yeah the best I can see is there are two layers over the copper paint besides what i applied. I did some research and found out that there is a solid anti fouling paint in copper. It looks like someone primed and painted over it so when I primed and painted it again the original primer they used lost its bond because of the off gassing. Im just guessing though i cant be sure. So Im starting over and Im going to do what i should have done to begin with and use a gel coat safe stripper, any suggestions? Also the paint i used was Rustoleum Topside paint because i read several places that if your boats not in the water long term it was fine to use. Well i never leave it in the water for more then a day however it never seemed to get hard. Is there something better I could use? I want something spray-able, that cures quickly, and off gasses quickly as well.
 

Woodonglass

Supreme Mariner
Joined
Dec 29, 2009
Messages
25,930
Yup you need to remove all traces of any bottom paint. Gelcoat is impervious to most strippers. I'd use this..
bulldog-gaf354-fiberglass.gif

You can use Rustoleum Pro Oil Based paint but..I'd Highly recommend adding the hardener. Read the third link in my signature line below. It has ALL the info on how to mix and apply. Lot's of our members have used it with GREAT results. Including ME!!!:eek::D;)
 

NickHansen

Cadet
Joined
Sep 9, 2010
Messages
27


After a much needed vacation and a break from the boat I'm back at it............ So let's try this again and hopefully get it right this time


NickHansen

Cadet
Joined
Sep 9, 2010
Messages
27
Hey Wood just want thank you for taking the time to put together your info for painting with tractor paint. Got the first coat done and it already looks a million times better then before. Hopefully finish it by Friday so I can finally get to the interior.
 

Woodonglass

Supreme Mariner
Joined
Dec 29, 2009
Messages
25,930
Make sure that the Solids in the Tractor Primer are NOT settled to the bottom of the can. IF they are take it back cuz it will NEVER mix right. If it's been on the shelf for a while it WILL go Bade. Make them open it at the store and check that the solids are NOT settled. They HAVE a problem with their primer!!!! Paint is Great!!!! I've switched to the Clean Metal Primer made by Rustoleum. Never had an issue with it!! Works great with the Tractor Paint. Good luck with the painting. If your temps are in the 80's, I would use their reducer mixed with Plain Mineral Spirits 75% Reducer 25% Mineral spirits. This will slow the dry time a bit and create less Orange Peel. If you do get Orange Peel wet sand the first coat and then use more MS in the mix and open the Fan on the gun more. Also back off the PSI at the gun to around 30-35 psi.

Watch this...
 
Top