1996 Force 50HP ELTP Exhaust seal/water leak

Havlik82

Cadet
Joined
Jun 25, 2014
Messages
20
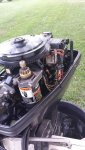
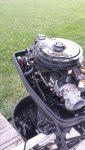
To my better judgement I purchased a 1986 Bayliner with a 1996 Force 50hp on the back. It was father's day and I've wanted a boat for awhile, but I was also on a budget. It started right up in the guy's driveway and I've never owned an outboard and didn't know what to look for. 3 months later I still have yet to enjoy my boat. Initially I had it serviced a local shop to get the fuel pump and impeller replaced. Starting was weak, I thought it was the battery, but when I got it home and tinkered with it I discovered the starter was bad, I replaced that and found the solenoid went bad too, (probably due to me being a bone head and putting some ground wires on the top of the solenoid) so I replaced that. After taking it out for a spin, when I would get over 10mph, the moter would rev up and down, I thought it was the prop, but that didn't solve my issue, I then discovered the carb was spraying fuel out of the air vent and basically pouring out the the front, and there was a loose elbow on the powerhead right below the fuel pump. I rebuilt the carb (thanks to all there great forums it was a snap). I then moved on to the fuel pump and discovered all sorts of black buildup in it, leading me to believe that the fuel lines were toast so I rebuilt the fuel pump and changed out all the lines and the fuel filter. This leads me to where I'm at now: there is water spraying into the upper unit case from the base of the powerhead in spots and I suspect exhaust is also getting in the case because with the cover on, the motor will occasionally die when idling. It makes me nervous to have water anywhere near the carb so I need to replace this seal. Any tips on how to remove this powerhead? I'm thinking it may be over my head and I should just take it to the shop, but if enough of you can give me some confidence I'll give it a shot.

I still need to get it to the lake to verify that the revving issue is cleared up, but I'm guessing that was fuel system related due to the carb and fuel pump issues.

Hopefully after all of this is back together I don't discover any sort of piston probs, I'll be so disappointed...but at least I'm learning a lot, right?
 
Last edited:

smoedog

Petty Officer 1st Class
Joined
Mar 25, 2012
Messages
238
I just went through this with my motor. Exact one you have. If you cab turn a wrench then you can do this. Simple steps... Disconnect cannon plug Disconnect battery cable from starter solenoid and ground from block Disconnect power going to trim relays Disconnect 2 wires that control your trim Disconnect ground from harness to left rear corner of cowling Disconnect throttle cable from motor Disconnect fuel line going into pump Disconnect water pressure gauge feed line from top of cylinder head (if equipped) Remove lower cowling cover by pulling single bolt and but up under the pivot point on front of motor Once that cowling is removed it will uncover 6 bolts Remove the bolts the back your trucks tailgate up to motor Lift motor straight up off of leg. The power head maybe weighs 100 lbs if that Now there are 2 seals you need to replace. One is between the motor and leg you just separated. The other you will need to remove the adapter plate from the bottom if the motor. I believe its about 10 bolts and a screw. One you pull that plate you'll see the other you need to replace. Both are less than 10 bucks. Now take my advice when putting it back together, I learned the are way. When putting the new gaskets in. Use gasket sealant on all the mating surfaces and make sure to use lock tite on all fasteners. I didn't and blew the gasket out again due to the bolts backing out Then just assemble in reverse order. The PO of the boat had a shop do the exact job for 750 dollars, and they stripped a bolt and snapped another leaving me to discover it lol If you don't fix it, eventually it will fail all together and the exhaust pressure will over come your water pump and overheat your motor. It is about a 2-3 hour job. Very easy
 

smoedog

Petty Officer 1st Class
Joined
Mar 25, 2012
Messages
238
I just went through this with my motor. Exact one you have. If you cab turn a wrench then you can do this. Simple steps... Disconnect cannon plug Disconnect battery cable from starter solenoid and ground from block Disconnect power going to trim relays Disconnect 2 wires that control your trim Disconnect ground from harness to left rear corner of cowling Disconnect throttle cable from motor Disconnect fuel line going into pump Disconnect water pressure gauge feed line from top of cylinder head (if equipped) Remove lower cowling cover by pulling single bolt and but up under the pivot point on front of motor Once that cowling is removed it will uncover 6 bolts Remove the bolts the back your trucks tailgate up to motor Lift motor straight up off of leg. The power head maybe weighs 100 lbs if that Now there are 2 seals you need to replace. One is between the motor and leg you just separated. The other you will need to remove the adapter plate from the bottom if the motor. I believe its about 10 bolts and a screw. One you pull that plate you'll see the other you need to replace. Both are less than 10 bucks. Now take my advice when putting it back together, I learned the are way. When putting the new gaskets in. Use gasket sealant on all the mating surfaces and make sure to use lock tite on all fasteners. I didn't and blew the gasket out again due to the bolts backing out Then just assemble in reverse order. The PO of the boat had a shop do the exact job for 750 dollars, and they stripped a bolt and snapped another leaving me to discover it lol If you don't fix it, eventually it will fail all together and the exhaust pressure will over come your water pump and overheat your motor. It is about a 2-3 houI just went through this with my motor. Exact one you have. If you cab turn a wrench then you can do this. Simple steps... Disconnect cannon plug Disconnect battery cable from starter solenoid and ground from block Disconnect power going to trim relays Disconnect 2 wires that control your trim Disconnect ground from harness to left rear corner of cowling Disconnect throttle cable from motor Disconnect fuel line going into pump Disconnect water pressure gauge feed line from top of cylinder head (if equipped) Remove lower cowling cover by pulling single bolt and but up under the pivot point on front of motor Once that cowling is removed it will uncover 6 bolts Remove the bolts the back your trucks tailgate up to motor Lift motor straight up off of leg. The power head maybe weighs 100 lbs if that Now there are 2 seals you need to replace. One is between the motor and leg you just separated. The other you will need to remove the adapter plate from the bottom if the motor. I believe its about 10 bolts and a screw. One you pull that plate you'll see the other you need to replace. Both are less than 10 bucks. Now take my advice when putting it back together, I learned the are way. When putting the new gaskets in. Use gasket sealant on all the mating surfaces and make sure to use lock tite on all fasteners. I didn't and blew the gasket out again due to the bolts backing out Then just assemble in reverse order. The PO of the boat had a shop do the exact job for 750 dollars, and they stripped a bolt and snapped another leaving me to discover it lol If you don't fix it, eventually it will fail all together and the exhaust pressure will over come your water pump and overheat your motor. It is about a 2-3 hour job. Very easyr job. Very easy
 

smoedog

Petty Officer 1st Class
Joined
Mar 25, 2012
Messages
238
Holy crap. I posted this through my phone and it thru all editing out the window and double posted lol. Sorry about that. I will fix it when I get home
 

Eddie Rivera

Petty Officer 2nd Class
Joined
Feb 19, 2013
Messages
183
Havlik82 - i sent you a couple of private messages, take a look at them. I went a year and a half dealing with multiple issues with my 89/50 HP and with no experience whatsoever and with multiple never ending issues i was able to succeed only with the help from these guys here, amazing people like Jiggz / Frank Acampora / pnwboat / nordin and others too, so trust me - you can do it - post pictures & videos and you will soon be enjoying your boat, i am, and man what a feeling it is for everything to be working fine.
 

Eddie Rivera

Petty Officer 2nd Class
Joined
Feb 19, 2013
Messages
183
take a look at my video of my motor leaking a whole lot of water, at first i didnt even notice it, but it progressed quickly.
 

jerryjerry05

Supreme Mariner
Joined
May 7, 2008
Messages
18,183
The video looks more like the water tube that goes from the pump to the power head isn't sealing at the power head???
There is a seal at the top that might not be sealing right.
First do a compression test and see if the motors worth the effort?
Can you see the water leak when you remove the cover?
 

Havlik82

Cadet
Joined
Jun 25, 2014
Messages
20
Wow, thanks for the detailed instructions @smodog. Because I've already rebuilt the fuel systems, carb, replaced the starter and solenoid, and replaced a trim switch, most all of that makes sense. I'll take a bunch of pics and maybe a video or two. Do you remember the part numbers on the two seals? I went to b o a t s . n e t and I think I found the two seals and a diagram (see attached) Looks like there's a driveshaft seal as well, did you replace that? I know most of the bolts will come loose with no problems because I had to tighten 4 of them. They had completely been vibrated out and were loose in the lower cowling. Thank God they were all still there.

A few other questions, can I leave the flywheel on? I don't want to mess the timing up, it's really good right now. I guess it shows how much I know, I'm just assuming that timing can be messed up by removing the flywheel? How far up do I have to lift till I'm free of any pipes/legs and/or shafts? When I'm putting the powerhead back do I have to make sure to align any gears? How hard is it to loosten the throttle cables? I've never done that before.

I'm mulling over making a youtube video of this process...I haven't found a single one that details a powerhead replacement or exhaust seal replacement.

@jerryjerry05, that motor in the video is Eddie's old one before he replaced the powerhead, not mine, He finally got his running earlier this year.
96 powerhead assembly diagram.png
 
Last edited:

Jiggz

Captain
Joined
Oct 23, 2009
Messages
3,909
Before delving into removing the power head which is very doable is to specifically identify the problem first. Since you mentioned there is also exhaust leaks, it is then possible the source of the water leak could be the exhaust gasket which can be replaced without having to remove the powerhead. This is a much easier part to repair except maybe when removing the old bolts which tend to snap. But if you do it carefully and you get lucky you might get away snapped free.

Post pics of the problem and most of forum members in here can give a good diagnose, even on pics.
 

Havlik82

Cadet
Joined
Jun 25, 2014
Messages
20
@Jiggz I will snap a couple of pics, you can distinctly see water spraying out of the driver's side upper seal between the powerhead and the adapter plate near the rear most screw (basically right below the fuel pump area), I'll look a little closer to see if I can find anymore spots. I was assuming the exhaust and water get piped out the same place through the prop and tell tale area? My assumption was that if I have water leaks I also have exhaust leaks, and I can tell you that the motor runs quite a bit better with the top off, and will kill occasionally with the top on, hence my belief that I have an exhaust leak on top of the water in the powerhead case problem.
 
Last edited:

Jiggz

Captain
Joined
Oct 23, 2009
Messages
3,909
That will be great. Obviously, you having actual visual of the symptoms will have a more accurate diagnosis of the problem. And as previously mentioned, lower leg gasket also tend to wear out overtime and the only way to replace them is to remove the powerhead. If you sincerely believe this is the case, then go ahead and order the parts and plan your course of action in removing the PH. Since this is a virgin tour for you, take as many pics as you can as you progress through so you can have reference when it's time to put it back. Mark shift linkages, wires and other interference like control cables, electrical cables, hoses, etc so it will be same when you put it back. If you face difficulties, always post pics of the problem and a good description so you can get prompt and specific responses. Goodluck.
 

smoedog

Petty Officer 1st Class
Joined
Mar 25, 2012
Messages
238
Yes you leave the flywheel on. To remove the throttle cable just pull the retaining nut off and slide the end of the throttle cable.

The first time I did it I changed the driveshaft seal because I was already in there but I really didn't need to, but its so cheap you might as well.

After you have everything disconnected it is only about a 3-4 inch lift off the drive shaft and its free. its best to have a second set of hands to pull stuff out of the way just in case. No gears or anything to mess with, when you go to drop the power head back on , lube up the drive shaft with grease and when you place it on the shaft you might have to rotate the powerhead a little to line up the splines.
 

Havlik82

Cadet
Joined
Jun 25, 2014
Messages
20
Duplicate post deleted
 

Attachments

  • 20140805_192703.jpg
    20140805_192703.jpg
    69.9 KB · Views: 0
  • 20140805_192708.jpg
    20140805_192708.jpg
    65.2 KB · Views: 0
Last edited:

Havlik82

Cadet
Joined
Jun 25, 2014
Messages
20
Update on what I've done so far: I should have done this awhile ago, I bought a compression tester yesterday because I didn't want to tackle this project without double checking the compression for myself (my boat mechanic that did the water pump and impeller said he thought he had checked it, but couldn't remember the readings). I had 121 PSI on both cylinders. I removed the starter, and the carb, took the bottom cowling off, and took the bottom 6 bolts out without any trouble (NO SNAPPED BOLTS...YEAH!) I'm going to disconnect all the electrical/ground wires and the throttle tonight so all I have to do is lift the sucker out when my seals get here. hopefully I don't have any issues with the other screws/bolts. I have a feeling those are the one I need to worry about.
 

Havlik82

Cadet
Joined
Jun 25, 2014
Messages
20
one question I thought of as I look at the diagram...when I pull the powerhead up, I'm going to be pulling it up attached to the adapter plate right? I assume the bolts/screws to remove the adapter plate from the power head will be on the bottom of the adapter plate?
 

smoedog

Petty Officer 1st Class
Joined
Mar 25, 2012
Messages
238
yes you'll be bringing the adapter plate up with it, then there are about 10 bolts and 1 phillips head screw holding the adapter plate to the powerhead. There was no need to pull the starter or carb, hell i would put the starter back on before throwing the powerhead on to make it easier down the road
 
Top