Bellows Replacement Parts List - Alpha 1 Gen 2 - Help Please

enginesilo

Petty Officer 1st Class
Joined
Jun 9, 2008
Messages
355
Can use some help on parts and procedure to change the Bellows on my Alpha 1 Gen 2 Outdrive. The time has finally come to change my bellows on my Alpha 1 Gen 2 with the Mercruiser 3.0. They weren't leaking, but its been many years so I figured it was good time to just do it. I can use some help with ordering parts, and then i'll post separately for help on the procedure.

My gimbal bearing is not making any noise and sounds fine, but its 10 years old so I figured I'd just change it while i'm in there. I'm also going to do the Trim/Tilt sending sensors while everything is apart.


Parts:
Can you all confirm if these are the parts I need to get the job done?

-Alpha 1 Gen 2 transom service kit which includes the gimbal bearing, Part #30-803099T1

-Bellows Adhesive, Part #92-86166Q 1

-Shift Cable (Lower Replacement Cable), Part #865436A02

-Shift Cable Removal Tool, Part #91-12037

-Trim/Tilt Sender and Limit Kit, Part #805320A03

Tools:
I am borrowing the alignment bar, bellows expander ring, and the bellows expander tool, and hinge pin tool from a friend. I'll have to get a slide hammer from somewhere to get the gimbal ring out.

Anything else for parts to get the job done? Any tips or things to know other than have a lot of beer and be ready for lots of cursing?
 

alldodge

Moderator
Staff member
Joined
Mar 8, 2009
Messages
42,649
Looks like you have a good list to do the job. Bt Doctur and Bondo would be the guys for ease of install tricks. As for the gimbal bearing, I wouldn't replace it unless its needed. My 94 Rinker has yet to be changed and still doing fine. Put your fingers inside the bearing and rotate and feel how smooth. If its smooth its good.
 

Bondo

Moderator
Staff member
Joined
Apr 17, 2002
Messages
71,128
Anything else for parts to get the job done? Any tips or things to know other than have a lot of beer and be ready for lots of cursing?

Hi Frank,.... A can of Quicksilver Power Tune,.... 'n Bandaids for yer knuckles,...

The power tune, ya just need a tiny squirt into the drive shaft bellows, when ya push in the aluminum lockin' ring,...
It'll slip right in, rather than Drivin' it with a drivin' tool,...
Also helps in slippin' the new water hose on,...

I too, wouldn't change the gimbel bearin', unless it feels rough,....

Yer gonna end up with an extra shift cable bellows with the kits,....
For the shift cable bellows, toss the metal crimp-ring, 'n use a couple little zip-ties in alternatin' directions, off settin' the locks, for a full circle seal,...

A 1/2" allen key/ socket adapter does the job of the hinge pin tool,...
Some heat on the bellhousin' where the pins screw in, helps soften the loc-tite on 'em,....
I don't use loc-tite goin' back together, but form-a-gasket #3, aka; Perfect Seal,...

Also, never again in my life will I install an exhaust bellows, when I can use the exhaust boot,...
That alone saves the busted knuckles,..... ;)

The trim sender/ switch ain't too bad on the Gen.IIs, but a helper would make it much easier to get aligned, 'n in-place,...

Lastly,.... Follow the factory manual for the proper order to reaasemble in,....
 

achris

More fish than mountain goat
Joined
May 19, 2004
Messages
27,468
Get a can of Power Tune as the lubricate for getting the uni joint bellows on the bell housing...Make sure the retainer ring and bellows are exactly in place and square before you push the retainer in. Make sure you replace the trim senders before fitting the bellows. Tie a length of cord to the engine end of the old shift cable before you pull it out. Then tie the cord to the new one and use it as a guide as you pull it in. Agree with AllDodge about the gimbal bearing. I know of many 20 year old gimbal bearings still working perfectly. If it ain't broke, don't fix it. Don't lose the synthane washers between the gimbal ring and bell housing. Many people don't know they are there and they drop away (unseen) as you remove the hinge pin... Use a 1/4" drive 5/16" socket on an extention rather than a screwdriver to tighten the bellows clamps. I've seen many 'stabbed' bellows when the screwdriver slips.

Best tip, follow the manual... Don't deviate or re-order the steps...

Good luck.

Chris.........
 

Bondo

Moderator
Staff member
Joined
Apr 17, 2002
Messages
71,128
Use a 1/4" drive 5/16" socket on an extention rather than a screwdriver to tighten the bellows clamps.

Ayuh,.... Donno how I forgot that one Chris,...

Can't imagine not havin' a 1/4 drive racket, 2, 6" extensions, a 2", a short 5/16" socket, 'n a swivel adapter to do the job,...
 

JoLin

Vice Admiral
Joined
Aug 18, 2007
Messages
5,146
Ever since I saw Bondo recommend it here, Merc Power Tune has become my 'go to' lubricant for all kinds of things that don't slide together easily. It's amazing.

As for the water hose, try putting it on 'dry' and you'll understand why some refer to it as the the task that can make a grown man cry. Boil some water and put it in an insulated travel mug. soak the end of the hose for a few minutes, spray the transom fitting and inside of the hose with Power Tune, and it'll slip right on. Repeat for the other end. You'll wonder what all the fuss was about.

My .02
 
Last edited:

JASinIL2006

Vice Admiral
Joined
Feb 10, 2012
Messages
5,725
Power Tune works great!

I'd echo Chris' advice to tie a tracer string on the shift cable before you pull out the old cable. I failed to do this (thanks, Mercruiser service manual :mad-new: ). Trying to install the new cable without a tracer to route the cable was a mighty pain in the rear!
 

enginesilo

Petty Officer 1st Class
Joined
Jun 9, 2008
Messages
355
Thanks again for all the awesome tips so far everyone. I was traveling so the project went on hold, but today I made more progress and got everything cleaned up. I have a few specific questions on the process if you guys don't mind sharing.

First off, that Power Tune stuff is AMAZING! The water line went on like a piece of cake, thanks Bondo and achris, and everyone else. That truly was incredible how well it worked!

Here are some specifics.

Oil Line
-Where the reservoir oil line meets the transom housing barb, the bellows kit didn't come with a zip tie or hose clamp. I noticed my boat had a simple zip tie at the transom end, and nothing at the bell housing end. What is recommended at both ends where the oil line meets the transom, and the bell housing?


Loc-tite vs Perfect Seal
-So no Loc-tite anywhere? Perfect seal on all bolts including the hing pins bolts and all?


Order of Process
I went through the manual and it seems like they move around a bit in terms of order, couldn't really follow it step by step since I found certain procedures before others, but I sort of get the process as a whole so i'm mapping it below based on what seems possible.. Can anyone chime in if it sounds proper?

Transom Side:
-Water Line
-Oil Line
-Trim Senders
-Shift Cable Bellows (To Transom-Thanks for the tip Bondo on using Zip Ties instead.)
-Exhaust Bellows (To Transom-I want to attempt an exhaust bellows, if it fails i'll put a tube on instead)
-U-Joint Bellows (To Transom-Think I read some like to place this on the bell housing end first?)

Is it better to feed the shift cable through the shift cable bellows before gluing it on or is it fine to just grease and pass it through?


Bell Housing Side
-Install shift cable into bell housing leaving 2 threads showing (Or is flush better?), place bell housing, and carefully feed cable through the shift cable bellows and route properly.
-Guide U-Joint bellow onto bell housing end.
-Install bell housing screws so it is installed and able to flex on its pivot
-Install U-Joint bellows with ring (I'm going to attempt using the Power Tune instead of the push in tool)
-Install Exhaust Bellows onto bell housing

Any tips appreciated:)
 
Last edited:

alldodge

Moderator
Staff member
Joined
Mar 8, 2009
Messages
42,649
Oil Line
Use either power tune or soap but power tune would be better. Have the tie wrap already on the brass barbed fitting loose before you push the oil line on the transom side. Its not an issue on the bell housing side

No locktite and I'll leave the rest to the other guys
 

enginesilo

Petty Officer 1st Class
Joined
Jun 9, 2008
Messages
355
Oil Line
Use either power tune or soap but power tune would be better. Have the tie wrap already on the brass barbed fitting loose before you push the oil line on the transom side. Its not an issue on the bell housing side

No locktite and I'll leave the rest to the other guys
Thanks AllDodge, heading out to work on it now. Trim senders done, water line done, oil line next, and then everything else. If anyone else has any tips i'm all ears.
 

khe

Petty Officer 1st Class
Joined
Dec 7, 2012
Messages
234
When I replaced my oil hose a few weeks ago, there was a small zip tie at the transom end and a plastic toothed clamp on the bell housing fitting.
 

enginesilo

Petty Officer 1st Class
Joined
Jun 9, 2008
Messages
355
Thanks again everyone. I just did the job today in the last 3 hours or so. Fingers crossed, The job went smooth all the way up until the U-Joint Bellows. Between adhesive getting on my gloves/hands, wondering if it was pushed on enough, etc, I could use a strong drink. Only time will tell now if I get the remaining back together, and then if floats or leaks.

Shift Shaft Removal for Exhaust Bellows Tool.
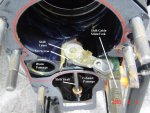
I didn't realize I needed to remove the shift shaft to get the exhaust bellows expander tool inside, can someone share tips on how to remove that? I can see there is a flat head screw head on the upper side, but when I went to try to unscrew it there was no movement. For reference, i'm talking about the shift shaft set screw in the picture I found online. The exhaust bellows sure does sound like a better idea right about now but i'm already in the process with the bellows.

EDIT: I decided to try to take the expander tool apart to get it inside and it let me pass by the shift shaft without removing it. Figured I'd leave this here in case someone searches in the future.

Exhaust Bellows

I left the exhaust bellow to the bell housing for last, I think that's what the manual was suggesting but I'm still not clear what the steps were from A to Z since the manual is definitely written for a mechanic, not a regular weekend warrior like myself.. I can't imagine this is going to be easy trying to get adhesive on it and all. Do I just flex the bell housing upward, get some adhesive in there, and then use the expander tool to get it on and then tighten the clamp? If that ends up failing, is it possible to pull the exhaust bellows off by trimming the engine up? If I remember right I should still be able to put the exhaust tube on without removing anything else. Any tips for each appreciated.

Dry Time
About how long should I wait until I start turning the engine and trimming it up and down to get the trim sensors installed, etc? A day of drying before I start flexing it all around?

Thanks guys.
shift-shaft.jpg
 
Last edited:

alldodge

Moderator
Staff member
Joined
Mar 8, 2009
Messages
42,649
The screw is also a pin which goes clear thru the shift lever. Unscrew it and it should come completely out.

No need to wait for drying, it will hold if the clamps are on correct and tight
 

enginesilo

Petty Officer 1st Class
Joined
Jun 9, 2008
Messages
355
The screw is also a pin which goes clear thru the shift lever. Unscrew it and it should come completely out.

No need to wait for drying, it will hold if the clamps are on correct and tight
Thanks AllDodge,
I'm planning on taking the expander tool apart and attempt to not have to remove the pin, we'll see how that goes. My gas tank is on E so i'm cleaning up for the day, will attempt the exhaust bellows tomorrow, along with get the shift cable core installed and a few other elements.

Every time I touch this boat I learn more and more why I/O mechanics charge what they do :)
 

khe

Petty Officer 1st Class
Joined
Dec 7, 2012
Messages
234
I did the same job on a 1976 888 drive. I took the exhaust bellows expander tool apart to get in in and then re-assembled it - it worked out OK.

The set screw that AllDodge is referring to has red Loctite on it and you'll need to heat it with a propane torch in order to break it loose. You then run the risk of damaging the shift shaft seal.

The flange in the bell housing is oval and the exhaust bellows are round so it will take a bit of effort to get it started. Try doing it without bellows adhesive to learn the technique an then install it with the adhesive.

The 888 project I was referring to started out as just trim limit and position sensors but moved into shift shaft seal replacement, lower shift cable replacement and bellows replacement. I was so glad to be done with that job...
 

Bondo

Moderator
Staff member
Joined
Apr 17, 2002
Messages
71,128
Every time I touch this boat I learn more and more why I/O mechanics charge what they do

Ayuh,... One of the toughest parts is understandin' ya gotta pull stuff ya ain't workin' on, to work on the stuff ya do wanta work on,......
 

enginesilo

Petty Officer 1st Class
Joined
Jun 9, 2008
Messages
355
Ayuh,... One of the toughest parts is understandin' ya gotta pull stuff ya ain't workin' on, to work on the stuff ya do wanta work on,......

Thanks again guys for all the advice so far. So, I misjudged the flat side of the U-Joint bellows like a dummy and didn't have it aligned as far as I should have, and it seems that the water tube pulls at the transom side of the U-joint bellows on the back. Seems like the way the tube sits, it would do this regardless though. I filmed 2 short videos so you can see if its acceptable or if I should pull it. The first video is of the outdrive turned to the right so its naturally in a position to touch it more, then the second video I brought the outdrive turned only a little to the right. Unsure if I could trim the water tube slightly from the bell housing side so it isn't sitting so tight to the back side of the transom housing, or if I should just pull it and redo it getting that flat side aligned.

Video 1:
Attached

Video 2:
In my next post


Time to remove it and start that bellow over, or is it normal?

Pro advice appreciated on this one.
 

achris

More fish than mountain goat
Joined
May 19, 2004
Messages
27,468
Get your fingers in there and try and pull the bellows off. Don't dig your nails in, just use your finger tips. The results are your answer.....
 
Top