Compression issue with Mercruiser 140

wallacejones

Cadet
Joined
Feb 3, 2013
Messages
10
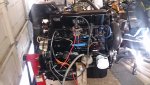
I have a Mercruiser 140 that I have rebuilt because of a leaking 2 piece rear main seal and low compression (115-120psi). It had a rough idle, and was burning oil.

The serial # is 2675390. (Serial Range Mercruiser 120/140 1967-1969 2062141 THRU 2791956).

What I did:
Honed the cylinders. (all of the cylinders were within specs)
Replaced the rings on the pistons.
New rear main seal.
New rod bearings.
New seals all around.

On the head I replaced an exhaust valve on cylinder 4.
Lapped all valves into the seats and leak tested. The valves seal very tighty now.

I adjusted the valves on all cylinders with the correct lash and no play.

The engine is on an engine stand and I have set it up to run from there. It starts right up and sounds and runs much better.

However, the compression is still kinda low, (125psi) across all four cylinders, BUT, if I loosen the valves so that they are "loose" meaning there is a little play when the piston is at TDC, there will be a gap between the top of the valve stem and rocker arm of about 1mm. In this case the compression test indicates normal PSI (135 - 140psi).

This however caused some valve chatter when the engine is running, but the compression is ideal.

Could it be that the valve stems are too long for some reason now due to wear on the face of the valve?

Could it be the lifters are worn? They looked completely fine as well as the cam when I had them out.

Has anyone encountered this before?

Thanks!
 

Bondo

Moderator
Staff member
Joined
Apr 17, 2002
Messages
71,133
I adjusted the valves on all cylinders with the correct lash and no play.

Ayuh,.... Welcome Aboard,..... How, Exactly, did you adjust the valves,..?? in detail,....
 

Scott Danforth

Grumpy Vintage Moderator still playing with boats
Staff member
Joined
Jul 23, 2011
Messages
50,425
as another observation. since you did not replace the cam and lifters. when you had the lifters out, did you number them to make sure they go back to the exact same cam lobes. if not, the lifters on different lobes will eat the lobes.
 

wallacejones

Cadet
Joined
Feb 3, 2013
Messages
10
Hi Bondo, Thanks for the warm welcome!

I watched this video on adjusting the valves.
https://www.youtube.com/watch?v=Y9LjFmRQBjk

When the piston is at the beginning of the compression stroke on the cylinder I am adjusting.
1. Tighten down the nuts on both intake and exhaust until there is no up and down on the push rod.
2. Make a 3/4 turn on the valve nut and it is set (Maybe).

This is the process that led to the compression going down in each cylinder by about 10psi.. Which indicates to me that the valves are not shutting 100% on the compression stroke. I assume this would allow gas air mixture to leak out of the head during compression. This assumption could be wrong. (This is my first engine rebuild, thanks be to the internet )


I did number the lifters and the push rods and put them back in order.

Thanks
 

Bondo

Moderator
Staff member
Joined
Apr 17, 2002
Messages
71,133
I watched this video on adjusting the valves.

Ayuh,..... Youtube is a wonderful thing,..... But,.....

You picked a video done by a nitwit, he's Soooo wrong in so many ways,.....
For one, that motor is Not the Iron Duke,....
The Iron Duke is a Pontiac based GM motor,.....
Our boat motors are a different Chevy based motor,....

2ndly, ya use the timin' marks, not the position of the lifters,....
No reason what so ever to pull the pushrod cover, Just the valve cover,....

I did find this video, that's shows a Great way to find TDC,....
He also explains which valves to adjust, when, as the motor needs to be at TDC for the 1st run through some of the valves, then the motor is rotated 360*, 'n the rest of the valves are adjusted,.....
He also cranks the motor on the starter to pump up the lifters, Before adjustin',....

While many use the spin the pushrod method, I believe it leads to folks adjustin' 'em to tight,.....
In stead of spinnin' the pushrods, I move 'em, Up, 'n Down, til there's No lash, No movement up, 'n down,....
Then tighten 'em 3/4ers of a turn,....

Good Luck, I agree, ya got the valve lash, Waayyy to tight,....
 

wallacejones

Cadet
Joined
Feb 3, 2013
Messages
10
I followed the video instructions on the valve tightening procedure. I also needed to get a new compression tester, the one I was using before had the release valve fail. I also noticed that the old tester was not sealing completely in the plug hole even though it was tight. Got around that for a while by using teflon tape, but it failed completely.

With the valves tightened to specs, i was able to get 135psi on the cylinders. Num.4 was closer to 130psi. (I think I was losing as much as 10psi from the leaky compression tester I was using previously ).

But I'm still baffled by the fact that if the valves were loosened with about 1/16 inch up and down play in the rod lash, the compression was 140psi on all of the cylinders with the new compression tester. It seems obvious the valves were not closing completely on the compression stroke, or closing too late?.

I imagined that if the lifters were just 1/16 - 1/8in taller it would make up the difference, which led me to think the lifters are worn? As mentioned, the lifters looked good, completely flat and no scuffing or wear. Maybe they are just all worn down by 1/8 inch evenly?

So im going to leave it as is right now as 135psi is not bad, but if I find a way to recover the other missing 5-10psi I would be really happy. If it is just a lifter replacement I will be even more happy.


Thanks
 

QBhoy

Fleet Admiral
Joined
Mar 10, 2016
Messages
8,348
Have you heard the Merc 3.0/140 engine running before ? They do have a wee rattle to them...from the lifters. Just the way they are. Just in case.
Also, did you resize the pistons and rings or just replace like for like after honing the cylinders?
 

kenny nunez

Captain
Joined
Jun 20, 2017
Messages
3,341
Another source of noise on the 3.0 is the starter drive ratteling, especially if the bracket on the front of the starter that mounts it to the engine block is loose or missing. The later 3.0 s with the small starter do not seem to have that problem because of their lighter weight.
 

wallacejones

Cadet
Joined
Feb 3, 2013
Messages
10
Hi Qbhoy, I have not really listened to a healthy 3.0/140, at least not enough to make a mental note of how it sounds under normal conditions. My engine now has a low decibel even rattle now that the valves are adjusted correctly. When I had the valves adjusted to loose it was more of a uneven slappy rattle.

I reused the existing pistons which are for a standard 4.0 inch bore. The rings were for a standard bore.

The honing I did was just a surface honing. I did not take any measurable amount of material away.

the measurements for the bores were within specs.

I think the widest part was about 4.001. The bottom of the bore where there is no piston contact was 3.995. A slight taper but within specs.

Having just put the starter motor back on I did not notice any wear and it seems to run quiet.
 

Attachments

  • DSC_0176.jpg
    DSC_0176.jpg
    507.9 KB · Views: 0

wallacejones

Cadet
Joined
Feb 3, 2013
Messages
10
Here is a video of the 140 engine running before I yanked it and rebuilt it. The clacking noise was an exhaust leak under the manifold from cylinder #2. You can see that when I pull the spark plug wire for #2 that the noise stops. At first I thought it was a spun bearing. It is an old style manifold with a heater pipe for the choke, the pipe extends all the way through the manifold through holes on the top and bottom of the manifold. the pipe had worked its way loose and exhaust was exiting out of the hole on the bottom of the manifold. I have some more videos to upload to youtube of after the rebuild. Not in the video, but oil is leaking out of the rear main seal at a pretty good volume.
 

wallacejones

Cadet
Joined
Feb 3, 2013
Messages
10
Here it is running and ready to go back into the boat. Would be nice if one of you talented pros could tell me if it sounds ok. Thanks
 

Bondo

Moderator
Staff member
Joined
Apr 17, 2002
Messages
71,133
Ayuh,..... Sounds just Peachy to Me,.... Drop it in,.... lets go for a Boat Ride,....

The vent hose on yer fuel pump, should be clearish tygon tubin', routed so it can be easily Seen, if the pump diaphragm ruptures,....
Not black rubber hose run down, 'round, 'n under,....

Also, if yer runnin' rubber hose from the fuel pump, to the carb,.....
Use 1 piece, get ridda the extra barb, 'n clamps,.... 'n use coast guard approved A-1 hose,....
 
Joined
Mar 12, 2017
Messages
19
Just a quick question about doing your compression tests, you are holding the throttle open when your spinning the engine over right? I always forget to open up the throttle and get low readings during testing.
 

wallacejones

Cadet
Joined
Feb 3, 2013
Messages
10
The vent hose on yer fuel pump, should be clearish tygon tubin', routed so it can be easily Seen, if the pump diaphragm ruptures,....
Not black rubber hose run down, 'round, 'n under,....

Which is the vent hose on the fuel pump? I have a grey fuel line coming from the portable fuel tank and connected to the fuel pump intake. The outgoing hose, the one that is spliced, is going to be changed out definitely. It kept getting shorter every time the carb came off because I had to cut it at the nipple because it would not slide off unless I damaged it. So I spliced a piece in temporarily.

The fuel pump that came on this engine when I got it was the old style domed pump with the built in fuel filter. It was leaking fuel from the weep hole so it had to go.

The one on there now has no filter, so I certainly should put one inline.. Correct?

Weathersbytaylor, You know, I knew that, but it's a step I overlooked during the last tests that I did. I'll do the compression tests again to be sure.

Thansk
 
Top