- Joined
- Jul 18, 2011
- Messages
- 18,331
The Backstory
I had a 1969 Mercury 7.5 HP motor (S/N 263XXX) for quite some time and did some restoration and upgrades to it. Most significantly I changed the drive shaft to a stainless steel shaft from a 1980 motor. This upgrade gave good salt water running as the carbon steel shaft easily pitted in salt water and caused leakage of the oil seal.
Anyway, the salt water finally took its toll on the powerhead and I decided to retire the motor after 10+ years in the salt. As a replacement, I found a 1972 7.5 HP (S/N 337XXX); got it for $175. Unknown to me at the time was that the 1972-73 7.5 HP/9.8 HP motors had Mercury’s first generation of a capacitor discharge (CD) ignition. This version of the ignition is widely known as the ‘Phase Maker’. Basically, it is a points-based ignition, but the electronics works backwards from the traditional ‘points’ based ignitions.
When I picked up the motor, I tested it for compression and spark. It had really good compression and decent spark. So, in the car the motor went. The motor had not been run in many years, but I got it running after a while and ran a heavy dose of fuel system cleaner through it . . all was good. I used the motor a couple of times and then it would no longer start. It turned out to be an ignition problem . . . no spark.
I replaced much of the wiring in the ignition and purchased a new set of isolation blocks for the ‘maker points’. For anyone troubleshooting or re-building a Phase Maker ignition, Bill Mohat has published a nice write-up on the design and CDI Electronics has a trouble-shooting guide.
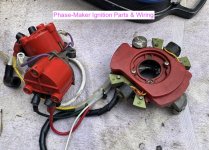
After much effort in rebuilding and testing the Phase Maker, it simply would not generate enough of a spark to run the engine. Ignition parts for this series of motors (early 1970’s) are rare and expensive. Rather than loading up the ‘parts cannon’ with $500 of parts, I decided to take the Phelon Magneto ignition from my now defunct 1969 motor and replace the Phase Maker ignition.
The Process of Changing from Phase-maker to Magneto
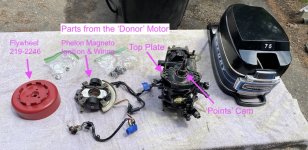
Assuming that you have a ‘donor’ motor, with a complete Phelon Magneto ignition, flywheel, and points cam from a late 1960’s era motor, here are the steps . . .
.
.
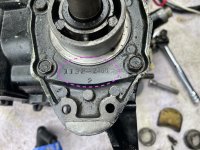
1) Remove the entire Phase Maker ignition (stator, coils, bracket, wiring) from the ‘target’ motor. To do this you will be taking the pull-start housing and flywheel off. Make note of the part number of the top plate (bearing carrier) of the powerhead of the target motor. If it is 1132-2400, you will not need to make any changes to the powerhead, if not then you may need to take the bearing carrier/top plate from the ‘donor’ motor and any shims that it has. Also note that if you are converting a mid-1970's motor, the crankshaft may also be different, in which case you may want to consider going 'forward' in technology, rather than 'backward'.
.
.
.
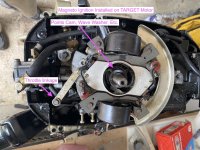
2) Remove the cam from the target motor. Replace the target motor’s cam with the cam from the donor motor (398-2230). Also, make sure to put back the wave washer and woodruff keys for the cam and flywheel.
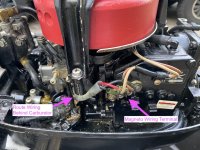
3) Install the Magneto stator and wiring on the target motor, attaching the throttle advance bracket to the throttle lever.
.
.
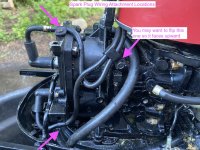
4) Secure the spark plug wiring to the 3 places on the starboard side of the powerhead, and the ignition cut-off wiring to the port side of the powerhead.
.
.
.
5) Install the magneto flywheel (219-2246) on the target motor. Re-install the pull-start of the target motor.
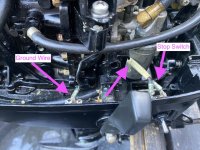
6) The stop switch on the 1970’s era motors was moved to the starboard side of the lower cowling, whereas the 1960’s motors had the stop switch next to the fuel connector. You will need to move the stop switch to the starboard location. Hopefully, the stop switch and ground wiring will be just long enough to snake around the powerhead and BEHIND the carburetor to reach the new location. If not, you will need to make longer wiring for the stop switch and ground. DO NOT RE-USE the target motor’s stop switch, because it works the opposite way of the magneto stop switch.
.
.
(Note that my donor motor has a toggle switch as the stop switch, rather than the push-button type)
7) Replace the ‘life-time’ spark plugs that the phase-maker motors use with traditional spark plugs that the magneto motors use.
8) Test for spark and check for proper throttle advance.
.
.
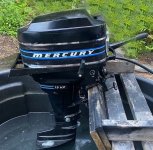
That’s pretty much it! You should have a working "Blue Label" motor.
I had a 1969 Mercury 7.5 HP motor (S/N 263XXX) for quite some time and did some restoration and upgrades to it. Most significantly I changed the drive shaft to a stainless steel shaft from a 1980 motor. This upgrade gave good salt water running as the carbon steel shaft easily pitted in salt water and caused leakage of the oil seal.
Anyway, the salt water finally took its toll on the powerhead and I decided to retire the motor after 10+ years in the salt. As a replacement, I found a 1972 7.5 HP (S/N 337XXX); got it for $175. Unknown to me at the time was that the 1972-73 7.5 HP/9.8 HP motors had Mercury’s first generation of a capacitor discharge (CD) ignition. This version of the ignition is widely known as the ‘Phase Maker’. Basically, it is a points-based ignition, but the electronics works backwards from the traditional ‘points’ based ignitions.
When I picked up the motor, I tested it for compression and spark. It had really good compression and decent spark. So, in the car the motor went. The motor had not been run in many years, but I got it running after a while and ran a heavy dose of fuel system cleaner through it . . all was good. I used the motor a couple of times and then it would no longer start. It turned out to be an ignition problem . . . no spark.
I replaced much of the wiring in the ignition and purchased a new set of isolation blocks for the ‘maker points’. For anyone troubleshooting or re-building a Phase Maker ignition, Bill Mohat has published a nice write-up on the design and CDI Electronics has a trouble-shooting guide.
After much effort in rebuilding and testing the Phase Maker, it simply would not generate enough of a spark to run the engine. Ignition parts for this series of motors (early 1970’s) are rare and expensive. Rather than loading up the ‘parts cannon’ with $500 of parts, I decided to take the Phelon Magneto ignition from my now defunct 1969 motor and replace the Phase Maker ignition.
The Process of Changing from Phase-maker to Magneto
Assuming that you have a ‘donor’ motor, with a complete Phelon Magneto ignition, flywheel, and points cam from a late 1960’s era motor, here are the steps . . .
.

.
1) Remove the entire Phase Maker ignition (stator, coils, bracket, wiring) from the ‘target’ motor. To do this you will be taking the pull-start housing and flywheel off. Make note of the part number of the top plate (bearing carrier) of the powerhead of the target motor. If it is 1132-2400, you will not need to make any changes to the powerhead, if not then you may need to take the bearing carrier/top plate from the ‘donor’ motor and any shims that it has. Also note that if you are converting a mid-1970's motor, the crankshaft may also be different, in which case you may want to consider going 'forward' in technology, rather than 'backward'.
.

.

.
2) Remove the cam from the target motor. Replace the target motor’s cam with the cam from the donor motor (398-2230). Also, make sure to put back the wave washer and woodruff keys for the cam and flywheel.
3) Install the Magneto stator and wiring on the target motor, attaching the throttle advance bracket to the throttle lever.
.

.
4) Secure the spark plug wiring to the 3 places on the starboard side of the powerhead, and the ignition cut-off wiring to the port side of the powerhead.
.

.

.
5) Install the magneto flywheel (219-2246) on the target motor. Re-install the pull-start of the target motor.
6) The stop switch on the 1970’s era motors was moved to the starboard side of the lower cowling, whereas the 1960’s motors had the stop switch next to the fuel connector. You will need to move the stop switch to the starboard location. Hopefully, the stop switch and ground wiring will be just long enough to snake around the powerhead and BEHIND the carburetor to reach the new location. If not, you will need to make longer wiring for the stop switch and ground. DO NOT RE-USE the target motor’s stop switch, because it works the opposite way of the magneto stop switch.
.

.
(Note that my donor motor has a toggle switch as the stop switch, rather than the push-button type)
7) Replace the ‘life-time’ spark plugs that the phase-maker motors use with traditional spark plugs that the magneto motors use.
8) Test for spark and check for proper throttle advance.
.

.
That’s pretty much it! You should have a working "Blue Label" motor.
Last edited:


