


MikeSchinlaub
Senior Chief Petty Officer
- Joined
- Jan 14, 2025
- Messages
- 692
Fiberglass Repair Walkthrough ( Mods, since this is so large, I'm going to try to post roughly half of this as a reply. I don't know how well it will work, so please wait until I'm done before commenting.)
Introduction
I've been repairing boats for almost 12 years at this point. I've only ever done this at work, so I only have experience with the materials we use. This is a guide on how to fix damage in fiberglass, using pictures of a small area I'm currently working on.
Hope this helps.
1. Safety
Don't skip on the PPE. Gel coat is plastic, fiberglass is literally glass strands suspended in hardened resin, which is just more plastic. When you grind, you're turning all of that into fine dust and throwing it into the air. You don't want any of this in your lungs, eyes, or skin if you can help it. You may also be exposed to toxic fumes from the resin and gel curing, and other hazardous chemicals. You will need disposable gloves, safety glasses, and dust masks at a minimum. If you will be doing a lot of glassing or gel coating in a confined area, you will also need a respirator with organic vapor filters. When I grind, even small areas, I like to use a Tyvek suit with hood, full face respirator, and latex gloves with the wrists taped to the suit sleeves. I've had enough of that stuff in my eyes and skin over the years.
2. Tools
It should be mentioned that air tools will be impractical for most people, unless you have a large capacity air compressor with high CFM. Air tools use a LOT of air. I have them because I work in a body shop, there will be either electric or hand tool alternatives for anything here.
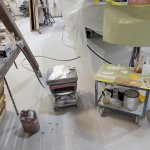
Grinders. Below are some examples of grinders. These are die grinders, with various attachments. You might be familiar with 3M's Roloc discs, which is the purple one. These work well, but I prefer the metal grinding discs. They last far longer, and the grit wraps around the edge onto the back side just a little. This has come in handy loads of times. They don't work well on wood though. The bits in the pouch and in the straight grinder are called Carbide Bits. These are sometimes useful in tight spaces and corners, but likely won't be needed for most DIY repairs.

You could also use an electric grinder with heavy grit sanding discs, but these will be too large for many small jobs, and lack the finer control of the die grinders.
Fiberglass Tools. Brush, roller, scissors, and gloves. Get the cheapest brush you can find. Once you use it for resin, it shouldn't be used for anything else, and the resin might set up in the brush if you don't clean it out fast enough. There's no point in getting a high quality brush. There are also a few kinds of rollers. The one shown is all I've ever used. There are ones made for corners, they look like tiny blunt pizza cutters, but I've never needed or used one. Really, if the corner is that sharp, the glass will likely lift out anyway.

3. Materials
This is where my experience is a bit limited. There are so many kind of fiberglass, resin, and gel coats, and we just don't use most of them. That being said, what we use works and there are no compatibility issues with anything.
The fiberglass we use is 1.5oz Chopped Strand Mat (CSM)

Fiberglass Cloth, also known as Woven Roving (continuous strands woven together at 90 degrees)

and Byply (Roving with a layer of CSM stitched to one side).

For pretty much any exterior fix, you will only need CSM. Roving and byply should be kept to interior structural repairs, such as stringer and transoms. This is because what makes the cloth strong is having long unbroken strands. So if you use it for small repairs, or sand through it during bodywork, you shorten the strands and defeat the purpose of using it.
We only use polyester resin. From reading stuff here, I think it's finishing resin because the surface isn't tacky when cured. The barrels we get don't specify though, it just says polyester resin. Polyester is what the factory uses, so there are no compatibility issues. Epoxy resin can't be used with CSM because the epoxy doesn't dissolve the adhesive used to bind the fiberglass together.
The polyester uses MEKP Hardener. Be very careful with this, as it will cause chemical burns if it gets on your skin or eyes. If you get any on you, wash it off immediatly with soap and water, or rinse your eyes out with water for 15 minutes (that's what the caution on the container says). Once mixed into the resin, it isn't as bad. I've gotten planty of resin on my arms as I'm working and never had any burns. Of course, I still recomend wiping it off as soons as possible with acetone (water won't take resin off). You might start feeling a burn through your gloves if you're working for a long time, but the gloves will protect you.If you happen to get this by the gallon, take a look at the cap. There is a small hole in the cap, with a plastic seal set into the cap, which also has a hole in it. The holes are offset. I think it's to prevent pressure build up. Be careful not to lose the seal, always tilt away from you when picking up the bottle, and wear gloves and glasses whenever you're doing anything with it.
You might need a thickener to make resin putty. We use Aerosil, which is a fumed silica powder.
You will need acetone for clean up, plastic deli cups for resin, and stir sticks. I would also suggest an empty gallon paint can to keep your brush and roller in.
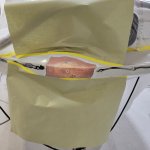
You will need materials to mask you work area. Masking tape and paper or plastic. I wouldn't use newspaper, it's too thin and will likely soak through with resin and stick to whatever surface it touches. I mask the surface of my table, so I recommend avoiding anything with wax or any other coating, just to be sure it doesn't contaminate the resin. Thin plastic would also stick to the glass and lift up with it, so use masking paper or thicker plastic. I use automotive masking paper, and it has never soaked through and stuck unless there was a cut or tear.
4. Grinding
Now we get to the actual work. You will need to grind out any damage. Damage to the glass can extend well past the damage visible to the gel coat. It can also be the opposite, with cracks in the gel extending farther than damage to the glass. Sometimes the cracks are only in the gel. The only way to know for sure is to grind down to the glass.

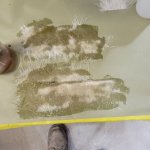
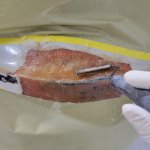
You will need to grind any cracks, white areas, and possibly air voids. When you are done, you should have a generous bevel, the glass should be solid with no white areas or flaking, and no sharp edges. Here is a picture of just the gel ground off to show damage.

This is after grinding the damage out. Those small holes and areas that are showing foam will be filled with resin putty to give the glass a surface to stick to. If you have large holes, you will need to attach a solid backing surface to the inside. Notice that I didn't grind the white around the one small hole. That was a rub rail screw, and isn't actually damage. The layers have seperated a bit, but this will happen wherever a screw is in the glass. Usually, boats will have a line cut through the gel above the screw line to keep cracks from spreading above the rub rail, but not this one. Cracks are also common around any screwed on hardware. This could be prevented by counter sinking the screw hole, but manufacturers don't take the extra time to do it.

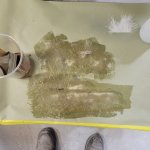
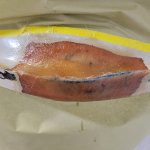
Finish by hand sanding with some 80 grit to smooth out any sharp edges. Fiberglass absolutely HATES sharp corners, you need to sand any corners to be as generously rounded as possible. There is a way to try to work with sharp corners you may miss, or aren't practical to eliminate, which will be covered later.
Air voids might not be practical to completely grind out. These happen because the fiberglass strands want to lay flat, and when pressed into corners such as a chine, it will spring back to flat. In theory, these air voids could extend the entire length of the point, so I wouldn't recommend chasing them. Just grind enough to fix the damage to the fiberglass and pack the air void with some thickened resin to provide a surface for your repair.
Introduction
I've been repairing boats for almost 12 years at this point. I've only ever done this at work, so I only have experience with the materials we use. This is a guide on how to fix damage in fiberglass, using pictures of a small area I'm currently working on.
Hope this helps.
1. Safety
Don't skip on the PPE. Gel coat is plastic, fiberglass is literally glass strands suspended in hardened resin, which is just more plastic. When you grind, you're turning all of that into fine dust and throwing it into the air. You don't want any of this in your lungs, eyes, or skin if you can help it. You may also be exposed to toxic fumes from the resin and gel curing, and other hazardous chemicals. You will need disposable gloves, safety glasses, and dust masks at a minimum. If you will be doing a lot of glassing or gel coating in a confined area, you will also need a respirator with organic vapor filters. When I grind, even small areas, I like to use a Tyvek suit with hood, full face respirator, and latex gloves with the wrists taped to the suit sleeves. I've had enough of that stuff in my eyes and skin over the years.
2. Tools
It should be mentioned that air tools will be impractical for most people, unless you have a large capacity air compressor with high CFM. Air tools use a LOT of air. I have them because I work in a body shop, there will be either electric or hand tool alternatives for anything here.
Grinders. Below are some examples of grinders. These are die grinders, with various attachments. You might be familiar with 3M's Roloc discs, which is the purple one. These work well, but I prefer the metal grinding discs. They last far longer, and the grit wraps around the edge onto the back side just a little. This has come in handy loads of times. They don't work well on wood though. The bits in the pouch and in the straight grinder are called Carbide Bits. These are sometimes useful in tight spaces and corners, but likely won't be needed for most DIY repairs.
You could also use an electric grinder with heavy grit sanding discs, but these will be too large for many small jobs, and lack the finer control of the die grinders.
Fiberglass Tools. Brush, roller, scissors, and gloves. Get the cheapest brush you can find. Once you use it for resin, it shouldn't be used for anything else, and the resin might set up in the brush if you don't clean it out fast enough. There's no point in getting a high quality brush. There are also a few kinds of rollers. The one shown is all I've ever used. There are ones made for corners, they look like tiny blunt pizza cutters, but I've never needed or used one. Really, if the corner is that sharp, the glass will likely lift out anyway.
3. Materials
This is where my experience is a bit limited. There are so many kind of fiberglass, resin, and gel coats, and we just don't use most of them. That being said, what we use works and there are no compatibility issues with anything.
The fiberglass we use is 1.5oz Chopped Strand Mat (CSM)
Fiberglass Cloth, also known as Woven Roving (continuous strands woven together at 90 degrees)
and Byply (Roving with a layer of CSM stitched to one side).
For pretty much any exterior fix, you will only need CSM. Roving and byply should be kept to interior structural repairs, such as stringer and transoms. This is because what makes the cloth strong is having long unbroken strands. So if you use it for small repairs, or sand through it during bodywork, you shorten the strands and defeat the purpose of using it.
We only use polyester resin. From reading stuff here, I think it's finishing resin because the surface isn't tacky when cured. The barrels we get don't specify though, it just says polyester resin. Polyester is what the factory uses, so there are no compatibility issues. Epoxy resin can't be used with CSM because the epoxy doesn't dissolve the adhesive used to bind the fiberglass together.
The polyester uses MEKP Hardener. Be very careful with this, as it will cause chemical burns if it gets on your skin or eyes. If you get any on you, wash it off immediatly with soap and water, or rinse your eyes out with water for 15 minutes (that's what the caution on the container says). Once mixed into the resin, it isn't as bad. I've gotten planty of resin on my arms as I'm working and never had any burns. Of course, I still recomend wiping it off as soons as possible with acetone (water won't take resin off). You might start feeling a burn through your gloves if you're working for a long time, but the gloves will protect you.If you happen to get this by the gallon, take a look at the cap. There is a small hole in the cap, with a plastic seal set into the cap, which also has a hole in it. The holes are offset. I think it's to prevent pressure build up. Be careful not to lose the seal, always tilt away from you when picking up the bottle, and wear gloves and glasses whenever you're doing anything with it.
You might need a thickener to make resin putty. We use Aerosil, which is a fumed silica powder.
You will need acetone for clean up, plastic deli cups for resin, and stir sticks. I would also suggest an empty gallon paint can to keep your brush and roller in.
You will need materials to mask you work area. Masking tape and paper or plastic. I wouldn't use newspaper, it's too thin and will likely soak through with resin and stick to whatever surface it touches. I mask the surface of my table, so I recommend avoiding anything with wax or any other coating, just to be sure it doesn't contaminate the resin. Thin plastic would also stick to the glass and lift up with it, so use masking paper or thicker plastic. I use automotive masking paper, and it has never soaked through and stuck unless there was a cut or tear.
4. Grinding
Now we get to the actual work. You will need to grind out any damage. Damage to the glass can extend well past the damage visible to the gel coat. It can also be the opposite, with cracks in the gel extending farther than damage to the glass. Sometimes the cracks are only in the gel. The only way to know for sure is to grind down to the glass.
You will need to grind any cracks, white areas, and possibly air voids. When you are done, you should have a generous bevel, the glass should be solid with no white areas or flaking, and no sharp edges. Here is a picture of just the gel ground off to show damage.
This is after grinding the damage out. Those small holes and areas that are showing foam will be filled with resin putty to give the glass a surface to stick to. If you have large holes, you will need to attach a solid backing surface to the inside. Notice that I didn't grind the white around the one small hole. That was a rub rail screw, and isn't actually damage. The layers have seperated a bit, but this will happen wherever a screw is in the glass. Usually, boats will have a line cut through the gel above the screw line to keep cracks from spreading above the rub rail, but not this one. Cracks are also common around any screwed on hardware. This could be prevented by counter sinking the screw hole, but manufacturers don't take the extra time to do it.
Finish by hand sanding with some 80 grit to smooth out any sharp edges. Fiberglass absolutely HATES sharp corners, you need to sand any corners to be as generously rounded as possible. There is a way to try to work with sharp corners you may miss, or aren't practical to eliminate, which will be covered later.
Air voids might not be practical to completely grind out. These happen because the fiberglass strands want to lay flat, and when pressed into corners such as a chine, it will spring back to flat. In theory, these air voids could extend the entire length of the point, so I wouldn't recommend chasing them. Just grind enough to fix the damage to the fiberglass and pack the air void with some thickened resin to provide a surface for your repair.
Attachments
-
 20250224_104620.jpg1.1 MB · Views: 4
 -
 20250224_110128.jpg2.2 MB · Views: 4
 -
 20250224_110705.jpg910.4 KB · Views: 6
 -
 20250224_110831.jpg1.1 MB · Views: 5
 -
 20250224_110855.jpg1.2 MB · Views: 3
 -
 20250224_111102.jpg1.1 MB · Views: 4
 -
 20250224_111857.jpg1.2 MB · Views: 5
 -
 20250224_112213.jpg2.6 MB · Views: 4
 -
20250225_124854.jpg2 MB · Views: 0