Ihateclevernames
Seaman
- Joined
- Sep 6, 2015
- Messages
- 67
So, where to begin........
Last year I purchased my first boat and got somewhat burned by the previous owner. I am pretty sure the guy did a quick flip on it by adding some bells and whistles, along with some krylon and called it good. Aside from the Motor shooting craps on me due to thermostat issues, the boat has turned out to be nothing but problems. Luckily, I didn't pay an arm and a leg for it so at the end of the day...........if I can get things back in order, I will be somewhat happy.
The upside is that I did come across a new motor and have a mechanic doing a tune up on it as we speak. It isn't exactly the same as the one that blew, but pretty close. Still part of the same OMC family, so it will give me options. I will be out the electric start until I can figure out what needs to be rewired, but thats the least of my worries.
So, lets start with the hull.
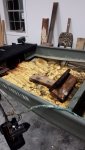
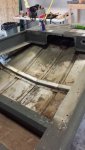
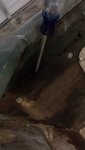
From the get go, this boat was HEAVY. Quite the PITA to move around the driveway and manipulate. After stripping off the plywood decks that the previous owner had on there, I uncovered the disaster that was more than likely 17 cans of spray foam and 15 gallons of water trapped underneath the bow between what was absorbed in the foam and what was pooled up.
See Below.
I removed all of the foam and water and began cleaning it up as I am sure there needs to be some sort of foam in the bow, it most certainly won't consist of rotting wood and water logged spray foam.
Anyone have any insight on what type of foam should be underneath the factory deck? (which appears to have been removed and replaced with construction grade plywood).
Moving on to the transom area and rear portion.
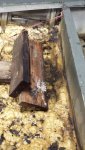
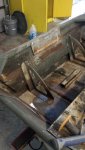
I removed part of the rear seat area as well. This will allow me to replace the transom, which is rotted and not suitable for use long term. The portions of the seats that had to be removed had foam underneath them, however it appeared to be factory and wasn't in the worst shape. I had to drill out the rivets in order to remove them in several areas, which I didn't like...........however replacing the transom is necessary, so I will have to re-rivet them and use some 5200 epoxy or something like that during the installation process.
As you can see below, I have several other rivets that need to be removed as well in order to get the transom wood out. and replace it.
I am assuming that I will need several different sizes of rivets (closed end) in order to put everything back together, but I will worry about that later.
Right now the priorities are cleaning off the JB weld and bondo mess over a few damaged areas and see if someone can repair it with a TIG welder, and replacing the transom board.
This will be an enduring project as would like to take my time with this and do it right versus having to do things over and over again.
Any input on what size plywood to use as the transom board? 1 board? 2 boards? I will have a 35HP Evinrude on there, with a jack plate that raises the motor up about 4 inches and acts as an attachment point for the motor.
Thanks for any input in advance guys, hopefully this is something that I can at least salvage in order to get back out on the water before the end of the year!
Andy
Last year I purchased my first boat and got somewhat burned by the previous owner. I am pretty sure the guy did a quick flip on it by adding some bells and whistles, along with some krylon and called it good. Aside from the Motor shooting craps on me due to thermostat issues, the boat has turned out to be nothing but problems. Luckily, I didn't pay an arm and a leg for it so at the end of the day...........if I can get things back in order, I will be somewhat happy.
The upside is that I did come across a new motor and have a mechanic doing a tune up on it as we speak. It isn't exactly the same as the one that blew, but pretty close. Still part of the same OMC family, so it will give me options. I will be out the electric start until I can figure out what needs to be rewired, but thats the least of my worries.
So, lets start with the hull.
From the get go, this boat was HEAVY. Quite the PITA to move around the driveway and manipulate. After stripping off the plywood decks that the previous owner had on there, I uncovered the disaster that was more than likely 17 cans of spray foam and 15 gallons of water trapped underneath the bow between what was absorbed in the foam and what was pooled up.
See Below.
I removed all of the foam and water and began cleaning it up as I am sure there needs to be some sort of foam in the bow, it most certainly won't consist of rotting wood and water logged spray foam.
Anyone have any insight on what type of foam should be underneath the factory deck? (which appears to have been removed and replaced with construction grade plywood).
Moving on to the transom area and rear portion.
I removed part of the rear seat area as well. This will allow me to replace the transom, which is rotted and not suitable for use long term. The portions of the seats that had to be removed had foam underneath them, however it appeared to be factory and wasn't in the worst shape. I had to drill out the rivets in order to remove them in several areas, which I didn't like...........however replacing the transom is necessary, so I will have to re-rivet them and use some 5200 epoxy or something like that during the installation process.
As you can see below, I have several other rivets that need to be removed as well in order to get the transom wood out. and replace it.
I am assuming that I will need several different sizes of rivets (closed end) in order to put everything back together, but I will worry about that later.
Right now the priorities are cleaning off the JB weld and bondo mess over a few damaged areas and see if someone can repair it with a TIG welder, and replacing the transom board.
This will be an enduring project as would like to take my time with this and do it right versus having to do things over and over again.
Any input on what size plywood to use as the transom board? 1 board? 2 boards? I will have a 35HP Evinrude on there, with a jack plate that raises the motor up about 4 inches and acts as an attachment point for the motor.
Thanks for any input in advance guys, hopefully this is something that I can at least salvage in order to get back out on the water before the end of the year!
Andy