Head Gasket Replace, 1998 Mercury Force 120hp

Themanofsteel

Petty Officer 1st Class
Joined
Jul 11, 2015
Messages
312
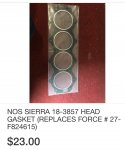
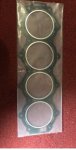
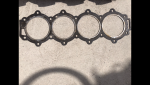
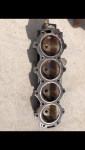
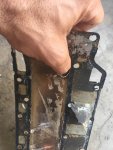
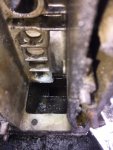
I have a 1998 Mercury Force 120hp. My bottom and second from bottom spark plugs rust after taking it out. I figured the gasket is possibly blown so I want to replace.
I have the gasket.
I cant find info on how to proceed and what I should and should not do.
A few questions I have...
1. Will I need a torque wrench?
2. Should I add sealer to the gasket or put on just as is?
3. Do the screws need to be tightened in a sequence, if so what sequence.

Ill take any other advise or tips anyone has.
 

Nordin

Commander
Joined
Jun 12, 2010
Messages
2,596
Yes you will need a torque wrench, no sealer at the gasket and you shall torque in a circular pattern starting from the middle.
Do the torque in at least three steps.
I do not know the final torque value of the headbolts maybe jerryjerry or pnwboat chime in, they will have the value in there minds.
Otherwise I will look it up and give you the value.
 

jerryjerry05

Supreme Mariner
Joined
May 7, 2008
Messages
18,089
The tightening should be done in 3 steps.
#1 at 14# #2 at 18# and #3 at 20#

Some run it an few hrs. and then re-torque.
The gasket has a built in silicone sealer.
Once it gets hot it melts and seals.

Rust on bottom plugs: could be the gaskets bad.
What compression readings on the motor?

I think these 120's were designed with lower comp on the top and bottom cyl.(or was that the other way??)

If it's not too late do a comp test.

Pics of the gasket???
 

Themanofsteel

Petty Officer 1st Class
Joined
Jul 11, 2015
Messages
312
All the cylinders read about 170+ except the bottom. It was about 150 compression. I bought the Gasket on eBay. Pics attached.
 

Attachments

  • photo289242.jpg
    photo289242.jpg
    128.7 KB · Views: 2
  • photo289243.jpg
    photo289243.jpg
    99.2 KB · Views: 3

Themanofsteel

Petty Officer 1st Class
Joined
Jul 11, 2015
Messages
312
Here Are the pics. The gasket actually looks ok but there was a little water in the bottom cylinder. I ran it a few minutes before taking it off.
 

Attachments

  • photo289349.png
    photo289349.png
    1.1 MB · Views: 5
  • photo289350.png
    photo289350.png
    1.4 MB · Views: 5
  • photo289351.png
    photo289351.png
    1.3 MB · Views: 5
  • photo289352.png
    photo289352.png
    1.3 MB · Views: 5

Themanofsteel

Petty Officer 1st Class
Joined
Jul 11, 2015
Messages
312
Since the gasket looked good I searched around for anyone having had a similar problem on this engine. Found a someone who had the exact same problem, link below. Water in the two bottom cylinders on a Force 120hp.

The issue was a crack in the Exhaust Plate. If that is my problem, where is the exhaust plate located? And is it a easy are hard fix? If I need to go there.

w w w. marineengine. com/boat-forum/showthread.php?250003-120hp-Force-water-in-cylinders
 

jerryjerry05

Supreme Mariner
Joined
May 7, 2008
Messages
18,089
The exhaust chest is the big flat piece on the left side of the motor.
The screws holding it in place are small and the heads will twist off if you barely touch them.

So be careful when removing.
WD-40 Krol or any penetrating oil.
I use a mix of power steering fluid and acetone.
Spray and then use a propane torch to heat them, then a small hammer to tap on the head.
You'll need to lower the bottom cover to access the screws.

The bottom screws are the worst to get off.
 

Themanofsteel

Petty Officer 1st Class
Joined
Jul 11, 2015
Messages
312
So behind this is the exhaust plate? According to online it has 2 gaskets. So If the plate it cracked it would let water in? I found a part on ebay. Part #819779
 

Attachments

  • photo289392.jpg
    photo289392.jpg
    1.7 MB · Views: 4
  • photo289393.jpg
    photo289393.jpg
    256.3 KB · Views: 3
Last edited:

Themanofsteel

Petty Officer 1st Class
Joined
Jul 11, 2015
Messages
312
I tied torching the screws to loosen them. I removed 1 screw ok but I broke the head off 2. These screws are so cheap. I keep trying to torch them but they are too tight. How hot should I get them?
 

Nordin

Commander
Joined
Jun 12, 2010
Messages
2,596
It is hard to tell how much you should heat them.
The purpose of heating is that the screws (made of stainless steel) and engine block (made of aluminium alloy) should expand.
Because of stainless steel and aluminium alloy expand different this makes the "white rust stuff" in the threads and the hole starts to move. and make the screw to loose.
Also the taping at the screw makes it to move.

The important thing is to be patient, patient and patient, do this things heating, taping and use penetrating oil for a long time.
Maybe you have to do it 1-2 times a day in over a week.

Some screw maybe still snap BUT as many screws you will undo with out snaping as possible the better.
Drilling out and rethread is a PIA.
 

pnwboat

Rear Admiral
Joined
Oct 8, 2007
Messages
4,251
A couple of tips for drilling the broken bolts.

1. It's sometimes hard to get the drill bit centered on the broken bolt, especially if it's broken off at an angle. If it's possible, flatten the top of the bolt with a grinder. Use a center punch and a hammer to punch a dimple in the center of the bolt. The dimple will help keep the drill bit centered.

2. If your standard High Speed Steel drill bits don't seem to be drilling very well, make sure that they are sharp. If still no luck, you can try using Cobalt drill bits. Cobalt is harder than High Speed Steel. Which ever one, make sure they are sharp.

3. The factory bolt size is 1/4 X 20 thread. It is possible to drill and tap one size bigger 5/16 X 18 on some of the holes (depending on how much metal is around the hole) if you inadvertently drill too much into the surrounding metal.

Good luck!

NOTE: Water is behind the stainless steel exhaust plate. Engine cooling water is pumped vertically up the exhaust plate and into the block.
 

jerryjerry05

Supreme Mariner
Joined
May 7, 2008
Messages
18,089
Be real careful when ordering the new gaskets and plate.
They made 2 different ones.
The older looks the same but the holes don't line up.
That is the part# but make sure that's what you get.
Some people sell parts for the older models as parts for a newer block( I know, I made that mistake or should say I bought their mistake)
 

Themanofsteel

Petty Officer 1st Class
Joined
Jul 11, 2015
Messages
312
Ok. Thanks everyone for all the info. I’ll update when I get this done.

I noticed the bolts don’t thread into the otter Cover, only to the engine. I should be able to remove the cover plate without drilling out the broken screws right? Should slide out I think. Then use vice grips to remove.
 
Last edited:

jerryjerry05

Supreme Mariner
Joined
May 7, 2008
Messages
18,089
Your right no threads on the cover.
Sometimes the amount of screw left isn't enough to grip.
 

Themanofsteel

Petty Officer 1st Class
Joined
Jul 11, 2015
Messages
312
I was able to remove the exhaust chest and the plate. As you can see from the attached picture it was cracked, near my thumb.

The only problem was I broke several heads to remove the exhaust chest but fortunately I can grab them with with vice grips but they are really stuck good.

FYI, these bolts were not stainless. Some were rusting. They were brass color. Maybe coated steal. Really weak.
 

Attachments

  • photo289521.jpg
    photo289521.jpg
    1.8 MB · Views: 5
Last edited:

jerryjerry05

Supreme Mariner
Joined
May 7, 2008
Messages
18,089
That's the first one I've seen with a hole in it.

The screws. Spray, heat, tap. let cool, repeat, again and again.
Your trying to breakup the corrosion that's built up around the threads.

One time I was changing the thermostat on a 1987 125.
I worked on that sucker for over 3 hrs.
And still broke a screw.
 

pnwboat

Rear Admiral
Joined
Oct 8, 2007
Messages
4,251
I used stainless steel bolts the last time I replaced the gasket on my exhaust cover. They were about 1/4" longer than the original, so I put a flat washer and a split ring lock washer and it has worked fine. I also used some anti-seize grease on the bolt threads.
 

Themanofsteel

Petty Officer 1st Class
Joined
Jul 11, 2015
Messages
312
I dropped a bolt down inside this shaft. How can I get to it?
 

Attachments

  • photo289614.jpg
    photo289614.jpg
    1.7 MB · Views: 2
Top