Help Identify Sterndrive Parts

morebacon

Seaman
Joined
Jun 3, 2016
Messages
58
So I've tried changing my water pump impeller with a kit for my Alpha 1 Gen II. First off, when I've separated the upper from the lower unit, these two metal parts came off. I've looked multiple times in the service manual, but I can't seem to figure out where from. Anyone know?

_1.png


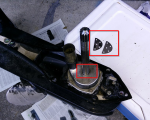
And one more question - my kit didn't have the seal for the drive shaft (http://www.iboats.com/Face-Seal-Tool-18-2599-Sierra/dm/view_id.172013) and it didn't come off from the upper unit when I've separated them. So I've started prying the upper unit seal thinking it got stuck there. But then I've noticed that underneath it had some metallic spring "seal" (hope the pictures below are clear enough to get an idea what I'm talking about).

Is this some other seal? I've broken a part of it trying to get it out, do I need to replace it now and how?

_3.png _2.png

I don't see any metallic spring in these diagrams (http://www.iboats.com/Mercruiser-Gen-II-Lower-Gearcase-Assembly-Exploded-View/dm/view_id.272971) so I'm quite confused now :|
 

Attachments

  • _1.png
    _1.png
    874.6 KB · Views: 0

achris

More fish than mountain goat
Joined
May 19, 2004
Messages
27,468
The 2 metal parts are the remains of your exhaust shutters. That is a good indicator that at some stage the engine was run without water. The rubber has been burnt off then and they have fallen down through the exhaust system and lodged in the drive.

As for the damaged seal in the bottom of the top box, you have a problem there. Both of those seals are installed from the inside of the box, the first things to go in on assembly. It was the older drives (pre-1991) that has the bottom of the 2 seals installed from the underside. In order to replace your seals, you are going to need to fully strip the top box (not as difficult as it sounds). That spring you see coming out of the seal is the garter spring that helps the seal seal.

The only special tools you'll need are the front cover nut spanner (iboats sells them very nicely thank you :)) and a seal driver. Remove the cover nut from the front of the drive and pull the drive gear and bearing assembly out as a single unit. Takle care with the the shims in behind the assembly. You'll need to put back in all and only those that came out. Next use a 12 point 3/8" socket and remove the top cover. Lift the driven gear and its bearing out. You now have access to the seals. Flip them out and drive the new ones in. Drop the driven gear and bearing back in. Put the shims back into the front of the drive and slide the drive gear and bearing assembly in, watching that the drive gear engages properly with the driven gear. Tighten the cover nut with the special spanner to 200 #/ft. put a good quality marine grease on the top cover screws and install them at 20#/ft.... The seals required are in the seal kit # 26-88397A1. (i wouldn't both replacing the seals and 'O' ring n the drive gear and bearing assy. Replace all others.)

Chris........
 
Last edited:

morebacon

Seaman
Joined
Jun 3, 2016
Messages
58
Thanks for the details folks, they were very helpful! I did manage to have the drive shaft disassembled today.

The spanner tool would have taken too long to get shipped, so I had to improvise. I found this plumbing wrench at Home Depot that did the job just fine, without damaging the retainer:

_4.png _5.png

Now I'm struggling to get rid of the old seals. Any better way than just trying to pry them off with a screwdriver?

Two more questions:

- manual says to remove the bearing cup, but I don't see any. Is is possible mine doesn't have one?

- there are so many different filters in the kit, which one do I use?

_6.png
 

Bt Doctur

Supreme Mariner
Joined
Aug 29, 2004
Messages
19,363
remove the horiz shaft first, don't lose the shims ,then remove the top cap and pull out the vert shaft, then replace the 2 seals
 
Last edited:

morebacon

Seaman
Joined
Jun 3, 2016
Messages
58
Yup, this is where I'm at right now, but I don't see any bearing cup like in the manual nor am I able to take the seals out. They've started to break apart when I tried pulling them out.
_9.png _8.png _7.png
 

Bt Doctur

Supreme Mariner
Joined
Aug 29, 2004
Messages
19,363
open that link, the manual shows using a long screwdriver pushing them into the top of the case to remove them, you install the new seals from the inside driving them downward
 

Fishermark

Vice Admiral
Joined
Oct 19, 2003
Messages
5,617
Glad you got the plumbing tool to work for you... but hope you went ahead and ordered the wrench. You will need it to torque the nut back on to the proper spec. Which is very high! It will take a lot of torque to get the nut back on correctly.
 

morebacon

Seaman
Joined
Jun 3, 2016
Messages
58
Glad you got the plumbing tool to work for you... but hope you went ahead and ordered the wrench. You will need it to torque the nut back on to the proper spec. Which is very high! It will take a lot of torque to get the nut back on correctly.

Yeah, will get a real tool for sure, though I'm hopeful the plumbing tool will work in reverse too.

open that link, the manual shows using a long screwdriver pushing them into the top of the case to remove them, you install the new seals from the inside driving them downward

Managed to get most of it out, but because adhesive was used there are still pieces that I can't get off. Tried with a wire brush, but not too much difference. How important is to get everything perfectly clean?
 

achris

More fish than mountain goat
Joined
May 19, 2004
Messages
27,468
Yup, this is where I'm at right now, but I don't see any bearing cup like in the manual .

That's interesting, because I can see it in the photo! You don't need to remove it, the seals will come out through it. It's that shine bit of steel just above the seals. DON'T SCRATCH IT!

Yeah, will get a real tool for sure, though I'm hopeful the plumbing tool will work in reverse too.

I wouldn't try. Wait for the proper tool to arrive. If you break the cover nut (and you will if you try and put 200#/ft torque on just one tab) you'll need to full disassemble the input shaft and bearings. And for that you are going to need a whole lot more tools and procedures. And there's also no way to get the right torque on that 'plumbing tool'... Yes, you need to get the right torque on the cover nut. If tyou don't, the drive gear to driven gear backlash will not be right, not to mention the possiblility of the whole assembly coming loose in operation. :eek: (say 'goodnight' to your drive!)

Managed to get most of it out, but because adhesive was used there are still pieces that I can't get off. Tried with a wire brush, but not too much difference. How important is to get everything perfectly clean?

Get it as clean as you can. The bottom 'landing' surface needs to be free of particals so the new seal sits square.

Chris....
 
Last edited:
Top