Issue: My 1987 Force 125 won't idle with the cowling on when its in the lake...(of course it works fine on the muffs)...
Description: My Force 125 is acting up this summer...I can start it up fine...but after about 1-5 minutes of idle it chokes out. If you remove the engine cowling you can see some exhaust you can't really tell where it was coming from. If you get it in gear before it dies you can run no problem. Only issue is I eventually need to dock it and nothing sucks worse than rough lake water and a dead motor around 10 other boats. Plus it gets harder and harder to start too after you start snuffing it out. Sound familiar? I've seen about 10 posts like this...we'll my turn...and I'm going to show you what I'm doing to fix it. (Hopefully...)
I checked the basics like the rubber boot on the water jet thing...and the donut seal near the bottom on day 1. Muffs worked fine...launched it and it snuffed out after about 3-5 minutes of idle. I recently changed out the lower unit and was concerned that possibly that was the issue b/c it worked fine last season...but its not the lower unit I'm convinced...I think I just finally have to "pay the piper" on this one....
As it stands...I'm about 51% done with what I think will be the repair and wanted to solve a few mysteries along the way.


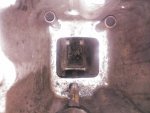
The photo 64.jpg attached shows the view down the motor leg where the exhaust snout fits. You can see 2 drain tubes on the top and the water line that comes up from the impeller on the bottom of the screen. I mention this photo b/c when I examined my idle rubber boot/spring thing...it had one of the drain tubes jammed in it. I didn't know any better so I put it all back together like I found it. I hear a lot of guys on the board say ...there was this tube thing in my spring...I didn't know what it was until I took the motor off the leg and realized ...it had washed out of its proper place and was trying to be flushed out by the engine . I took some marine grade 5200 RTV and glued them both back in place.
Nearly done scraping off the old RTV...
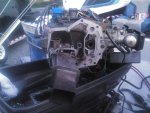
The next photo shows the bottom of the motor...You can see where the exhaust snout/leg fits on. What I say is I'm pretty sure that I was leaking exhaust between the exhaust snout and the shift lever area "somehow." Exhaust was killing the idle...I knew that for sure...but where? I sooooo just wanted to patch a leak with a little J B Weld and call it done. Considered cutting 2 four inch holes in the cowling...anything but this...
Anyway...after dismantling...I'm pretty sure the gasket area wasn't 100% intact all over the "important places" inside the motor...few areas with some water type scale/calcium surely were leaking (if I had to guess from the result...) I couldn't see smoke pouring out...but it was enough to snuff the motor after a few minutes..kind of like a fog when you took the cover off. I notcied that the exhaust snout leg gasket was intact...but probably not making great contact b/c it was all covered in scale/calcium type gunk. Surely not a air tight seal. What you should realize too is that the water tube coming up from the impeller is not air tight...so surely exhaust can come up that tiny hole around the tube. Which makes me think that if you get a good seal around the exhaust section...you're golden. If you don't then its going to be leaking out the shift lever etc...
As I do this I'm a bit concerned to see if I can get a good water tight connection between the impeller water tube and the bottom of the motor after I install new gaskets and RTV...it will change the distance between the previous incoming water tube height and the bottom of the motor. I may try and push the water tube up 1/4 of an inch and then let the motor weight push it back down the right distance.
Anyway...hope I have the patience to let the RTV fully cure before I crank it up and hopefully this is the ticket. So far its not too bad...but it is surely a job you don't want to do twice. I'll think about that before I turn the key too early...
Description: My Force 125 is acting up this summer...I can start it up fine...but after about 1-5 minutes of idle it chokes out. If you remove the engine cowling you can see some exhaust you can't really tell where it was coming from. If you get it in gear before it dies you can run no problem. Only issue is I eventually need to dock it and nothing sucks worse than rough lake water and a dead motor around 10 other boats. Plus it gets harder and harder to start too after you start snuffing it out. Sound familiar? I've seen about 10 posts like this...we'll my turn...and I'm going to show you what I'm doing to fix it. (Hopefully...)
I checked the basics like the rubber boot on the water jet thing...and the donut seal near the bottom on day 1. Muffs worked fine...launched it and it snuffed out after about 3-5 minutes of idle. I recently changed out the lower unit and was concerned that possibly that was the issue b/c it worked fine last season...but its not the lower unit I'm convinced...I think I just finally have to "pay the piper" on this one....
As it stands...I'm about 51% done with what I think will be the repair and wanted to solve a few mysteries along the way.


The photo 64.jpg attached shows the view down the motor leg where the exhaust snout fits. You can see 2 drain tubes on the top and the water line that comes up from the impeller on the bottom of the screen. I mention this photo b/c when I examined my idle rubber boot/spring thing...it had one of the drain tubes jammed in it. I didn't know any better so I put it all back together like I found it. I hear a lot of guys on the board say ...there was this tube thing in my spring...I didn't know what it was until I took the motor off the leg and realized ...it had washed out of its proper place and was trying to be flushed out by the engine
Nearly done scraping off the old RTV...
The next photo shows the bottom of the motor...You can see where the exhaust snout/leg fits on. What I say is I'm pretty sure that I was leaking exhaust between the exhaust snout and the shift lever area "somehow." Exhaust was killing the idle...I knew that for sure...but where? I sooooo just wanted to patch a leak with a little J B Weld and call it done. Considered cutting 2 four inch holes in the cowling...anything but this...
Anyway...after dismantling...I'm pretty sure the gasket area wasn't 100% intact all over the "important places" inside the motor...few areas with some water type scale/calcium surely were leaking (if I had to guess from the result...) I couldn't see smoke pouring out...but it was enough to snuff the motor after a few minutes..kind of like a fog when you took the cover off. I notcied that the exhaust snout leg gasket was intact...but probably not making great contact b/c it was all covered in scale/calcium type gunk. Surely not a air tight seal. What you should realize too is that the water tube coming up from the impeller is not air tight...so surely exhaust can come up that tiny hole around the tube. Which makes me think that if you get a good seal around the exhaust section...you're golden. If you don't then its going to be leaking out the shift lever etc...
As I do this I'm a bit concerned to see if I can get a good water tight connection between the impeller water tube and the bottom of the motor after I install new gaskets and RTV...it will change the distance between the previous incoming water tube height and the bottom of the motor. I may try and push the water tube up 1/4 of an inch and then let the motor weight push it back down the right distance.
Anyway...hope I have the patience to let the RTV fully cure before I crank it up and hopefully this is the ticket. So far its not too bad...but it is surely a job you don't want to do twice. I'll think about that before I turn the key too early...


