Lower unit on a 1957 7.5hp - advice?

chri0891

Cadet
Joined
Apr 9, 2020
Messages
25
I'm trying to get running a 1957 7.5hp seahorse AD-11. First time working on an outboard. I've got good spark and compression now, so moving on to the lower unit. What I know:
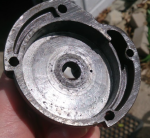
- It isn't from the AD-11. Is there a way to i.d. it? Or is it unimportant because if the housing fits the AD-11, does that mean that the internal seals etc are probably all compatible too?
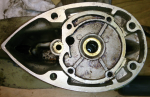
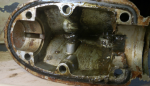
- I did a little research on this forum and I have the original cast impeller housing 303442, impeller #434424. The impeller was actually quite flexible, and not worn down. But all comments say to replace, so that's what I'll do.
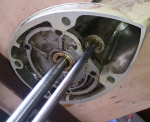
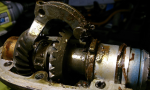
- I pulled the drain plug and about 10 drops of yellow oily water came out. Never having resealed a lower unit, turned to youtube. Getting the seals out seems like a big challenge for my limited tools. But I'm already this far….any advice? Buy a seal kit and go for it - or leave well enough alone, reassemble, and bucket test?
-Brent
p.s. I'd add photos but the website's not been letting me do that for a couple days...
 

Crosbyman

Vice Admiral
Joined
Nov 5, 2006
Messages
5,810
In the book "cheap outboards" the author suggests that simply replacing the gearcase oil mid -season or so is good enough compared to doing a reseal job. A reseal is not that complicated and you have to pull the head anyway for the impeller so it is up to you to reseal or not. the shift rod seal is tricky but doable…

Regular 90 grade wallymart oil is cheap and qwick to replace

lots of utubes on it
 

chri0891

Cadet
Joined
Apr 9, 2020
Messages
25
Thanks crosbyman- site is letting my load photos again so here's what I have in the water pump:

After parts cleaner and closer inspection there is some minor(?) pitting on the impeller housing. Not sure if it's enough to toss aside the new impeller and reorder a complete new plastic system. Maybe I should decide once I crack open the case and see its relative condition.

Speaking of, I saw some youtubes on pressure testing to check seals so I rigged something up. When I inject air the drive shaft pops up (out) and I hear air leaking out somewhere near there before the gage even registers. So I'm assuming that = fail and I should reseal.

Last thing, in other early OMC youtubes, people get to this point and just grab the driveshaft and pull it right out. Mine doesn't. Is there a pin/bushing in the case that holds it in? Plan is to open the case from here and then it'll become more apparent.

-Brent
 

Attachments

  • photo329802.png
    photo329802.png
    359.7 KB · Views: 0
  • photo329803.png
    photo329803.png
    1.1 MB · Views: 0

racerone

Supreme Mariner
Joined
Dec 28, 2013
Messages
38,880
It could well be a newer unit.----You will see when you open it up.-----Pressure test should be done with pump installed and the 4 screws tight.
 

oldboat1

Fleet Admiral
Joined
Apr 3, 2002
Messages
9,612
Don't overdo the pressure -- a few lbs is enough. Use a spray bottle with some water and detergent to spot leaks, checking the fill and vent screws as well.
 

F_R

Supreme Mariner
Joined
Jul 7, 2006
Messages
28,226
Brent, if you are pressurizing it as shown in your second picture, well then of course air will escape. The bearing housing is not being held down (water pump screws)
 

chri0891

Cadet
Joined
Apr 9, 2020
Messages
25
Well that's unanimous- very helpful. For whatever reason I figured it was ok with pump housing off because the seal should isolate the 'lube' part of the system from the 'water' part in the pump. But it makes sense that that drive shaft seal needs to be held down, essentially, by the water pump plate and housing. Or am I still way off base?

So now that I have the water pump portion apart I'm wondering, if I go ahead and seal the metal impeller plate down, install the new impeller, and seal/screw the housing back - and a pressure test (done correctly this time) fails - won't I need to disassemble the pump housing again to reseal the lower unit? Or is everything accessible from the bottom side (inside the case). Something tells me I'd be breaking apart the water pump again to put a new paper gasket beneath that metal impeller plate.

Just weighing the value of the above, vs. moving forward with the resealing process now as I've already got it halfway apart.

-Brent
 

racerone

Supreme Mariner
Joined
Dec 28, 2013
Messages
38,880
??----There is a gasket under that plate.----The pressure would tend to lift that plate.----The gasket may be very old too.-----The pump housing and the 4 screws MUST be installed in order to do a pressure test !
 

chri0891

Cadet
Joined
Apr 9, 2020
Messages
25
Ahh…now that makes sense, thank you racerone-
I'm this far, might as well see what I've got. Had those 6 beat-up case bolts soaking in oil overnight and I filed down a flat bit to fit them as well as possible. Time to try to get them out and open this thing up.
-Brent
 

chri0891

Cadet
Joined
Apr 9, 2020
Messages
25
Lower unit is apart, but the 'housing and seal assembly' beneath the impeller plate (first photo) is bad stuck. I've worked at it over the past few days. Started with the manual: 'carefully pry while lifting up with pliers on one of the webs'. Moved on to use the upper impeller cup as a tool with bolt studs, adding rotation (while prying much harder than I'd like to). No luck. I've never tried to apply heat to aluminum parts but I'm running out of options… I've watched every omc lower unit rebuild youtube I can find and am out of ideas. ??

Last note, on IDing this model. I found cast #313714 on the skeg, only google hit was eBay where it noted 1968-75 6hp johnson. But I think what I see through the case is a lower driveshaft, which I don't see on schematics from those years (a 2nd shaft is shown on schematics through mid-60s. Difference in seal kit between 1970+/- and 1957 seems to be an oil seal measuring 1.06" dia. instead of 1.00". I'm waiting for a caliper in the mail and hopefully that'll answer the question?

-Brent
 

Attachments

  • photo330458.png
    photo330458.png
    1.4 MB · Views: 0
  • photo330459.png
    photo330459.png
    1.2 MB · Views: 0
  • photo330460.png
    photo330460.png
    797.1 KB · Views: 0
  • photo330461.png
    photo330461.png
    878.8 KB · Views: 0

oldboat1

Fleet Admiral
Joined
Apr 3, 2002
Messages
9,612
I would leave it if unless you are sealing a known leak. They do come up, but old aluminum is brittle.
 

chri0891

Cadet
Joined
Apr 9, 2020
Messages
25
I guess I was hoping to get it apart to look at the lower shaft that runs through the gear case. There's one point in its rotation where it's hard to turn so I was thinking there may be some corrosion/gunk hanging it up. Also I was planning to replace upper oil seal #300599. Is it possible to do that with the aluminum housing piece in place, by chiseling the edges in and prying the seal out?
 

chri0891

Cadet
Joined
Apr 9, 2020
Messages
25
Update: I did eventually get every little piece of the lower unit torn apart and cleaned and resealed. Followed the advice on lots of posts and youtubes when reassembling. Greased/lubed all the gears and shafts, and checked everything spun and meshed well before installing the skeg and water pump - but I will say that after installing those pieces and filling the unit with gear lube, I'm surprised how difficult the driveshaft turns - it takes a firm hold with a vice-grip to turn it. Hoping that it's just due to tight new seals and not something seized up during install?

Anyways, as I go to return the powerhead to the frame, should I coat both sides of the lower crankcase gasket with the brush-on sealant? The gasket is paper type (not shiny). I read some posts on when to use sealant but didn't see this gasket listed.

-Brent
 

oldboat1

Fleet Admiral
Joined
Apr 3, 2002
Messages
9,612
Would have to feel it myself to get a sense of how tight the driveshaft seems -- use of a vise grip makes me think it's really tight. But I'll suggest anyway that it would feel tight with new seals and the friction from the impeller. Make sure to turn the shaft clockwise. And while the gearcase is empty, if it still is, pump a few lbs of air in and spray some soapy water around. Look for any bubbles to identify leaks.
 

racerone

Supreme Mariner
Joined
Dec 28, 2013
Messages
38,880
You did line up the wee pin with the groove in the forward bearing I hope.----That puts that bearing in the proper position for oil flow !-------Forward bearing must be fully seated forward to get proper gear mesh / location.
 

chri0891

Cadet
Joined
Apr 9, 2020
Messages
25
I did drop the forward bearing down with the pin, and the rear bearing had a tab that I pointed in what would be the upward direction I suppose (to be held in place by the gear case). The forward/reverse gears seemed to ride ok on the pinion gear (unless something got bumped out of place when placing the skeg). It was after sealing the skeg (I used a small amount of 847 around the spaghetti seal) and then setting the upper driveshaft into the grooves on the lower clutch driveshaft (and before sliding on the impeller plate and water pump that I first tried turning it.

Am I right to put brush-on sealant around that lower crankcase gasket? Kinda puzzled on that one but planning to do so.

-Brent
 

chri0891

Cadet
Joined
Apr 9, 2020
Messages
25
I took it apart, couldn't find anything wrong with alignment. I did notice when initially disassembling that the lower (clutch) driveshaft turned really hard, hung up especially in one spot on rotation, and once removed it had a fair bit of rust. Was able to wire wheel the shaft but didn't have a drill-type tool to get the stem - only had a bottle brush to get in there. I'm thinking that between that, and the new oil seal and vaseline on the impeller, the shaft was just really tight. Once the powerhead was back on, the thing does seem to turn okay with the pull start. Hopefully if it's still a problem it'll shear a woodruff key and not cause major damage...

So now back together and filled I see there's a small leak of gear oil coming from one of the screws on the skeg. Should I be able to take the screw out, coat it in brush-on sealer, and reinstall? Hoping to avoid redoing the spaghetti seal for a third time, that 847 sure is a mess.
 
Top