Maintenance on garboard or brass plug that is leaking.

MalibuMike

Petty Officer 2nd Class
Joined
Dec 29, 2020
Messages
137
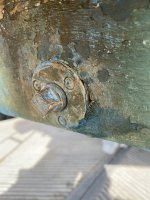
I had my boat out recently and saw water entering the engine bay but did not know the source. I read about a technique where you fill the hull with some water and look for leaks under boat. Well, that worked really well! I found the leak at the brass plug. I see that it is threaded in with three screws. I'm a little afraid to take it out since I dont know what is involved with maintenance. I could use some advice on what type of sealants to use in the screw holes or around the plug. In the event that the screw holes are stripped, I'm assuming I would just rotate it a bit for new holes. I would like to hear about how to install new holes if needed. Do I pre drill? Coat an exposed wood with epoxy? Any advice would help.
 

Attachments

  • IMG_3342.jpg
    IMG_3342.jpg
    2 MB · Views: 18

Scott Danforth

Grumpy Vintage Moderator still playing with boats
Staff member
Joined
Jul 23, 2011
Messages
50,487
first, never fill your boat with water. you now have water in areas that wont ever come out.

second, pull the garboard plug. you will most likely find that there is an issue with the transom.

for sealant, 3M 5200

yes, you always pre-drill holes. you also countersink the holes in the gel coat to prevent cracking of the gel.
 

Bondo

Moderator
Staff member
Joined
Apr 17, 2002
Messages
71,148
Ayuh,..... As Scott said, that's probably a sign of bigger problems with yer transom,.....

Get yerself a new garboard plug, 'n plate,....
Knock that one off, with whatever means necessary,....
Then probe the area, diggin' out any rot, til ya find solid material,....
Dependin' on how bad it is, build it back with a suitable filler, 'n install the new plug, 'n plate, usin' 5200 as the sealant,.....
 

Lou C

Supreme Mariner
Joined
Nov 10, 2002
Messages
13,157
Yep this might be where you get to learn a bit of fiberglass/wood repair. Hopefully there is not much wood rot in the core of the transom. I would dig as much out as I could and really dry it out as much as possible before refilling with thickened epoxy. Then make sure to seal the opening and screw holes really well. It takes time due to the steps involved and the time needed for drying and curing.

BTW be careful around that old bottom paint its toxic and you don't want to be scraping, sanding etc without proper protection.
 
Last edited:

Bt Doctur

Supreme Mariner
Joined
Aug 29, 2004
Messages
19,369
Remove the old one, remove any paint where the new one will go , and considering it looks like a bit of electrolsys add a bonding wire using a bolt and nut in one of the holes. So 2 screws and 1 bolt
 

MalibuMike

Petty Officer 2nd Class
Joined
Dec 29, 2020
Messages
137
Thank you all. To clarify, I backed the boat down the ramp to get it angled. Then add a few cups of water to see what would happen at the plug. I keep it in dry storage. There are some barnacles on it from maybe 15 years ago so maybe then it was docked in the water. Ill open it up and report back. If its got a lot of rot, Id rather just have a promo it right. I did get both bilge pumps working so there is some comfort but know Im wanting to know what the flow rate in to the boat would be if that whole plug were to fall away!
 

BRICH1260

Lieutenant
Joined
Jul 6, 2011
Messages
1,384
I would unscrew and discard that old plug and ring, check the surface underneath for rot. If good, I would clean up the area underneath, purchase a new plug assembly and reinstall with a good backing of 5200. I also like to coat my plug threads with Teflon tape or thread seal.
 

Lou C

Supreme Mariner
Joined
Nov 10, 2002
Messages
13,157
Main thing with a job like this is to deal with any possible wood rot. You want to dig out as much as you can and dry it all out, and fill with thickened epoxy. Then when installing your new garboard drain I'd use 3M 4200 to seal the opening and screw holes. The best way to deal with the screw holes, is to overdrill them (diameter and depth) and then fill with thickened epoxy and allow to cure. Then drill the epoxy for your new holes, still use sealer. That way your screws go into epoxy instead of wood and you'll never have to touch it again.

I had something similar when I had to repair 2 sections of rotted plywood in the engine compartment of my '88 F/W. Had to dig out the rotted ply with various implements of destruction, really DRY DRY the remaining wood, stabilize it all with thickened epoxy and install new wood.
 

Attachments

  • rot repair #1.JPG
    rot repair #1.JPG
    1.2 MB · Views: 6
  • rot repair #2.JPG
    rot repair #2.JPG
    1.2 MB · Views: 6
  • IMG_1746.JPG
    IMG_1746.JPG
    1.2 MB · Views: 5

dingbat

Supreme Mariner
Joined
Nov 20, 2001
Messages
16,387
I did get both bilge pumps working so there is some comfort but know Im wanting to know what the flow rate in to the boat would be if that whole plug were to fall away!
~3,600 - 4,560 GPH
 
Top