Merc Bravo 3 prop shaft seal....

GaGuy08

Cadet
Joined
Jul 23, 2022
Messages
11
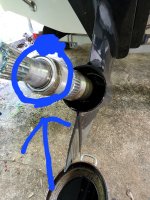
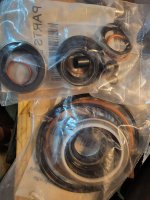
I've looked through a few threads about this and have read a bit to where my head now hurts.... Didn't see the answer that I was looking for right off, do I'll ask here. If it's been already answered, feel free to reply with a link... Also if it has, sorry for the re-asking... Firstly, I ordered two tools I knew I'd need to replace the prop shaft seals, including the seal kit... I didn't know about the third tool (which I need to get....)... Moving forward... Removed the bearing carrier, and hit a dead end, after more indepth searching I figured I've missed something somewhere, lol. Ended up finding out about that large tool needed to get the inner nut to remove the assembly, which I guess I need to do, put the carrier back in place, hand tight for now and put the boat back up.... My question (finally), the prop shaft seal (small one by outer prop, first one removed), how exactly do you replace that seal? I read somewhere that you have to take the whole thing apart? Would've been nice if they designed it to where you wouldn't have to do that, but it's looking like an oh well scenario...... Also, I've included a pic for reference. What else do I need to know? I've got a pretty good mechanical background, but never fooled with Bravo 3.... I'm sure I'll have more q's later, yay....
 

Attachments

  • 20220723_104916.jpg
    20220723_104916.jpg
    3.3 MB · Views: 8

GaGuy08

Cadet
Joined
Jul 23, 2022
Messages
11
That's a bit to read. I went over most of it, but the details of the actual replacement of the seal I either didn't see, or missed? Anyway, still dealing with the let down of my findings, rofl. I'm guessing, once I get this other tool, I'll remove the prop shafts, then they'll come apart, or will I need to pull them apart? Once apart I get the fun of the removal of the old seal... I'm including 2 pics of the seal kit I have gotten, one of which has part number for reference....
 

Attachments

  • 20220723_122423.jpg
    20220723_122423.jpg
    1.2 MB · Views: 3
  • 20220723_122444.jpg
    20220723_122444.jpg
    1.2 MB · Views: 3

alldodge

Moderator
Staff member
Joined
Mar 8, 2009
Messages
43,140
Removal is easy enough for the small shaft, the larger one is a bear but can be done. A press is best to install the seals. I used the old small seal and placed on top of the new small seal then a hose clamp to keep them from separating doing installPhoto185_zpsdc9301ff.jpgPhoto186_zpseaf5d1f2.jpg

That is the correct seal kit
 

GaGuy08

Cadet
Joined
Jul 23, 2022
Messages
11
Removal is easy enough for the small shaft, the larger one is a bear but can be done. A press is best to install the seals. I used the old small seal and placed on top of the new small seal then a hose clamp to keep them from separating doing installView attachment 366247View attachment 366248

That is the correct seal kit
So the smaller prop shaft will slide right out of the larger prop shaft? If that's the case then it shouldn't be too difficult... I've replaced several axle shafts in vehicles and such, so I have seal install tools, may do like you and use the old one as a tool to install the replacement. Reason I'm doing these is bc it's leaking oil, friend used the boat and it got fishing line in it, I can see a cut in the smaller seal.... not gonna blame him, can happen to anyone.... Thanks for the advice, so far, lol.
 

alldodge

Moderator
Staff member
Joined
Mar 8, 2009
Messages
43,140
Its a snap ring, but does not have holes so SR pliers can not be used. If memory serves it just takes a small screw driver
 

GaGuy08

Cadet
Joined
Jul 23, 2022
Messages
11
Cool, thanks for the info, once I get this other tool, I'll dive back into it....
 

GaGuy08

Cadet
Joined
Jul 23, 2022
Messages
11
Well, it was a pain, finally got it done, tho, couldn't find the torque spec conversion chart no matter how much I looked, and couldn't seem to have gotten ahold of a manual that's supposed to have them... either way, it's together, and sounds normal to me.... once I get home next weekend I'll take a look and make sure everything still looks good.... thanks again
 

alldodge

Moderator
Staff member
Joined
Mar 8, 2009
Messages
43,140
200 ft lb inner
150 ft lb outer
 

Attachments

  • 12 inch torque wrench.jpg
    12 inch torque wrench.jpg
    66.4 KB · Views: 9

GaGuy08

Cadet
Joined
Jul 23, 2022
Messages
11
Know what the torque spec is for the 150, I went back in and readjusted for the 200... sad thing is, the tool I have isn't 12" from centerline, I measured about 4".... took that in account, and my wrench is 27.5" center to center of double groove, set it to 112 ft. lbs.... felt more like what I removed it at.... but trying to figure out what to set the 150 at....
 

alldodge

Moderator
Staff member
Joined
Mar 8, 2009
Messages
43,140
Here is the 150 chart
 

Attachments

  • Bravo Bearing Nut Torque 150ft lb.JPG
    Bravo Bearing Nut Torque 150ft lb.JPG
    58.6 KB · Views: 9

alldodge

Moderator
Staff member
Joined
Mar 8, 2009
Messages
43,140
G

lad you sent that one, I need to up the torque on the bearing retainer... I figured since 150 is 75% of 200.... yeah....
The pic in post 11 is for 200FT LB
The pic in post 14 is for 150FT LB
See the fine print in post 11 pic, I didn't put a yellow 200 block in
 

GaGuy08

Cadet
Joined
Jul 23, 2022
Messages
11
Yeah I saw the 200 ratings and the 150 ratings, I need to go back in and readjust a lil tighter for the 150 ft lbs, it's a hair loose according to that graph, I've saved both to my phone....
 
Top