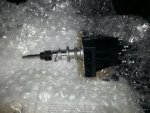
I purchased a kit to upgrade my 1988 3.0 from points to electronic using the genuine parts as shown here:
3.0L Delco Voyager EST Marine Electronic Distributor Kit
The instructions are great for the wiring & timing part but assume you know how to swap it. It looks pretty straightforward but I'd feel better if someone could answer a few dumb questions.
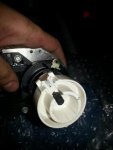
Whats the basic process of the R&R? It looks like there is a bent 'fork' that holds the assembly in. I assume that you loosen it slightly to change the timing and remove it completely to pull the assembly? Any tricks? It's never as easy as it sounds.
When reinstalling, do I simply position the metal tab on the new assembly the same way as the rotor on the old unit? I took photos of the guts of each. Wasn't sure how to align when reassembling for proper firing..
Thanks, I am hoping to do this and replace the plugs next weekend. The hope is to only have to set the timing once! I had to borrow the timing light.
3.0L Delco Voyager EST Marine Electronic Distributor Kit
The instructions are great for the wiring & timing part but assume you know how to swap it. It looks pretty straightforward but I'd feel better if someone could answer a few dumb questions.
Whats the basic process of the R&R? It looks like there is a bent 'fork' that holds the assembly in. I assume that you loosen it slightly to change the timing and remove it completely to pull the assembly? Any tricks? It's never as easy as it sounds.
When reinstalling, do I simply position the metal tab on the new assembly the same way as the rotor on the old unit? I took photos of the guts of each. Wasn't sure how to align when reassembling for proper firing..
Thanks, I am hoping to do this and replace the plugs next weekend. The hope is to only have to set the timing once! I had to borrow the timing light.