Mercruiser I/O Welch plug installation

Bud420x20

Seaman Apprentice
Joined
Apr 16, 2017
Messages
34
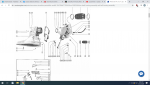
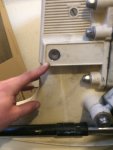
Instructions on the correct installation of a welch plug on the I/O? What do you guys use to install them? I installed this new one and it floated around until the permatex dried. I assume it's supposed to be a tight fit. (Photos attached, #5 on the schematic)
 

Attachments

  • photo329959.png
    photo329959.png
    454.2 KB · Views: 1
  • photo329960.png
    photo329960.png
    276.1 KB · Views: 1
  • photo329961.jpg
    photo329961.jpg
    968.5 KB · Views: 1

alldodge

Moderator
Staff member
Joined
Mar 8, 2009
Messages
42,947
I use hi-tach sealant and a socket which just fits inside the plug. Attach extension and drive it in, then remove. The socket keeps the plug from bending inward to far and makes a tight seal. If done right the socket will need some pulling to remove
 

Bud420x20

Seaman Apprentice
Joined
Apr 16, 2017
Messages
34
I use hi-tach sealant and a socket which just fits inside the plug. Attach extension and drive it in, then remove. The socket keeps the plug from bending inward to far and makes a tight seal. If done right the socket will need some pulling to remove

Best way to remove the one I just installed incorrectly?
 

alldodge

Moderator
Staff member
Joined
Mar 8, 2009
Messages
42,947
Best way to remove the one I just installed incorrectly?

Flat blade screw driver on top or bottom (your choice) and hit it with enough to pitch it in. One side will go in and the other out, then grab with pliers and pull.

Hit it with a small blow and keep increasing a bit more until it moves. Screw driver goes inside plug, not on edge of it. Don't want to score the opening
 

Bud420x20

Seaman Apprentice
Joined
Apr 16, 2017
Messages
34
Just to clarify. You guys are talking about the plug on the outdrive. Correct?
 

alldodge

Moderator
Staff member
Joined
Mar 8, 2009
Messages
42,947
First I am assuming the plug was installed cup edge facing out, and you said its loose

And I'm talking about this plug your pointing at, pics not that clear

image_329961.jpg
 

Bud420x20

Seaman Apprentice
Joined
Apr 16, 2017
Messages
34
This used to be domed. Now it's flat-ish. I checked for fit in between hits.
 

Attachments

  • photo330002.jpg
    photo330002.jpg
    1.3 MB · Views: 0

Bud420x20

Seaman Apprentice
Joined
Apr 16, 2017
Messages
34
I removed it because it was not tight and upon inspection it is slightly smaller in diameter and thinner than the plug that popped out.
 

Bondo

Moderator
Staff member
Joined
Apr 17, 2002
Messages
71,241
upon inspection it is slightly smaller in diameter and thinner than the plug that popped out.

Ayuh,...... I didn't know there's a difference, but yer listing is an Alpha Gen.II, 'n yer drive is an MC-1,.....
 

Bud420x20

Seaman Apprentice
Joined
Apr 16, 2017
Messages
34
Bondo I don't follow. It's a 1966 mercruiser EZ shift Serial#2002201 as far as I know. All the other parts seem to fit.
 

Bondo

Moderator
Staff member
Joined
Apr 17, 2002
Messages
71,241
Bondo I don't follow.

Ayuh,..... I'm just Guessin' that the welch plug changed sometime over the 40 years between the MC-1s, 'n the Alpha Gen.II drives,......

You said it's smaller, 'n thinner,......
 

Bud420x20

Seaman Apprentice
Joined
Apr 16, 2017
Messages
34
Bondo It gives that part number for my specific model. You're saying they changed the part dimensions and didn't change the part number? Sorry if I'm bugging you this is the first issue I've had in a couple years with it and I wanna fix it.
 

Bondo

Moderator
Staff member
Joined
Apr 17, 2002
Messages
71,241
Ayuh,..... 'n I said,...... I'm Guessing,......


I Don't Know,......

If it don't fit, Tightly, it ain't right,.....
 

Bud420x20

Seaman Apprentice
Joined
Apr 16, 2017
Messages
34
Bondo Any recommendation on what dimension tool to use when I attempt to install the new one when it arrives??
 

achris

More fish than mountain goat
Joined
May 19, 2004
Messages
27,468
Same plug (and same part number) from 1963 to 1990. And the Gen II doesn't have a plug.

The plug is designed to go into the hole, and with a tool behind it, be hit so it slays out and locks in place. You need to make a backing block to slide to the bottom of the shift slide cavity so you can 'set' the plug in place.

You also need to put sealer around the edges so it is water tight. You do not want to be filling that cavity with water! :eek:

Chris....
 
Top