Mercury 650 Won't Start

scottwoodward

Petty Officer 3rd Class
Joined
May 27, 2020
Messages
78
Model year 1970 (serial 2804270)

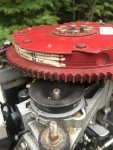
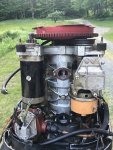
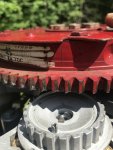
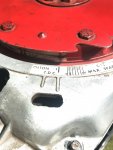
Before replacing fuel pump gaskets, carburetor gaskets, fuel lines and generally cleaning up the fuel system, I could at least get the engine to turn over and run for a short period. But after doing all these things, and replacing the timing belt, I cannot get the engine to start. I've got spark and the alignment of the pulley and marks on the flywheel are correct (arrow on pulley and three notches on flywheel; my model is the one with the incorrect sticker on the top cowling, but when the cowling is on, it lines up correctly). Spot checking TDC with #1 also shows alignment (but only eye-balled, not with a timing light). I'm getting fuel into the carbs, but it will not start. The timing belt slipped twice, which I thought was the problem, but it has stayed in the correct position the last three attempts at starting the engine. I don't know where to go next -- when I try to crank the engine, it let's out what sounds like a backfire as you can sort of hear in this video (https://drive.google.com/file/d/1ZY4dmBhjyp1aEy82QT1whRvXlH9pHxWw/view?usp=sharing). I don't know if I've got a spark/timing issue or a fuel issue.
 

Attachments

  • photo336148.jpg
    photo336148.jpg
    1.7 MB · Views: 0

The Force power

Commander
Joined
Feb 3, 2019
Messages
2,350
Verify if your set up is right; search this post in the search bar [h=1]65 650 flywheel/timing question[/h]
 

racerone

Supreme Mariner
Joined
Dec 28, 2013
Messages
38,540
Sorry to be blunt here.------Those new timing belts do not slip!!---Bad bearings in distributor ??------And stop cranking and hoping !---You are only destroying your starter motor ------There is something wrong when these motor do not start first crank !!-----Verify that you have timing correct .----Verify plug leads are on the correct posts on the distributor cap too.-----How did it run for you last month ??
 

scottwoodward

Petty Officer 3rd Class
Joined
May 27, 2020
Messages
78
I don't know what accounts for the alignment of the pulley going out of whack the first couple of times, but the alignment is fine now. It's staying in the correct position and alignment between the pulley and flywheel. #1 is TDC. Is there something else about the timing I should check?

I'm checking the fuel system now. The inlet needle on the top carburetor was stuck in the down position (pushed up). Don't know if that alone would cause it to not start. I checked the measurements on the float lever and it was off by a hair. Checking measurement on the float spring next.
 

racerone

Supreme Mariner
Joined
Dec 28, 2013
Messages
38,540
The 8 bolts on top of the flywheel.------Did somebody have that assembly off ??----Is it in the correct place ?----Check your timing with #1 piston at TDC.
 

scottwoodward

Petty Officer 3rd Class
Joined
May 27, 2020
Messages
78
No. Those bolts never came off. I used a flywheel puller to take it off as a unit. I then unscrewed the four screws on the stator, slipped on the timing belt, put the stator back on and then reinstalled the flywheel. The alignment of the pulley arrow and flywheel alignment mark is dead on.

I've got good spark. I did notice that the carburetor link is wet and there's fuel in the catch tray, but everything checks out with the top carburetor. I guess I could have a bad float, but when I pulled the carbs off and cleaned it up, I was sure to follow the manual to make sure the float spun freely. I also checked the inlet needs and they're good now. If I flooded it yesterday, it should be dried out by now. It's still not starting, however. Not sure where to go next on the trouble-shooting list.
 
Last edited:

racerone

Supreme Mariner
Joined
Dec 28, 2013
Messages
38,540
A simple question that needs one of 2 simple answers.------Does spark jump a gap of 7/16" on all leads with a " snap " you can hear , yes or no ?
 

racerone

Supreme Mariner
Joined
Dec 28, 2013
Messages
38,540
Well ---I asked for one of 2 answers and got neither one.----Good luck with your motor !
 

scottwoodward

Petty Officer 3rd Class
Joined
May 27, 2020
Messages
78
I'm new to all this and am learning as I go, but I want to learn how to do what it takes to properly maintain the motor, so forgive me if I can't answer questions effectively. I'll get a spark plug tester and measure the gap. I don't know where or how I would be listening for a snap on the leads.
 

racerone

Supreme Mariner
Joined
Dec 28, 2013
Messages
38,540
When there is proper spark on a spark tester you will hear it from 10 feet away.------It will go " snap , snap , snap " trust me.
 

scottwoodward

Petty Officer 3rd Class
Joined
May 27, 2020
Messages
78
Thank you Racer One. I got the ignition test kit today and if I did it right, then it confirms that the spark is jumping the 7/16 gap. See this video. Same result on all four cylinders. https://drive.google.com/file/d/1Lbj...ew?usp=sharing

I went back in my mind to see if I might have messed something up in putting new gaskets on the carburetor. I followed the manual carefully, but I just noticed in the parts diagram part 1399-3401, throttle shutter. It looks like it goes on behind the gasket where the carburetor attaches to the block. I did not recall seeing a part like this and when I looked back at a photo I took when I got the carbs off, I don't see any part that looks like what's in the parts diagram. See attached photos. The throttle shutter is #25 in the parts diagram. Grasping at straws and it seems like I've got a fuel problem somewhere.
 

Attachments

  • IMG_2200.jpg
    IMG_2200.jpg
    1.2 MB · Views: 0
  • Screen Shot 2020-07-27 at 8.20.35 PM.png
    Screen Shot 2020-07-27 at 8.20.35 PM.png
    64.1 KB · Views: 0
Last edited:

racerone

Supreme Mariner
Joined
Dec 28, 2013
Messages
38,540
Nope----That throttle shutter would be INSIDE the carburetor !!----It won't be missing !
 

scottwoodward

Petty Officer 3rd Class
Joined
May 27, 2020
Messages
78
I wonder if I might have overtightened parts of the carburetors when I put on the new gasket kits. The two parts that come to mind are the main jet and idle tube. I thought I put everything back together to the same level of tightness as when I disassembled the carbs. Fuel is getting to the bowls and it's not flooding.
 

scottwoodward

Petty Officer 3rd Class
Joined
May 27, 2020
Messages
78
I don't know if this is the source of my trouble, but after re-checking everything, I started down the path of adjusting the carburetor, but when I pumped out the fuel from the bowls, the gas looked like the first photo. Whatever the yellow stuff is, the gas sits on top, so it's more dense than the gas. After taking the fuel system apart to trace the source of the yellow stuff, I discovered that it's turning yellow inside the new fuel lines I bought. The second photo shows gas run straight through the new fuel line (left) and gas pumped straight out the gas can (right). I'm hoping this is the source of all the trouble.
 

Attachments

  • IMG_3869.jpeg
    IMG_3869.jpeg
    1.9 MB · Views: 0
  • IMG_3944.jpg
    IMG_3944.jpg
    1.7 MB · Views: 0

The Force power

Commander
Joined
Feb 3, 2019
Messages
2,350
My guess.......
Either you have water in the fuel-tank and/or the hoses are not rated for fuel????
 

scottwoodward

Petty Officer 3rd Class
Joined
May 27, 2020
Messages
78
Mercury 650 Kiekhaefer Still Won't Start

1970 model, serial number 2804270. I'm out of ideas as to what can be keeping the engine from starting even though it's cranking fine. I just can't figure out what's not right. Here's everything that's confirmed:

- Compression checks out at 120 PSI on all four cylinders
- Good spark on all four cylinders (jumping the requisite gap with tester)
- Timing belt recently replaced; distributor pulley arrow is aligned with TDC marks on flywheel (may not be perfect, but is pretty close -- have not tested with timing light -- can timing still be off even if aligned correctly?)
- New gaskets on both carburetors; confirmed clean fuel coming into the bowls
- Fuel screens/filters clean
- All basic checks good (fuel tank vented, bulb primed)
- Wiring harness is in tough shape with some wires a little frayed, but have shrink wrapped all wires
 

GA_Boater

Honorary Moderator Emeritus
Joined
May 24, 2011
Messages
49,038
Don't start a new thread or you will get the same questions again. Keep this thread going until the motor is running or you dump it in the lake.

On the timing belt - When the pulley arrow is lined up with the mark on the flywheel is #1 cylinder at TDC? Not the arrow on the flange, the arrow under the flange on the pulley.

Squirt a little gas in all 4 spark plug holes, put the plugs in and see if is pops off when cranked. Where are the idle screws set?
 

scottwoodward

Petty Officer 3rd Class
Joined
May 27, 2020
Messages
78
Yes, the arrow on the pulley itself is lined up with the mark on the flywheel for #1 cylinder at TDC. There's no arrow on the flange. The only potential issue there is that I'm 99% sure this is the model where the decal on the top cowling is wrong - that TDC for #1 is the shorter line to the left. I've tried the alignment both ways -- with the arrow on the pulley pointing right at the three alignment dots and also the arrow on the pulley pointing just to the right of the three alignment dots, where some prior owner appears to have scratched a line. Right now, the pulley is pointing to the scratched line which should put the alignment at TDC. See photos to show the decal and scratched line -- the photos with the belt and flange on do not represent its current position -- the arrow on the pulley is currently pointed at the scratched line on the flywheel.

I've tried putting gas in the #1 cyclinder and it did pop. Have not tried putting gas in all four, but will do so.

The idle screws on the carburetors are currently set at one full turn open from the lightly seated position, as described in the manual (if I'm reading it correctly - see photo). I have not touched the other adjustments on the distributor assembly plate.
 

Attachments

  • photo337219.jpg
    photo337219.jpg
    1.7 MB · Views: 0
  • photo337220.jpg
    photo337220.jpg
    1.7 MB · Views: 0
  • photo337221.jpg
    photo337221.jpg
    1.7 MB · Views: 0
  • photo337223.png
    photo337223.png
    783.8 KB · Views: 0
Last edited:
Top