My 1988 6hp Johnson Rebuild

NoEcm

Petty Officer 3rd Class
Joined
Jan 22, 2010
Messages
90
Johnson 6hp Crankcase.jpg

This is where this thread started:
http://forums.iboats.com/showthread.php?t=518801

I thought I would start this new thread to document my 1988 6hp Johnson rebuild and also to ask questions regarding my rebuild as it progresses.

I took lots of photos during the 4 hour disassembly. I went slow, easy and every thing was documented in either photos or my journal. The digital photos that I took will be a big help as I've never rebuilt an outboard motor before.

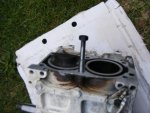
This is a photo of the bottom of the crankcase. Notice the corrosion on the bottom?

Bottom Corrosion.jpg


Now here's another photo of the same area after I scraped away some of the corrosion.

Bottom Corrosion 2.jpg

So far so good.

I now just need to get the corroded case cleaned up and take it to the welding shop for repair.
 

NoEcm

Petty Officer 3rd Class
Joined
Jan 22, 2010
Messages
90
Re: My 1988 6hp Johnson Rebuild

Time to clean up the crank. Nothing serious, just wanted to polish the journals a little:

4000 grit rouge and a flat shoelace to polish the journal:
Journal - Shoelace.jpg


The finished product:
Journal - Polished.jpg
 

NoEcm

Petty Officer 3rd Class
Joined
Jan 22, 2010
Messages
90
Re: My 1988 6hp Johnson Rebuild

Cleaned parts today. Started by soaking some of them in solvent and then bead blasting. Here's a picture of the head. Is there anything that I can coat the water passages with that would slow down (or prevent) the corrosion?

Head.jpg
 

NoEcm

Petty Officer 3rd Class
Joined
Jan 22, 2010
Messages
90
Re: My 1988 6hp Johnson Rebuild

Here's a picture of the bottom of the crankcase all cleaned up. Compare this to the above photos.

Crankcase Bottom.jpg


Cleaned and ready for welding. Will the welder just build this portion up or should I cut out this part and splice in a new piece of aluminum that he can weld in?

Cleaned - Ready for Welding.jpg
 
Last edited:

Haffiman

Commander
Joined
Dec 17, 2009
Messages
2,454
Re: My 1988 6hp Johnson Rebuild

Being a casting and a lot of heat on one side from exhaust and cold water on the other, I would guess building up might be the best solution. Problem is to get the same expansion rate from the rebuild as the original piece.However let the welder decide, it is a tricky one. I'm afraid the warranty might be on you though.
 

raczekp1

Lieutenant
Joined
Mar 30, 2010
Messages
1,327
Re: My 1988 6hp Johnson Rebuild

hi. dont wory will be fine.
its welded one side of cylinder block.
 

Attachments

  • DSCF2989.jpg
    DSCF2989.jpg
    130.9 KB · Views: 0

NoEcm

Petty Officer 3rd Class
Joined
Jan 22, 2010
Messages
90
Re: My 1988 6hp Johnson Rebuild

I had the block rewelded and I did all the grinding and machining. Here is the finished product:

IMG_5230.jpg


Here is a picture of the bracket I made for re-assembly:

IMG_5239.jpg


Here is the bracket and block clamped to a vise:

IMG_5238.jpg


Next steps:

1. Wash and clean the block.

2. Order the gaskets and stuff for re-assembly.
 

Ant-Knee

Petty Officer 2nd Class
Joined
Oct 14, 2011
Messages
139
Re: My 1988 6hp Johnson Rebuild

WOW,

You are doing some real nice work there ..
Keep the pics coming..

Ant...
 

NoEcm

Petty Officer 3rd Class
Joined
Jan 22, 2010
Messages
90
Re: My 1988 6hp Johnson Rebuild

Oh, and I forgot to mention that I found a unused/brand new 1990 6hp Johnson long shaft last week:
http://forums.iboats.com/showthread.php?t=521981

Looks like I'm going to end up with 2 Johnson 6hp long shaft trolling motors after I finish rebuilding this one.

Also, just finished ordering parts. Total came out to just under $150.
 
Last edited:

1946Zephyr

Vice Admiral
Joined
Oct 21, 2008
Messages
5,556
Re: My 1988 6hp Johnson Rebuild

Wow, nice job on the block. You'll have a nice motor, when it's all done. Yea, I know what you mean about finding motors. LOL As a result of my "findings" I have a pair of 40's, 35's, and 5 1/2's.
 

NoEcm

Petty Officer 3rd Class
Joined
Jan 22, 2010
Messages
90
Re: My 1988 6hp Johnson Rebuild

A couple of questions:

1. Should I coat the water passage area that was just rewelded with anything to slow the corrosion down?

2. Also, it looks like there was a leak around the exhaust tube area. Should I seal the area where the water tube enters the crankcase and the area around the Water Tube Grommet with RTV?

IMG_5240.jpgIMG_5241.jpgIMG_5242.jpg
 

NoEcm

Petty Officer 3rd Class
Joined
Jan 22, 2010
Messages
90
Re: My 1988 6hp Johnson Rebuild

Time to install the pistons. Only one problem, I could not find a ring compressor that would work with a 1 7/8" piston that I could borrow so I had to improvise with a couple of hose clamps. First you start with 2 hose clamps making sure you have the gap in the ring aligned with the pin in the ring grove; if installed properly you should be able to rotate each hose clamp/piston ring just a little bit to "feel" that the ring is aligned with the ring groove pin.

IMG_5244.jpg

Next, you'll slide the bottom hose clamp up so that there is only one hose clamp on the piston:

IMG_5245.jpg

Install as you normally would and here are the installed pistons:

IMG_5246.jpg

Looking in through the exhaust port, verify that each ring is aligned with the pin:

IMG_5248 - with arrow.jpg


Work slowly and use extreme caution making sure that the ring gap is properly aligned with the pin in the ring grove before tightening the hose clamps. If it is not, you could break a ring, damage the piston, or both.
 

NoEcm

Petty Officer 3rd Class
Joined
Jan 22, 2010
Messages
90
Re: My 1988 6hp Johnson Rebuild

Here is a better picture with no reflection from the camera flash:

Ring Gap.jpg
 

superspark

Cadet
Joined
Nov 11, 2011
Messages
9
Re: My 1988 6hp Johnson Rebuild

NoEcm, your not only a good engineer but an excellent photographer as well. Keep the work and the pictures coming,
it will be great to see the completed engine running. Hope you will make a video of that day.
 

NoEcm

Petty Officer 3rd Class
Joined
Jan 22, 2010
Messages
90
Re: My 1988 6hp Johnson Rebuild

The gaskets and seals + the Service Manual (eBay) that I ordered arrived this week. Inventoried, the gasket and seal order arrived perfectly, nothing missing and nothing extra.
IMG_5255.jpg

Assembly will start shortly.

Some of the parts you see in the box are for my 70hp. Figured that I should rebuild the water pump at the same time.
 

NoEcm

Petty Officer 3rd Class
Joined
Jan 22, 2010
Messages
90
Re: My 1988 6hp Johnson Rebuild

A question for the engineering people here.

Exhaust Cover.jpg

#1 This is the cooling channel that corroded out

#2 This is the "Exhaust Cover, Inner". The black mark there is what I colored in with a sharpie to match the hole in Gasket #3

#3 This is the "Gasket, cover". There are 2 of these gaskets. One on each side of #2 (the Exhaust Cover, Inner)

#4 This is the inside of the Exhaust cover

This is how it all fits together:

How it fits.jpg


Cooling water (Salt Water) enters the cooling channel #1 and gets trapped there because there is no outlet.

Gasket #3 has a cutout but the cooling water goes nowhere because the "Exhaust Cover, Inner" is solid where the cutout is.

My Question: Should I cutout the "Exhaust Cover, Inner" #2 where I marked it in sharpie to correspond with the cutout in Gasket #3 so that cooling water can circulate better?

Yes or no, please explain so I can better understand.

Thanks and much appreciated!!!
 

NoEcm

Petty Officer 3rd Class
Joined
Jan 22, 2010
Messages
90
Re: My 1988 6hp Johnson Rebuild

I may have answered my own question. Look at the picture that I found on eBay after submitting my posting:
ScreenShot002.jpg

Notice that this part already has the cutout in the "Exhaust Cover, Inner".

Guess I'll be making that cutout after all.
 

NoEcm

Petty Officer 3rd Class
Joined
Jan 22, 2010
Messages
90
Re: My 1988 6hp Johnson Rebuild

Masked and repainted the lower engine cover this morning:

IMG_5264.jpg
 
Top