My Johnson Workhorse rebuild project

2manband

Seaman
Joined
Jul 10, 2011
Messages
62
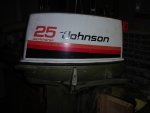
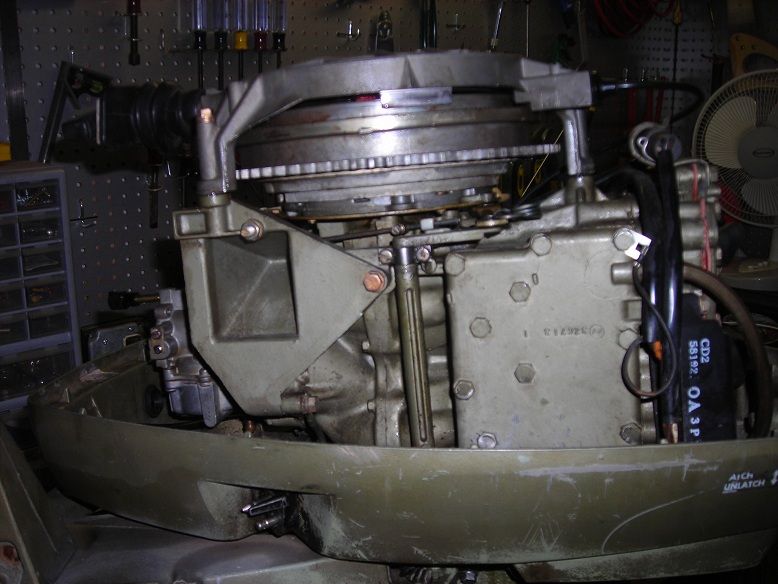
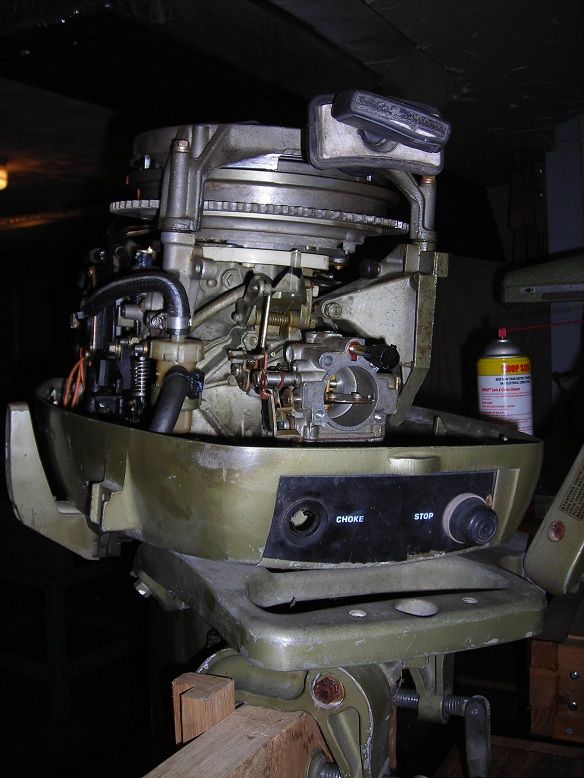
I figured that since I've done so much lurking around here - soaking up all the good info - it was about time for me to post some stuff about my current project. Last Sunday I took a road trip to pick up this baby - A 1981 Johnson Workhorse 25HP model number J25RWCIM


DSCN0762.jpg


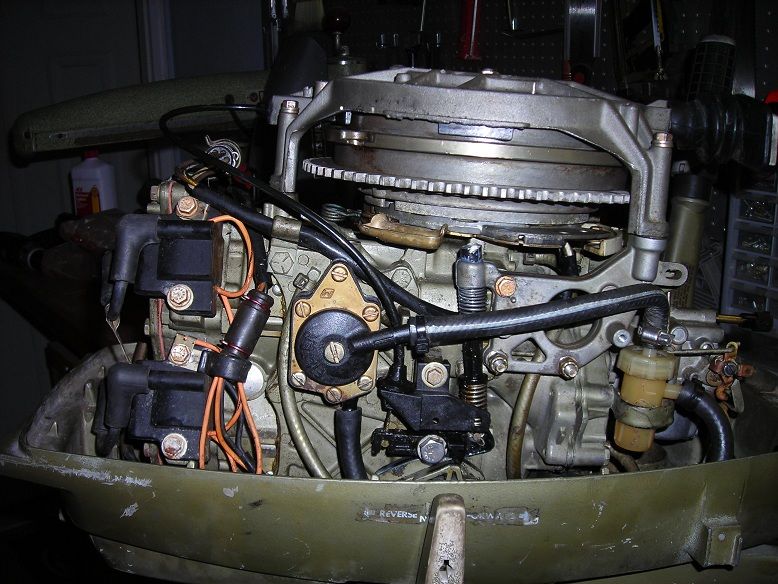
Seller indicated that the powerhead was rebuilt a few years ago - bored 0.030 over, with new pistons and rings. From the apparent compression, and the minty-fresh appearance of the head gasket, I have no reason to doubt him. Planning to run a compression test to see where we are today, but I expect that it will be pretty good.

DSCN0764.jpg


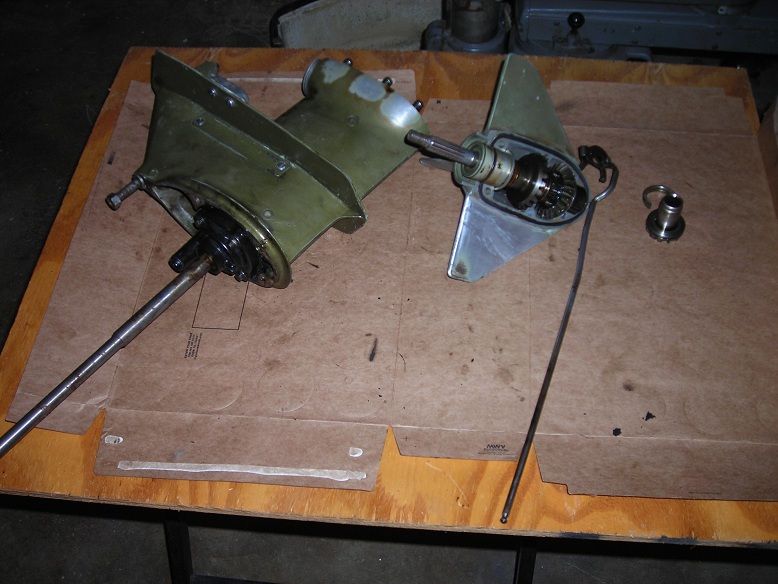
Starboard bracket was cracked but I've secured a used replacement and got it bolted in place.

DSCN0763.jpg


DSCN0766.jpg


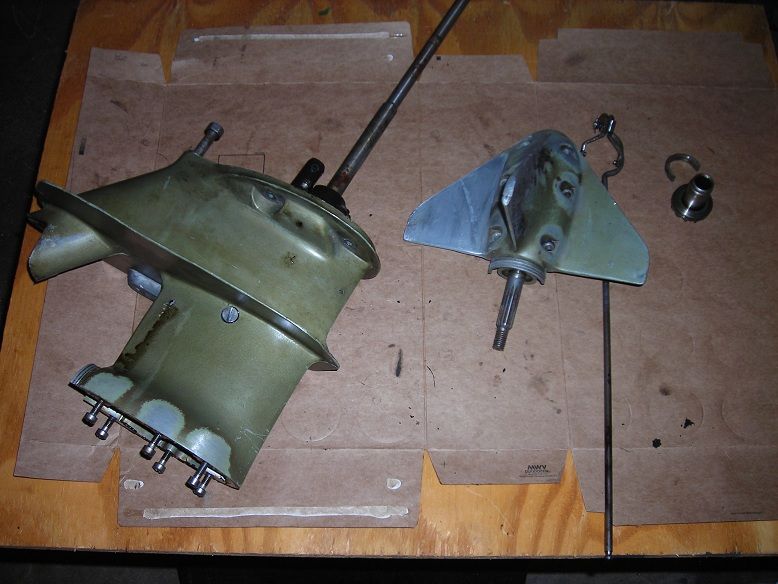
One of the interesting features of these models is that they have side fins on the gearcase housing in addition to the skeg. One of them was broken off, but the piece had been saved, so I had a local welding outfit weld it back on. Needs a bit more sanding but I think it should paint up good as new:

DSCN0767.jpg


DSCN0768.jpg
 

Attachments

  • DSCN0762.jpg
    DSCN0762.jpg
    95.2 KB · Views: 0

2manband

Seaman
Joined
Jul 10, 2011
Messages
62
Re: My Johnson Workhorse rebuild project

So far I've done the following:

- Cleaned the carb. The Low speed jet was pretty well plugged and out of adjustment which probably explained the hard starting

- Fixed a minor issue with the recoil starter not recoiling

- Cleaned the ignitions terminals and jiggled the wiring to get both plugs firing. I'm not sure if this properly fixed the problem or not. The plug wires are looking pretty worn.


So what comes next, you ask? I'm planning to rebuild the thing to "good as new" condition and use it for (hopefully) many years to push around a Starcraft Seafarer 14. Provided that the compression checks out, I'm planning to:

- Rebuild the Carb. Doesn't seem to be in bad shape now that it's clean, but I figure a rebuild kit is cheap insurance

- Rebuild the water pump. See above re: cheap insurance

- Rebuild the fuel pump. Cheap insurance

- New fuel lines - same reason

- New ignition coils. May not be necessary, but they come with new plug wires, and aren't much more expensive than purchasing the plug wires alone.

- New seals for lower unit. Gearcase lube was pretty milky and looked like water had gotten to it.


Once I get the 8,746 problems sorted out that all this is sure to create, I plan to shoot it with a few fresh coats of rattlecan Johnson white and get on with the important business of catching small numbers of small fish. :D

I'll update as things progress.
 

2manband

Seaman
Joined
Jul 10, 2011
Messages
62
Re: My Johnson Workhorse rebuild project

Compression test came out great - 130 psi on both cylinders - so it's full speed ahead.

I ordered the parts necessary to do the things described above, and they're starting to trickle in.

Got the new ignition coils installed over the weekend and the previously anemic and somewhat intermittent spark is now much stronger and more regular. The CDI replacement coils had a different number of wires than the OEM, so this was somewhat confusing, but I reasoned that the CDI unit grounded through its metal mounting tabs, whereas the OEM model had a separate ground wire. So I installed it accordingly, and it looks to have worked out.
 

2manband

Seaman
Joined
Jul 10, 2011
Messages
62
Re: My Johnson Workhorse rebuild project

OK guys - I've hit my first roadblock; removing the prop shaft seals. I understand this is an area that's given a lot of folks trouble. I have mine soaking in some Liquid Wrench right now while I contemplate my next move.

Thinking about borrowing a slide hammer with pilot bearing puller from the local auto parts place - something like this:

225182757.jpg


But I have two concerns with that approach:

1. Will the puller legs close small enough to fit inside the seal.

2. Will the barb on the puller legs be so long that it scores the housing when removing the seal.

This style seems a little better:

blind_bearing_puller.jpg


But I would still have some of the same concerns, and I can't find any place locally that loans out this style.

I really don't want to drop big bucks on the OMC specialty tool that I'll only use a few times, but also don't want to cause any damage to the expensive parts in the LU.

Any recommendations?
 

2manband

Seaman
Joined
Jul 10, 2011
Messages
62
Re: My Johnson Workhorse rebuild project

2manband,
great thread.

Can you clarify which seal you're referring to? Indicate the part number, please...

http://www.marineengine.com/parts/j...25RWCIM&manufacturer=Johnson&section=Gearcase

Thanks Jasper - your LU service manual has been very helpful.

In the exploded parts drawing, they are number 26 and 27. They're press fit back to back inside the gearcase head assembly (#25). Looks like #26 isn't available here, but my Sierra lower unit seal kit included them both.
 

2manband

Seaman
Joined
Jul 10, 2011
Messages
62
Re: My Johnson Workhorse rebuild project


I recall reading through that link, and I think that will be helpful in getting the drive shaft seals out of the lower unit, but for now I'm stuck (pun intended) on the ones for the prop shaft.

I suppose that if I had access to a slide hammer and the appropriate fittings I could use that for the drive shaft seals as well.

I'm sort of leaning towards buying a cheapo version of type in my bottom pic. I also tinker with rebuilding old woodworking machines, and pulling bearings is a common problem that I run into - so it would be useful for more than just this project.

But I would hate to buy one and then have it not work. Seems to me that it would, but figured I'd check with the more experienced crowd here.
 

kfa4303

Banned
Joined
Sep 17, 2010
Messages
6,094
Re: My Johnson Workhorse rebuild project

Removing old seals can be a PITA. I've had ok luck (sort of) using a long flat head screwdriver and driving them out from the backside, or using a puller like the one below, but unless you get real lucky, they usually have to be snipped, clipped and chipped out of place. Just be patient, cuss a lot and try not to damage the relatively soft aluminum housings in which the seals are housed.
 

Attachments

  • Seal_Puller.jpg
    Seal_Puller.jpg
    22.9 KB · Views: 0

2manband

Seaman
Joined
Jul 10, 2011
Messages
62
Re: My Johnson Workhorse rebuild project

......try not to damage the relatively soft aluminum housings in which the seals are housed.

That's exactly what I'm worried about. I'm a big proponent of having the right tool for the job (and of time + penetrating oil). I've ruined an expensive part or two by going after pressed fittings with the wrong tool, and have vowed to never do it again.

In this case I can't justify $175 for the right OMC tool, but I could manage $40 or so for a cheapo slide hammer setup - especially because I can use for other stuff.

In any case, I'll take the replacement seal along with me in my pocket to make sure that one of the expanding collets would fit properly.
 

jasper60103

Commander
Joined
Sep 18, 2008
Messages
2,055
Re: My Johnson Workhorse rebuild project

Yea, I heard a lot of trouble with these seals too. I think I heard someone had success using a dremel tool, but don't quote me on this. Please keep us posted and the pics coming. I may have a lower unit rebuild in my future. Thanks.

edit: I did some searching. Here's a thread that may be helpful...
http://forums.iboats.com/showthread.php?t=459267
 

kfa4303

Banned
Joined
Sep 17, 2010
Messages
6,094
Re: My Johnson Workhorse rebuild project

Believe it or not, a good vice, a $10 seal puller and patience are probably you're best bet. Gotta remember when these old gems were designed the idea of a "special tool" to do routine maintenance, like changing oil seals was, ridiculous. Using rags, or small wooden shims underneath the puller is usually enough to prevent and damage to the housing.
 

2manband

Seaman
Joined
Jul 10, 2011
Messages
62
Re: My Johnson Workhorse rebuild project

Mission accomplished:

I borrowed a slide hammer and pilot bearing puller from the local mega-autoparts chain (free of charge) and used it to pull the seals from the headcase. I allowed some liquid wrench to penetrate for 24 hours, fitted the pilot bearing puller - which was almost too big, but just made it - applied the slide hammer, and - holding the headcase in one hand and the slide hammer in another, had the first seal removed in about 3 or 4 whacks, reset and had and the inner seal removed in 3 or 4 more.

Worked like charm, no damage done whatsoever, and didn't cost a dime.

I then reinstalled the new seals by using an artist's brush to paint on a very thin bead of red permatex and driving them home with a rubber mallet and an appropriately sized socket. Packed the area between the seals with marine grease and called it done.

I'm headed back out to the garage now to pull the drive shaft seals from the lower unit with the same tool before I have to return it (I have it for 5 days)

Sealpuller.jpg


I love it when a plan comes together.

Hannibal.jpg
 

kfa4303

Banned
Joined
Sep 17, 2010
Messages
6,094
Re: My Johnson Workhorse rebuild project

awesome! cool tools. even better when they're free :) Thankfully, getting the seals out is the hardest part. The rest is pretty easy. What type of permatex did you use? The manuals say to use 3M 847 gasket sealant on the seals, but it's hard to find and a little pricey. I've tired permatex ultra black and permatex aviation gasket sealer with so-so results, but I'm always curious to see what other folks are using.
 

jasper60103

Commander
Joined
Sep 18, 2008
Messages
2,055
Re: My Johnson Workhorse rebuild project

That's great news and thanks for the update. I'll have to save this thread for future reference.
 

2manband

Seaman
Joined
Jul 10, 2011
Messages
62
Re: My Johnson Workhorse rebuild project

awesome! cool tools. even better when they're free :) Thankfully, getting the seals out is the hardest part. The rest is pretty easy. What type of permatex did you use? The manuals say to use 3M 847 gasket sealant on the seals, but it's hard to find and a little pricey. I've tired permatex ultra black and permatex aviation gasket sealer with so-so results, but I'm always curious to see what other folks are using.

I ended up using the red kind. I intended to use the aviation stuff, but nobody stocked it locally and I didn't really want to delay the project waiting for delivery. As I understand it, one of the main advantages of the aviation permatex is that it comes in a can with a brush, which makes it easier to apply a thin bead. I figured I could duplicate that aspect of it by using an artists brush.

I got the driveshaft seals replaced last night - the old ones popped right out with the same slide hammer. Also rebuilt the water pump. Today I rebuilt the carb, installed new fuel lines and fuel pump. The old fuel pump had a tear in the diaphragm - I decided to replace instead of rebuild the water pump because it was so finicky to get back together.

So I'm getting pretty close to being done. Still waiting on some detent balls for the clutch dog on the prop shaft (part #29 in the link above) because, of course I lost one during disassembly. Then I'll be ready to button it up and give it a test.
 

2manband

Seaman
Joined
Jul 10, 2011
Messages
62
Re: My Johnson Workhorse rebuild project

OK - I've encountered my first problem:

I got everything buttoned up yesterday, and put the motor into a trash can full of water for a test run. It fired up on the second pull. Excellet!

BUT- after running for 30 seconds or so it started to miss, and then miss more and more, and then it died. Pulled the plugs and they were wet with fuel so I don't think it was a fuel delivery issue.

I could get a spark by grounding out the plug, but my open-air spark tester won't arrive for a few more days, so I wasn't able to get a good read.

I pulled the cord a few times to blow out the cylinders, thinking that I had flooded it. In desperation, I tried a little shot of carb cleaner in each plug hole (I know, I know) but couldn't even get it to fire on that.

I'm thinking power pack. I understand that these can often begin to fail as the motor warms up. Im gonna go through the trouble shooting procedure here:
http://www.cdielectronics.com/downloads/troubleshooting guide/OMC 2 Cylinder 1977-2006 4-60 HP.pdf
and see what I come up with.

What a bummer. I thought I might be able to go fishing today.
 

jasper60103

Commander
Joined
Sep 18, 2008
Messages
2,055
Re: My Johnson Workhorse rebuild project

Well, it sounds like you're getting close. Hang in there!
 

kfa4303

Banned
Joined
Sep 17, 2010
Messages
6,094
Re: My Johnson Workhorse rebuild project

Hello again 2man. Sorry to hear about the engine troubles. The good news is that it ran for a bit, so the compression is probably ok and you said that fuel delivery seems to be ok, so all that remains is spark. Unfortunately, I don't know much about the fancy electronic ignitions, but this link may be of some help. You should be able to get any replacement parts you may need right here at iboats and/or marineengine.com. Good luck. Keep us posted.

http://www.leeroysramblings.com/johnson_9.9_magneto.htm
 

2manband

Seaman
Joined
Jul 10, 2011
Messages
62
Re: My Johnson Workhorse rebuild project

Well I had a little more time to mess with the motor this evening. Replaced the plugs with the proper kind and the proper gap.

Motor fired up on the second pull. Ran great in a barrel of water for about 5 minutes (longer than before) and then started sputtering, missing, and died. Applying some choke helped when the sputtering started, but 20 or 30 seconds later I couldn't even keep it running on choke.

I wasn't able to run the full CDI diagnostic because I only have a cheapo analog multimeter. But I tested what I could and did get a few screwey resistance readings on some of the leads that can indicate a power pack problem (per the CDI troubleshooting guide). Of course they may also indicate a problem with the sensor/trigger under the flywheel. I don't really know because I can only measure resistance, not DVA.

When the motor runs, I can stop it, disconnect a lead and observe a good 7/16" spark. Once it dies I get no spark. I also disconneced the kill switch - no change, so that's not the problem. I tested every ground that I could find, and they're all snug and reading zero ohms.

Once I finished the diagnostic tests (maybe 15-20 minutes time), I hooked things back up and the motor fired again. It ran a while (maybe 1-2 minutes) and then died the same way.

I went ahead and ordered a new powerpack. I feel about 70% sure that's the problem - it would be nice to run the full diagnostic and know for sure, but a decent digital multimeter and DVA adapter will cost me more than the powerpack will. And then I may well have to buy the powerpack on top of that. Plus I figure that since it's a restoration project, and the motor is 30+ years old, and because powerpacks do go bad, it might not be a bad idea to replace it anyway.

So one more weekend of waiting and not fishing.

Things were so much simpler when I just had a canoe. :D
 
Top