My Larson Project

groom1234

Cadet
Joined
Dec 18, 2013
Messages
15
Hi all,
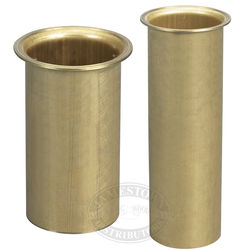
I posted earlier about my project, which is going well. Just a question. This is a 64 model. There are drain holes through the transom for the splash well and the bilge. They appear to be light gauge brass tubes, beaded on one end, that were inserted through a hole in the transom and flared to make a seal. So I guess there are two questions: Am I right about the method, and how do I get them out? I am assuming the I either bang them or drill them out. Knowing what it means to assume, I decided to inquire here first. Any help will be appreciated.
Jules
 

jbcurt00

Moderator
Staff member
Joined
Oct 25, 2011
Messages
25,169
Re: My Larson Project

You can use a bare hacksaw blade to score the tube, it's likely got an adhesive holding it in place too. Not going to save it for re-use, so by any means necessary to get it out.

Iboats sells the replacement tubes in a few diamters & a few types of material: brass, aluminum, plastic. As do other vendors.
613.jpg

You can make your own flaring tool:
FlaringTool.jpg


Or a Moeller flaring tool:
020700-00_07272-72dpi.jpg
 

groom1234

Cadet
Joined
Dec 18, 2013
Messages
15
Re: My Larson Project

Well, thank you for the prompt reply jbcurt00. Info duly noted!
Two other questions: I seem to have two threads going; what or who is MOD? Should probably keep only one going. Or just abandon the first one?

Second; I've seen several references to
foam filled fiberglass stringers
, which I appear to have in my Larson. Would anyone care to comment on how I navigate this condition? Do I have to cut everything out, is there a short cut which will allow the reuse or adaptation of the existing structure, any help/suggestion gratefully accepted.
Jules
 

jbcurt00

Moderator
Staff member
Joined
Oct 25, 2011
Messages
25,169
Re: My Larson Project

A moderator (or MOD, Mod, mod) is one of the nice fellas that help keep this site & forum running smooth and they can combine your Larson threads, just PM, private message, 1 of the guys in the list here:
Contact Moderators

The 1st thread's posts will be 1st (it's ordered by date) no matter which thread you pick to keep using, and which you'd like pasted into it.

I'm don't know which Larson models &/or years had foam filled stringers, but if they are in good shape, not delaminating from the hull and remain fairly intact as you remove the deck (floor) you may have gotten lucky. Before I suggest a method of checking them, tell you to re-use them (if you pull them out) or tell you to leave them as is, I'd like to see them.

My 1960 Glastron FireFlite also has no wood inside the stringers. Since mine are in great shape & well adhered to the hull I don't plan to remove them. I may add a layer of glass to them & across the rest of the hull, it is quite flimsy & thin. But that is mostly for my piece of mind. I know it isn't really necessary. But mine are also empty, hollow shells, not foam filled.

So lets get a look at this Larson of yours.
 

groom1234

Cadet
Joined
Dec 18, 2013
Messages
15
Re: My Larson Project

I will post pics as soon as I have a replacement USB cable as I lost mine
 

JASinIL2006

Vice Admiral
Joined
Feb 10, 2012
Messages
5,731
Re: My Larson Project

I replaced ghe transom and deck in my Larson 186 (see the link to my restoration thread in my signature block below. My boat also has the foamfilled fiberglass stringers and bulkheads. What did you want to know about them? Maybe I can help.

Jim
 

groom1234

Cadet
Joined
Dec 18, 2013
Messages
15
Re: My Larson Project

JAS & jbcurt,

jbcurt your answer to the drain tube Q, is remarkable. How did you do that?

On to the stringers; no pics yet but here is a brief description. There are two of them running B to S, one each side of center, 6 inches out. So, a 12 inch space down the center of the boat. They are each 10 inches wide, 6 in deep on the CL side and 4 in on the outboard side. They are glassed with a very coarse, 90 degree weave cloth (the strands are abt 3/16 wide). It appears that there is a single layer. The glass is broken on top but the sides are solid and adhesion to the hull is perfect, except for dirt.

Under the broken glass is a layer of "wood", a 1 x 10. It's completely shot. At 2 or 3 places there are cross members running P to S. they are incorporated into the stringers and run just under the 1 x 10, but not to the hull. They supported a strip of 1 x ply that ran down the center, and was flush with the tops of the finished stringers, to provide a level surface for the deck.

The deck plywood was set in wet resin on top of the stringers, and stapled down to both the stringers (puncturing them), and to the other wooden support members. There are rusted staples as evidence. Then the whole thing was glassed over and tabbed at the edges, etc.

All the wood is gone and will be removed. Right now it looks like I will need only to remove the old glass down to the foam, place new wood, and glass over the top.

The keel is 2 or 3 inches tall by about 1 1/2 wide. Same kind of glass, and appears to be sound. I think there is foam in there as well and will drill pilot holes to verify. Other than that there is no stringer down the center. I will core the stringers at the bottom to see if the foam is
dry and if so, I think I dodge a big bullet.

I found the HIN and am writing to Larson to see if they have any info. so more later with pictures.
Jules
 

jbcurt00

Moderator
Staff member
Joined
Oct 25, 2011
Messages
25,169
Re: My Larson Project

jbcurt your answer to the drain tube Q, is remarkable. How did you do that?

Do what?
BTW: its John

On to the stringers......
If the 1X10 wood STRINGERS are rotten, I'd be willing to bet the foam beneath them will be compromised as well. If these areas are compromised, I suspect the keel wood & transom will be as well.
 

groom1234

Cadet
Joined
Dec 18, 2013
Messages
15
Re: My Larson Project

Hi John,
So, rain on my parade LOL. I am doing the transom as it has issues. I'm going to use a small hole saw and a right angle drill to do some core samples along the stringers and keel. We shall see what we shall see. What I really hope is that the chines are solid! Should have a cable in a couple of days.
I was complimenting your cut and paste job re the tubes.
Later,
Jules
 

jbcurt00

Moderator
Staff member
Joined
Oct 25, 2011
Messages
25,169
Re: My Larson Project

Right click an online image, choose copy image, come back to your post & paste the image into your replies.

Works @ my browser & iboats software most of the time. Need to be careful not to repost copyrighted or trademarked images & info though. Occasionally the website I get the pix from, have them saved in website 'coding' formats that don't copy & paste correctly. It usually appears to be pasted correctly on my end before I hit submit, but then when my reply goes live online, there's no image, or an image square w/ a red X in it. Still others have copy disabled on their online images so you can't copy them.

Else, not much too it. Photobucket works pretty good most of the time. For stuff I deem important enough to save & reference I use it, rather then copy/paste so I can re-use the image regularly.......
 

groom1234

Cadet
Joined
Dec 18, 2013
Messages
15
Re: My Larson Project

My cable came today and here is a shot of the boat. My first attempt so I don't know what to expect.
J


IMG_0746_1024.jpg
 

coolbri70

Lieutenant Commander
Joined
Oct 6, 2011
Messages
1,554
Re: My Larson Project

nice looking boat:thumb:, wish my chrome and gelcoat was in that good of shape
 

groom1234

Cadet
Joined
Dec 18, 2013
Messages
15
Re: My Larson Project

So, hopefully I am starting to get the posting pic thing down. We'll see. My last post had the bow view; here is the stern;
IMG_0748_1024.jpg

I removed the transom caps, and exposed the ugliness beneath:
IMG_2075_1024.jpg

Then, using the mighty Rigid version of a Fein Tool, and a screw chisel (LOL) I removed the gunk and separated the Cap from the transom:
IMG_2077_1024.jpgIMG_2078_1024.jpgIMG_2076_1024.jpgIMG_2075_1024.jpg

So far, so good.

I will be posting some pics of the separation process (decapitating I think). I have the rub rail off on one side and began to remove the staples holding it together. I started to get some deformation and stopped as I have questions. More later.
Thanks to all who are following and please know that I am appreciating all input.
Jules
 
Last edited:

groom1234

Cadet
Joined
Dec 18, 2013
Messages
15
Re: My Larson Project

Hey boaters,
I have begun to separate the deck and hull which are fastened together with staples through lips on the hull and deck, just like paper is. The staples go through the deck lip, then the hull lip and are curled back on themselves to fasten the two pieces together. Does anyone know more about this process or where I might find a stapler (electric, pneumatic?) which would handle the 3/16 to 1/8 inch thickness of the two layers of fiberglass? You can see the condition in pics 3 and 4 above. I guess what I am really asking is: how am I going to fasten the deck and hull together again, when the project is going back together? I don't think that pop rivets will work because of the shape of the rub rail aluminum extrusion; there is just enough room in the cavity to fit over the seam. Pop rivets are not flush on one end and I think will interfere with the fit. Or is there a pop rivet that is flush on both sides?
 
Last edited:
Top