Pinging Ckalupa

rpdwyer

Seaman Apprentice
Joined
Apr 22, 2012
Messages
38
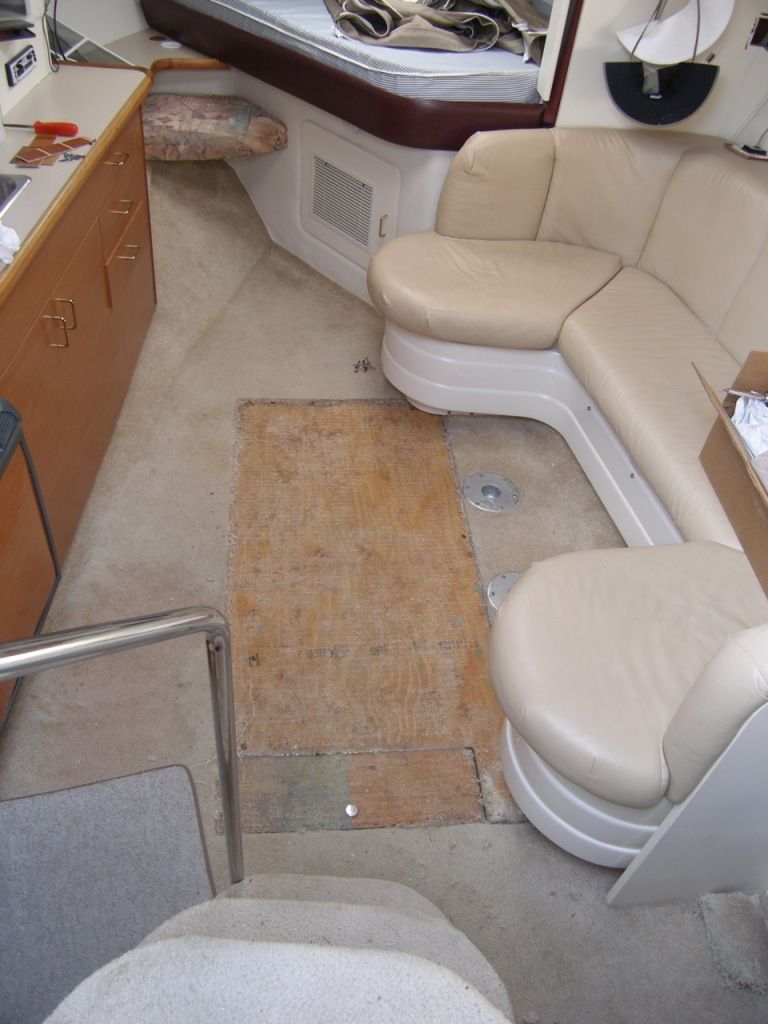
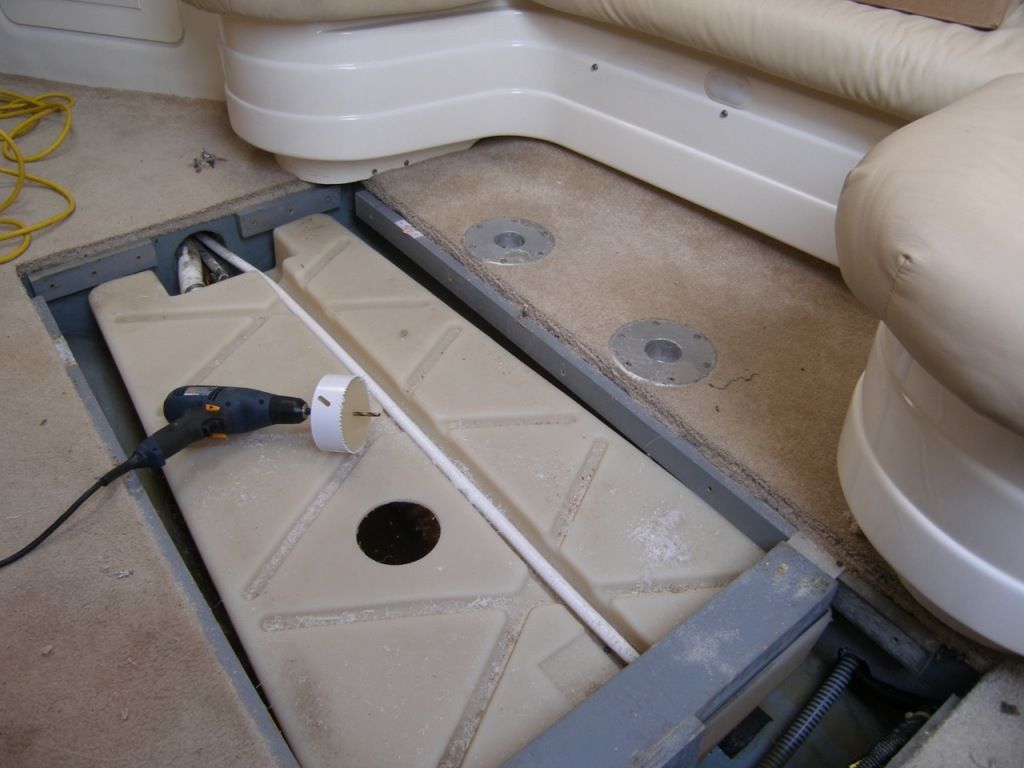
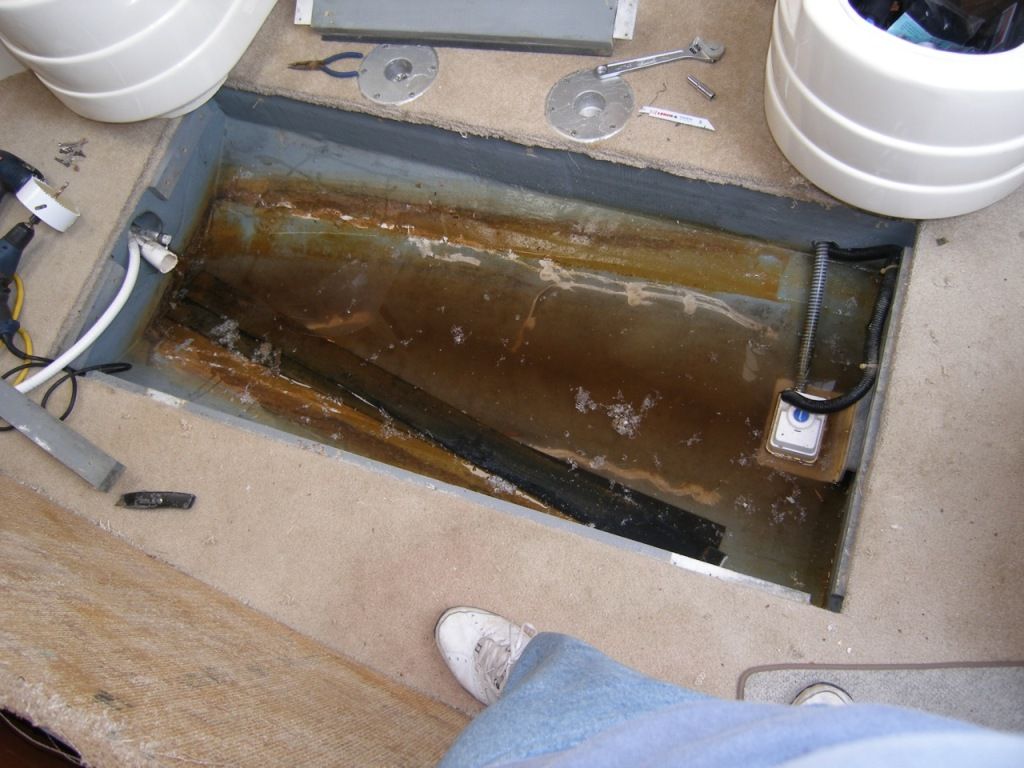
So I have started my winter project of removing all horizontal carpet with Lonseal Teak and Holly laminate.

Problem I am having is removing the lounge seat base. I have disconnected all screws at the base and two in the aft storage closet as well. The aft part of the lounge is free and will move forward, but clearly it is still being held by some screws at the forward section where the back cushion butts up against he forward bulk head/divider for the forward berth.

However, I cannot find a way to get access to these screws. Currently the back cushion is still attached to the base... and I found the nuts/bolts the hold the base to the back. Do I have to separate these first before I can pull the base out?

I didn't think it was possible because the bolts coming down form the lounge back into the base are very long so that even the nut off, the back cushion would have to be pryed up to clear the base.

Any help here is appreciated.

--Rick
 

ckalupa

Seaman
Joined
Aug 24, 2011
Messages
56
Re: Pinging Ckalupa

What I did was remove the screws from the "plastic base attaching to the floor" and tipped the whole booth forward, then removed the nuts holding the top of the booth from the plastic base and separated it. In other words what I had was the booth back was only attached to the base.

As I see you have found there were a couple screws in the closet that were going through that beauty wall for the side of the booth and also into the booth back itself. There were none like that in the front (by the bed). I found it helped to remove that wood panel pc by the step (the steps side of the booth) and if you have it, remove the flip top bench in front of the closet and associated parts (also attaches to the under-cockpit bed) as that all makes one assembly. Get it out of the way IMO.

Dont forget to remove that light assemble that is in the lower plastic of the booth (under-table foot lighting) - if you do, it will remove itself for you as you tip the booth forward :)
 

ckalupa

Seaman
Joined
Aug 24, 2011
Messages
56
Re: Pinging Ckalupa

Just thought of it - there may have been a couple screws through the front part that went into the top from the front berth area (I did a couple things at the same time so had to access this area anyhow). I lifted the mattress off the bed and went through the hole on top.
 

rpdwyer

Seaman Apprentice
Joined
Apr 22, 2012
Messages
38
Re: Pinging Ckalupa

Thanks for the reply. I was down there yesterday... about to give up since I had removed all nuts and screws and could not get the left side (forward) portion of the bench/seat to move... when I just decided to try one last time... this time to go straight up with it. It released at that point. There were no screws holding it from the side it just seemed as if there was. Once I went up with it several inches, I was able to pull it forward and move out.

Currently, the base is forward berth and the cushion back is in the rear berth... neither fit very well and I will be working under and around them when I go to put the new floor in. How did you handle them??? I've removed the white wood panel just infront of the little flip up bench... but have actually left the flip up bench top in place because it's about 15 screws to remove.

The 2 metal table base holders are removed. The next time down there, I will remove the stairs and will likely use a long straight edge to run my razor against to cut the carpet at all locations where the vertical plane meets the horizontal and rip up the carpet.

Then I will build a little tent out of plastic and sand the glue residue assuming it's not too bad. Otherwise I will go with a sheet of plywood on top.

Then I will template the area with some hardwood flooring felt and use that to cut my pattern from the lonseal. Will post pics when I've cleaned up the area... it's a mess right now.

Thanks again.

--Rick
 

ckalupa

Seaman
Joined
Aug 24, 2011
Messages
56
Re: Pinging Ckalupa

Definitely take before and after pics and post them!

THe seat base would not come out for me so I left it on the front bed. It was sufficiently out of the way to work on the rug without it. The back will come out with a bit of contortions. I had to get it out as I was recovering it. Comes out in one pc. The base, I have no clue how that would come out nor how they got it in? I suspect that went in before they put the top on the boat or at least before they put the pilot console on.

Once you start pulling up the carpet you will find it all comes out. They seem to use extra glue on the blackwater tank cover. THey also use a million staples on each step! Mark the steps as you remove them so it is easier to tell which one goes where on the re-install?

The stairs will be a lot of fun, too. Those screws are really on there and I ended up breaking the heads off of two trying to remove it. Not fun.

Like I said - post pics before (during) and after as there are a few people with these same Cabrios updating them now and this all helps.
 

rpdwyer

Seaman Apprentice
Joined
Apr 22, 2012
Messages
38
Re: Pinging Ckalupa

Thanks again for the advice. I have started a thread in another forum... but this one is more for Larson's so will post here as well. Here is the beginning of the process... removing the freshwater tank from the boat

OK, so I have never drank from our water tank.... it just bothers me the idea of water staying in the tank for weeks on end... so we bring tap water from home on the boat. But as the summer progressed, I would notice my water from the faucets was beginning to smell. Bleach and flushing the tank several times helped, but didn't ever really get rid of the smell altogether. So for a winter project, I thought I would take a look inside my water tank. To get to it, I had to remove the carpeting from the access panel to get at the screws holding it down. Here's the access panel sans carpet:

P1010052.jpg


Had to rip the carpet off... and it smelled! There is no smell when you take whiff on the top of the carpet (and it's clean), but the under side had residual moisture and it smell like mildew... Thats where that elusive smell inside the closed up cabin has been coming from! Going to remove all carpet on horizontal surfaces and replace with Lonseal Teak and Holly... but more on that later.

Access panel removed, tank showing:
P1010054.jpg


Dirty lines... that's OK, I'm replacing them all.

P1010055.jpg


I cut an opening for a 4" water tight deck plate to have a look inside:
P1010056.jpg


So I stuck my camera in the hole... now I know why my water smelled!
P1010057.jpg


Water drained into the bilge, lines cut and tank removed. My bilge needs a good cleaning and a new coat of grey bilge paint:
P1010059.jpg


So I have the tank here at home... will power wash it and clean it up nice before I put it back in. Will replace the fitting and it will get new lines to it.
 

rpdwyer

Seaman Apprentice
Joined
Apr 22, 2012
Messages
38
Re: Pinging Ckalupa/ Cabrio 310 flooring redo

Re: Pinging Ckalupa/ Cabrio 310 flooring redo

I intend to reroute the old water fill from the starboard side of the boat to the port side why???? have a look at this last photo:

P1010051.jpg


Really Larson... water fill is all of 4" away from pumpout?

Anyway, will post more as I make progress.

I am in the process of removing the lounge seat so i can use a sharp razer to cut out the carpet where the lonseal is to go. The lounge is proving difficult to remove.
 

rpdwyer

Seaman Apprentice
Joined
Apr 22, 2012
Messages
38
Re: Pinging Ckalupa

While my tank will remain clean going forward, for actual drinking water purposes I will be using the following:

screenshot20121114at911.png


screenshot20121114at912.png


The blue BPA free water bottle I will fill with our tap water from home (well water) each time out. The faucet will mount just off to the right of the galley faucet and use the same sink. The tank will be underneath the galley sink cabinet. Total clear hose line run... about 2 feet.

--Rick
 

ckalupa

Seaman
Joined
Aug 24, 2011
Messages
56
Re: Pinging Ckalupa

Thanks again for the advice. I have started a thread in another forum... but this one is more for Larson's so will post here as well. Here is the beginning of the process... removing the freshwater tank from the boat

OK, so I have never drank from our water tank.... it just bothers me the idea of water staying in the tank for weeks on end... so we bring tap water from home on the boat. But as the summer progressed, I would notice my water from the faucets was beginning to smell. Bleach and flushing the tank several times helped, but didn't ever really get rid of the smell altogether. So for a winter project, I thought I would take a look inside my water tank. To get to it, I had to remove the carpeting from the access panel to get at the screws holding it down. Here's the access panel sans carpet:

P1010052.jpg


Had to rip the carpet off... and it smelled! There is no smell when you take whiff on the top of the carpet (and it's clean), but the under side had residual moisture and it smell like mildew... Thats where that elusive smell inside the closed up cabin has been coming from! Going to remove all carpet on horizontal surfaces and replace with Lonseal Teak and Holly... but more on that later.

Access panel removed, tank showing:
P1010054.jpg


Dirty lines... that's OK, I'm replacing them all.

P1010055.jpg


I cut an opening for a 4" water tight deck plate to have a look inside:
P1010056.jpg


So I stuck my camera in the hole... now I know why my water smelled!
P1010057.jpg


Water drained into the bilge, lines cut and tank removed. My bilge needs a good cleaning and a new coat of grey bilge paint:
P1010059.jpg


So I have the tank here at home... will power wash it and clean it up nice before I put it back in. Will replace the fitting and it will get new lines to it.

I have been offline for a while (boats are put up for the winter). I dont think that is your fresh water tank under the floor. That likely would be your holding tank. The fresh water tank is located up under your bed to the left of the AC unit right there with the water pump and filter. Not real easy to get at. I changed my filter to a new screen kind that was easier to get apart (albeit still not "easy")
 

rpdwyer

Seaman Apprentice
Joined
Apr 22, 2012
Messages
38
Re: Pinging Ckalupa

I have been offline for a while (boats are put up for the winter). I dont think that is your fresh water tank under the floor. That likely would be your holding tank. The fresh water tank is located up under your bed to the left of the AC unit right there with the water pump and filter. Not real easy to get at. I changed my filter to a new screen kind that was easier to get apart (albeit still not "easy")

Heh... wouldn't that be a shock. But no, it is the freshwater tank. The holding tank is under the vberth... as when I bought the boat, the waste lines from the head to the tank were the first things I replaced. Also, the holding tank has 2 1.5" lines running to it... one from the head and one to the pumpout. The freshwater tank has one 1.5" for fill and two 3/4" for venting and running to the pump itself.

I will need to update with pics soon as the clean tank and new lines are in... just too busy lately to get down to the boat to make more progress on my flooring redo.

--Rick
 

ckalupa

Seaman
Joined
Aug 24, 2011
Messages
56
Re: Pinging Ckalupa

I better go back and check mine out again :)

Not that I needed to do anything with the tanks but it just looked like the hoses were running from the water pump to that tank up under the bed. Never really followed it through but thought that it made sense to be close to the tank it was pulling from. Unless my boat is plumbed differently?? Have to check it out.

Trying to imagine why they would put the pump all the way up under the bed and put the water tank in line with the sink 6 feet back - then run the hoses up to the nose of the boat for the pump and all the way back to the sink and further back for the sink in the head and even further back for the sink up in the cockpit. Remarkable.......
 

ckalupa

Seaman
Joined
Aug 24, 2011
Messages
56
Re: Pinging Ckalupa

So did you ever get that base of the booth out of there for your flooring project?
 

rpdwyer

Seaman Apprentice
Joined
Apr 22, 2012
Messages
38
Re: Pinging Ckalupa

I better go back and check mine out again :)

Not that I needed to do anything with the tanks but it just looked like the hoses were running from the water pump to that tank up under the bed. Never really followed it through but thought that it made sense to be close to the tank it was pulling from. Unless my boat is plumbed differently?? Have to check it out.

Trying to imagine why they would put the pump all the way up under the bed and put the water tank in line with the sink 6 feet back - then run the hoses up to the nose of the boat for the pump and all the way back to the sink and further back for the sink in the head and even further back for the sink up in the cockpit. Remarkable.......

Yours might be plumbed differently... but not likely. Under the vberth mattress are two access panels. The big one gives you access to the waste tank area. If you open that panel and you see two 1.5" hoses attached to that tank (and a 5/8" vent hose)... that's your waste tank. The water tank only uses one 1.5" line... for filling. The two smaller are for venting and for running to the pump itself.

As for the lounge base, I have it currently inside the aft berth area. Only about 3/4 of it fits there so the it hangs into my working area... which makes things more difficult. Currently I have ripped up my carpeting on the flat surfaces and made templates from hardwood flooring felt for the thin sheets of panel wood I am going to put down for a smooth sub floor. Haven't gone past that yet as I have been too busy with the holidays. Maybe this weekend I will get down there.

--Rick
 

ckalupa

Seaman
Joined
Aug 24, 2011
Messages
56
Re: Pinging Ckalupa

Ug - you mean you are sleeping over a sewer? :grumpy:

Have you figured out where the shower sump pump discharges? Also, I noticed in your picture that you do not have a pump located in where the fresh water tank is (you may have pulled it before taking the pic) - where does that go?

-edit - it is in one of the pic - I believe that this the forward bilge pump but never found which outlet that discharges from.
 

rpdwyer

Seaman Apprentice
Joined
Apr 22, 2012
Messages
38
Re: Pinging Ckalupa

Ug - you mean you are sleeping over a sewer? :grumpy:

Have you figured out where the shower sump pump discharges? Also, I noticed in your picture that you do not have a pump located in where the fresh water tank is (you may have pulled it before taking the pic) - where does that go?

-edit - it is in one of the pic - I believe that this the forward bilge pump but never found which outlet that discharges from.

Yes on sleeping over a sewer bit (I believe you are as well :) )... but it emits no smell or any noise whatsoever when flushed... likely because when I replaced the lines, I removed the tank, powerwashed it, replaced the fittings and used generous amounts of 4200 on the threads. Also, I had new mattresses made for both the forward and aft berths... much thicker than what was there so between the 8" mattress on top of carpet covered plywood base, there is no noise whatsoever.

Yes... on the shower sump... I finally found that the last time I was at the boat. It's in the base of sink cabinet in the head area. You open the little cabinet door to the sink base and remove two screws securing the wooden shelf and pull it out. The shower sump is below this wooden shelf sunken into the hull. Not exactly easy access.

Regarding the forward bilge pump in the picture, it discharges out right next to the AC unit discharge... which is roughly half way between the forward starboard window and the middle starboard window.

I'm going to try to get down to the boat on Sunday to template out the panels and get them in place. Will take pics while I'm there to show progress... and to show you the nice message some of the boys in Pulaski left on the backside of the lounge when they assembled the boat.

edit - here are some pics of the cleaned up water tank before I put it back in the boat

p1010002jr.jpg

p1010003ki.jpg


--Rick
 

ckalupa

Seaman
Joined
Aug 24, 2011
Messages
56
Re: Pinging Ckalupa

nice job on the tank clean-up! I knew where the shower sump was mostly because the vanity cabinet comes loose when I am pounding on the water and saw it. Had to fix the pump. It works - just not sure where it discharges to?? I also saw on the AC unit that it says to keep the shower sump running when the AC is on. Not sure I like that so I cycle it ever so often when I am running the AC. I never did see if the AC cooling coil water drained into the shower sump or where it went? Again, leave it to the engineers to put something up under the berth bed, then make it run all the way around the boat and 2/3's way back to drain into the shower sump :)
 

rpdwyer

Seaman Apprentice
Joined
Apr 22, 2012
Messages
38
Re: Pinging Ckalupa

Do you have "after" pics of the remodel yet?

I wish I did because that would mean I am done. Unfortunately, I am not. Carpet is still up, but no floor down yet.

I've done some mods in the engine compartment and elsewhere but have not finished the floor yet. If I can get get the new sub floor glued and screwed down this upcoming weekend then roughly two weeks from now, I can get put the new lonseal floor down. Sub floor was dry fit yesterday so I might even try later this week one night. Pictures will be forth coming... but right now, it's a big mess.

--Rick
 

rpdwyer

Seaman Apprentice
Joined
Apr 22, 2012
Messages
38
Re: Pinging Ckalupa

Do you have "after" pics of the remodel yet?


My Lonseal Teak and Holly arrived yesterday. This weekend, I will finish prepping the new subfloor and template out the area to get Lonseal so next week I can install it. The week after it gets splashed. Will post pics when I begin and finish the install.

--Rick
 

rpdwyer

Seaman Apprentice
Joined
Apr 22, 2012
Messages
38
Re: Pinging Ckalupa

4 new pics... template on top of material, flooring cut to template, flooring laying in the boat and flooring glued down with cut out for bilge door access.

This week I will route along the bilge door opening to get a nice clean cut and then cover the bilge doors with flooring as well. Then reglue down the carpeting where it abuts the new flooring.
Then I can put it all back together again.

flooring1.jpg

flooring2.jpg

flooring3.jpg

flooring4.jpg
 
Top