project 88 winner intrigue 1700, 3.0 GM Mercruiser I/O

JdavidG

Cadet
Joined
Aug 14, 2015
Messages
14
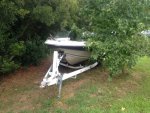
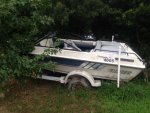
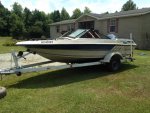
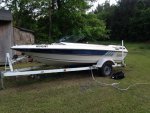
So this will be the first boat I've ever worked on, fixed up, repaired, what have you. I hesitate to say restore, it's an almost thirty year old ski boat that has been sitting outside for a few years. I bought it last year for three hundred bucks and after tearing out the seats and trying unsuccessfully to turn the engine over I figured it would need to be torn down to see what was needed.
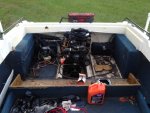
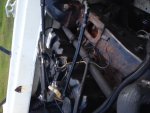
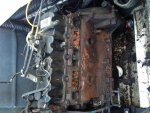
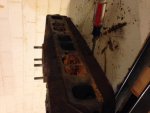
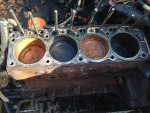
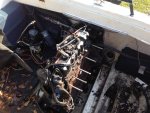
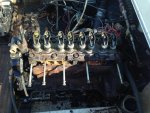
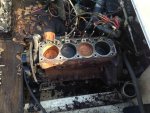
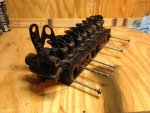
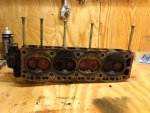
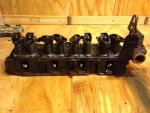
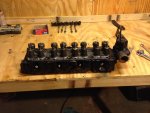
​Now after not doing anything with it for awhile I've begun the process of tearing the engine down to repair it. There's rust in the intake, and there was water in the oil when it was changed last year.
Besides the engine issues there's also water damage in the floor where the gas tank sits in the back, and it needs to be reupholstered.
I'll post pictures when I can and I'll keep this updated, I have experience in motorcycles, small engines and forklifts, so the wiring and engine work will be a breeze but the fiberglass and hull repair I'm sure I'll have a lot of questions about.
I look forward to this experience.
Joe.
 

JdavidG

Cadet
Joined
Aug 14, 2015
Messages
14
No Title
 

Attachments

  • photo242734.JPG
    photo242734.JPG
    159.5 KB · Views: 0
  • photo242735.JPG
    photo242735.JPG
    138.4 KB · Views: 0
  • photo242736.JPG
    photo242736.JPG
    151.5 KB · Views: 0

JdavidG

Cadet
Joined
Aug 14, 2015
Messages
14
No Title
 

Attachments

  • photo242737.JPG
    photo242737.JPG
    132.1 KB · Views: 0
  • photo242738.JPG
    photo242738.JPG
    94.1 KB · Views: 0
  • photo242739.JPG
    photo242739.JPG
    153.8 KB · Views: 0

sphelps

Supreme Mariner
Joined
Nov 16, 2011
Messages
11,475
Welcome aboard ! Nice looking boat ! Before you start tearing to much apart on the motor I would check all the stringers and transom for rot ... If they are bad you'll
will need to pull the motor to fix them ... Then you will have better access to the motor and the boat structure ..
Good luck and let us know how we can help !
 

JdavidG

Cadet
Joined
Aug 14, 2015
Messages
14
Thank you. since I found water in the oil when I changed it last fall and rust in the head I suspect that I'll be pulling the engine anyway to clean up the bottom end. I suppose I'll check the stringers and transom when I get to that point.

Is there a way to check the stringers before tearing up the deck? Any tell tale signs I should look for?
 

JdavidG

Cadet
Joined
Aug 14, 2015
Messages
14
No Title

I pulled off the end cap and water inlet of the Manifold to see all the rust and damage I am going to have to clean up. There's quite a bit to do.
 

Attachments

  • photo242943.JPG
    photo242943.JPG
    91 KB · Views: 0
  • photo242944.JPG
    photo242944.JPG
    93.8 KB · Views: 0
  • photo242945.JPG
    photo242945.JPG
    89.9 KB · Views: 0

sphelps

Supreme Mariner
Joined
Nov 16, 2011
Messages
11,475
Check out the motor mounts and anywhere you can get to the stringers ... Maybe a ski locker or inspection hatch .. Take a 1/4" drill bit and drill some holes down low on the stringers in many places ... Light colored dry shavings are good ...dark wet mushy shavings bad ... If you find no bad wood you can seal the holes with 5200 ... Check the transom also ...Careful not to go through the hull ..
 

JdavidG

Cadet
Joined
Aug 14, 2015
Messages
14
No Title

Got the tarp off the boat again and removed the head, found what I assumed would be there, rusty pistons and cylinders. next step is removing the outdrive and the block. It's been awhile since I've worked on anything that smells like stale gas, so that was a plus.
 

Attachments

  • photo243886.jpg
    photo243886.jpg
    79.7 KB · Views: 0
  • photo243887.jpg
    photo243887.jpg
    86.8 KB · Views: 0
  • photo243888.jpg
    photo243888.jpg
    101.2 KB · Views: 0
  • photo243889.jpg
    photo243889.jpg
    100.7 KB · Views: 0
  • photo243890.jpg
    photo243890.jpg
    96.1 KB · Views: 0

JdavidG

Cadet
Joined
Aug 14, 2015
Messages
14
No Title

One head bolt was so badly rusted that I used a 17mm instead of a 19mm to turn it off, after hammering the socket in place.
 

Attachments

  • photo243891.jpg
    photo243891.jpg
    98.1 KB · Views: 0
  • photo243892.jpg
    photo243892.jpg
    98.6 KB · Views: 0
  • photo243893.jpg
    photo243893.jpg
    94.3 KB · Views: 0
  • photo243894.jpg
    photo243894.jpg
    99.5 KB · Views: 0
  • photo243895.jpg
    photo243895.jpg
    100.7 KB · Views: 0
Top