Proper procedure for setting base timing on a 1995 Mercruiser 5.7 TBI?

Devil_Inside

Petty Officer 3rd Class
Joined
Jun 17, 2007
Messages
76
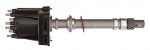
I am trying to find the correct procedure for setting the base timing on my 1995 Mercruiser 5.7 TBI, engine serial number 0F293683. The engine has MEFI-1 ECM and a Delco EST distributor.

I had to remove the distributor in order to replace my intake manifold and now I need to set the correct timing. I have a Mercruiser service manual and a Seloc service manual, but neither describes the procedure in great detail.
 

Attachments

  • photo266434.jpg
    photo266434.jpg
    15.4 KB · Views: 5

Bt Doctur

Supreme Mariner
Joined
Aug 29, 2004
Messages
19,348
I believe its still point and shoot, no base timing.Do you know how to install a dist?
 

Devil_Inside

Petty Officer 3rd Class
Joined
Jun 17, 2007
Messages
76
I believe its still point and shoot, no base timing.Do you know how to install a dist?


The distributor is installed correctly. I found TDC on #1, made sure it is on compression stroke, dropped-in the distributor, and placed #1 ignition wire where the rotor was pointing. My firing order in in the correct order.

Here is what I found as a procedure, but I am not 100% sure if it applies to my engine or not, and I cannot find a definitive answer on that:

V6 and V8 EFI Models (EFI Ignition)

Two items of test equipment are required: an inductive pickup timing light and one of either a Scan Tool, Marine Diagnostic Code Tool or MerCruiser Special Timing Tool (Quicksilver 91-805747A1).
1. Connect timing light (91-99379 or similar) to No. 1 spark plug wire. Connect power supply leads, if applicable, on light to 12 volt battery. Refer to Specifications ? ?Engine Rotation and Firing Order,? for cylinder numbering and location.
2. Connect a shop tachometer to engine.

NOTE: Before starting engine make sure the timing tab and mark, or marks, on crankshaft damper are clean. Chalk or white paint on timing marks may help visibility.

NOTE: If NOT Using MerCruiser Timing Tool: With engine running, set the scan tool or Marine Diagnostic Code Tool to the SERVICE MODE and follow manufacturer?s instructions. On 350 Mag MPI Model, engine RPM will automatically increase to a higher RPM. You do not have to increase it manually, as stated in the following steps.

3. Connect the Timing Tool (or appropriate tool, as listed above) to the DLC connector (in the electrical box or on the electrical bracket) of the wiring harness.
4. Start the engine. Allow it to reach normal operating temperature.
5. On all models except 350 Mag MPI: Manually adjust the engine throttle to 1800 RPM.
6. Aim timing light at timing tab, located on the timing gear cover and crankshaft torsional damper. Check the timing. Refer to ?Specifications.?
7. Loosen the distributor clamp bolt enough to just be able to rotate the distributor with some resistance.
8. Aim timing light at timing tab and recheck location of timing mark. Slowly rotate the distributor clockwise or counterclockwise to adjust the timing to specified degrees.
9. Aim timing light at timing tab and recheck location of timing mark. Repeat Step 8 until timing is correct. Torque distributor hold down bolt to 30 lb. ft. (40 N.m).
10. Manually close the throttle to bring engine RPM back to idle.

IMPORTANT: Be sure to disconnect MerCruiser Special Timing Tool from the DLC connector, or set the tool to NORMAL MODE if using the Scan Tool or Marine Diagnostic Code Tool, before attempting to resume normal operations. If the MerCruiser Special Timing Tool is left in pace or the setting of the tool remains in SERVICE MODE, the ignition system will operate only in the ?Service Mode?. This means that the additional timing advance features would not function.

11. Disconnect the MerCruiser Special Timing Tool from the DLC connector. If using the Scan Tool or Marine Diagnostic Code Tool, set the tool to NORMAL MODE. Disconnect the tool.
12. Stop the engine. Turn ignition key to OFF position.
13. Remove timing light.
 

bruceb58

Supreme Mariner
Joined
Mar 5, 2006
Messages
30,589
A Delco EST needs to be put into base mode. The question of course is if that procedure you have posted is for a MEFI 1. The procedure I have from a Volvo manual that is also MEFI 1 says 1000 RPM. You should be able to use a jumper wire between terminals B and C.

You should confirm with the actual manual for your engine.
 

Bt Doctur

Supreme Mariner
Joined
Aug 29, 2004
Messages
19,348
I dont think it applies to your motor there is mention of a purple/white that is grounded to go into base timing mode for the TBV
 
Last edited:

Devil_Inside

Petty Officer 3rd Class
Joined
Jun 17, 2007
Messages
76
I dont think it applies to your motor there is mention of a purple/white that is grounded to go into base timing mode for the TBV


I called Mercruiser, yes, it does. I need a paper clip to jump A and B terminals.
 

Devil_Inside

Petty Officer 3rd Class
Joined
Jun 17, 2007
Messages
76
A Delco EST needs to be put into base mode. The question of course is if that procedure you have posted is for a MEFI 1. The procedure I have from a Volvo manual that is also MEFI 1 says 1000 RPM. You should be able to use a jumper wire between terminals B and C.

You should confirm with the actual manual for your engine.


Right. Unfortunately the manual for my engine does not list anything about that. Even the tech from Mercruiser was confused and couldn't understand why the procedure is not listed. He was actually convinced I had a Thunderbolt IV distributor until I showed him a picture... It is not common for a 1995 to have a Delco EST, but mine does.

I was told to jump terminals A and B, start the engine, let it warm up, advance throttle to 1200RPM (or more) and set the basic timing using a timing light. I will give that a shot today, hopefully I don't blow anything up...
 

alldodge

Moderator
Staff member
Joined
Mar 8, 2009
Messages
42,627
I was told to jump terminals A and B, start the engine, let it warm up, advance throttle to 1200RPM (or more) and set the basic timing using a timing light. I will give that a shot today, hopefully I don't blow anything up...

Agree, this is the correct way

And make sure you have a good supply of water on the hose, if using a hose
DLC base timing.jpg
 

bruceb58

Supreme Mariner
Joined
Mar 5, 2006
Messages
30,589
I was told to jump terminals A and B, start the engine, let it warm up, advance throttle to 1200RPM (or more) and set the basic timing using a timing light. I will give that a shot today, hopefully I don't blow anything up...
B is the terminal that gets you into base mode. A is a ground and C is also likely a ground which is why Volvo and Merc are slightly different.
 

Devil_Inside

Petty Officer 3rd Class
Joined
Jun 17, 2007
Messages
76
I figured it out, I followed the procedure outlined a few posts above, and it worked.

I have the correct FSM for my engine (even called Mercury to confirm), but for whatever reason there is no mention of that procedure or even that distributor! Even the techs at Mercruiser were puzzled by that and had no explanation why it wasn't listed. I think only the late production models 1995 with a Bravo 3 came with this setup, so it it somewhat rare.

The other thing that threw me a curveball was the fact that the engine was skipping erratically and there was an audible "knock" or "bang" associated with it. Oh and every time that happened, the timing mark would jump. I thought it could be a stuck valve or God knows what else, but it turned out that I had a bad ignition wire. It is almost never the wires, but I replaced them and the problem went away.

Now all I have to do is replace a faulty solenoid for my trim pump and I can finally hit the water.
 

alldodge

Moderator
Staff member
Joined
Mar 8, 2009
Messages
42,627
Oh and every time that happened, the timing mark would jump. I thought it could be a stuck valve or God knows what else, but it turned out that I had a bad ignition wire. It is almost never the wires, but I replaced them and the problem went away.

Good to hear your up and going in fine order, but I don't believe it

In any case hope it stays that way
 

CaptainMak

Petty Officer 1st Class
Joined
Apr 28, 2012
Messages
294
https://youtu.be/fSEwwa6D2jM

The part about the paperclip is what you probably need to set it into BASE MODE. You'll notice your RPM's go up to about 1000RPM. This is a quick video I made. Don't judge. LOL
 

Devil_Inside

Petty Officer 3rd Class
Joined
Jun 17, 2007
Messages
76
Good to hear your up and going in fine order, but I don't believe it

In any case hope it stays that way


You don't believe which part exactly? It makes sense to me, if you have intermittent spark on one cylinder, that would cause the engine to skip, which will in essence cause the timing mark to "jump".
 

bruceb58

Supreme Mariner
Joined
Mar 5, 2006
Messages
30,589
If you have a bad spark plug or wire, the energy that needs to be delivered to that plug can easily jump within the cap to any other plug wire so I see it easily that it is possible. Very hard on your coil too.
 

Devil_Inside

Petty Officer 3rd Class
Joined
Jun 17, 2007
Messages
76
If you have a bad spark plug or wire, the energy that needs to be delivered to that plug can easily jump within the cap to any other plug wire so I see it easily that it is possible. Very hard on your coil too.


I suspect that might have been the case. I replaced the cap and rotor initially, thinking that could have been it. Didn't fix the issue. Next I put new spark plugs, again no difference. Finally I replaced the wires as a last ditch effort and that worked.

Once I got the engine to run correctly, and I found the correct procedure for setting up the base timing, the rest was a breeze.
 

alldodge

Moderator
Staff member
Joined
Mar 8, 2009
Messages
42,627
You don't believe which part exactly? It makes sense to me, if you have intermittent spark on one cylinder, that would cause the engine to skip, which will in essence cause the timing mark to "jump".

Bad wire can cause a miss but at idle the timing would stay the same, no advance. Just my opinion, others differ
 

bruceb58

Supreme Mariner
Joined
Mar 5, 2006
Messages
30,589
Bad wire can cause a miss but at idle the timing would stay the same, no advance. Just my opinion, others differ
Unless the bad wire or plug causes energy to be sent down the wire your timing light is on. Seen it happen myself.

Of course the timing isn't changing and you really shouldn't see it since the light should flash 90 degrees away.
 
Top