Rotten stator wires? It can be fixed ...info on how to replace the wires

Chief34

Cadet
Joined
Sep 12, 2018
Messages
17
I decided to post this info in case it might help someone else in my shoes... I couldnt find any info other than soldering or crimping on to the wire coming out of the stator... This is assuming you have some decent wire left. In my case I didn't have any wire left that was good. I figured there must be a way to get to the windings under the factory cover and fix this stator rather than replace. It worked... Here is some info on what you will encounter...

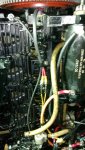
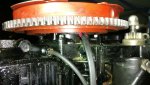
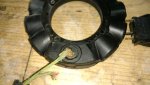
Here is what I started with...
 

Attachments

  • photo301185.jpg
    photo301185.jpg
    745 KB · Views: 9
Last edited:

Chief34

Cadet
Joined
Sep 12, 2018
Messages
17
Here is another picture closer up under the stator and flywheel... You can see the green corrosion and the outer casing is completely gone after I touched it... One of the wires fell apart right at the grommet where it enters the stator...
 

Attachments

  • photo300951.jpg
    photo300951.jpg
    815.9 KB · Views: 7
Last edited:

Chief34

Cadet
Joined
Sep 12, 2018
Messages
17
Here is a picture after the stator is removed and is upside down on the bench...
 

Attachments

  • photo301186.jpg
    photo301186.jpg
    765.4 KB · Views: 13

Chief34

Cadet
Joined
Sep 12, 2018
Messages
17
I wish I would have gotten more pics right here but I started by prying out the rubber grommet around what was left of the wires.... After the grommet is removed there is a metal ring in there. I just pried that metal ring out of the hole. Once it is out there is some "peg board" like material in there that I'm guessing is insulation... Once that was dug out ,I had to carefully clean out the black "plastic" casing that covers the entire stator.... I gently used a 3/32" drill bit and drilled through the cover in several spots around the wires... Then dug out the covering with a small flat head and needle nose pliers... You can feel the drill bit "poke" through the casing before it hits any windings... Just be careful, you don't want to hit or cut any of the windings... Once it's cleaned up you can solder a couple of new wires to the windings where the old wires were tied in... This is what it looks like...
 

Attachments

  • photo301187.jpg
    photo301187.jpg
    821.8 KB · Views: 14

Chief34

Cadet
Joined
Sep 12, 2018
Messages
17
Next I oriented the wires where I wanted them and I put a couple of pieces of blue painters tape on the outside and inside as a "form"... I was in a hurry and not sure if this was even gonna work, lol. I could have trimmed the" plastic" housing a little cleaner. A Dremel helps. It's not really plastic. That's why I put it in quotes it's fibrous. Kind of like fiberglass.... Anyway, I mixed 30 min epoxy and filled the cavity to seal it up and insulate it.... Here's what that looked like...
 

Attachments

  • photo301188.jpg
    photo301188.jpg
    780 KB · Views: 9
Last edited:

Chief34

Cadet
Joined
Sep 12, 2018
Messages
17
After the epoxy hardening and removing the tape, I slid a piece of heat shrink over both wires and put a couple of crimped ring terminals that are adheasive lined and heat shrunk.... All done. Tested AC voltage out of the stator and everything was working great! Hopefully this helps somewhe save some 💰 
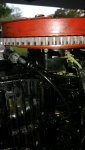
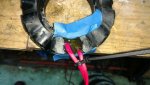
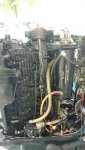
The worst part is cleaning the casing off. Have patience and don't Jack the windings up... Good luck!
 

Attachments

  • photo301189.jpg
    photo301189.jpg
    908.3 KB · Views: 7
  • photo301190.jpg
    photo301190.jpg
    802.9 KB · Views: 6
Top