Steering arm pinch bolt

Stinnett21

Chief Petty Officer
Joined
Jun 24, 2012
Messages
557
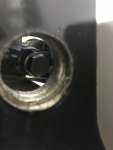
I removed my “Frankenstein” plugs on the side of my A1 G2 (ser# OM424120) in an effort to torque my steering arm pinch bolt. To get a socket on one side I have to turn the steering wheel almost hard over so it will line up. This renders the other side well out of reach, seemingly, with normal tools. Any flex head wrench that I’ve seen is too large to go through the hole. I bought a pair of angled needle nose pliers hoping I could grab it tight enough. Didn’t work. Still turns on me. This appears much harder than shown in Merc manual #31. Any suggestions on what kind of tool to get this done? Any thoughts are much appreciated.
 

Attachments

  • photo324497.jpg
    photo324497.jpg
    1.4 MB · Views: 2

stonyloam

Vice Admiral
Joined
Mar 13, 2009
Messages
5,827
You could grab a cheap open end wrench and put the torch to it to bend it to fit. Grind the edges to fit in the hole if necessary.
 

harringtondav

Commander
Joined
May 26, 2018
Messages
2,442
I was able to access from inside the transom. I had to disconnect the power steering valve/cylinder from the tiller and the transom plate and swing it out of the way. I used pivoting head "GearWrenches" since I could only get one ratchet click at a time. ...thinking I used a small cheater pipe to get leverage. I'm not a large man, so that helped.

The same pivoting head wrenches may help access from the O/D's service plugs.
 

Bondo

Moderator
Staff member
Joined
Apr 17, 2002
Messages
71,103
This renders the other side well out of reach, seemingly, with normal tools. Any flex head wrench that I’ve seen is too large to go through the hole. I bought a pair of angled needle nose pliers hoping I could grab it tight enough. Didn’t work. Still turns on me.

Ayuh,........ Maybe a couple of off-set 12-point box-end wrenches can get it done,..??.......

Considerin' this path has been down before on this assembly, it might be past simple tightening again,......
 

alldodge

Moderator
Staff member
Joined
Mar 8, 2009
Messages
42,621
This shouldn't be an issue, yet your posting says it is. I've done the procedure (Bravo) and had no issue with original tightening. Used a socket on one side and boxed/opened end on the other.

I removed my “Frankenstein” plugs on the side of my A1 G2

Disconnect the pin on the steering arm from the steering cable so you have freedom to move bell housing

The bolt should not need to be re-torqued, so there may be another issue, maybe need a new pin or arm
 

Stinnett21

Chief Petty Officer
Joined
Jun 24, 2012
Messages
557
It’s a 2002 and I’m the original owner. It has 1400 hours all freshwater. A new gimbal ring was installed professionally around 2008. I guess swinging the kids on a tube for 6 years took its toll. Thus the plugs. Since the hard part was already done, hole drilling, I thought I would remove the plugs in the off season and check the torque since I do have a small bit of play. Appears to be mostly in the steering arm. I tried on offset wrench. Close but no dice. AllDodge, I'm trying to envision how removing the clevis pin would make a difference versus moving the bell housing with the steering wheel. Can you explain? Thanks to all for the very helpful replies.
 

alldodge

Moderator
Staff member
Joined
Mar 8, 2009
Messages
42,621
I don't see how your not able to get connect to both ends, so by removing the pin which connects to the steering ram, it can be moved without turning the helm. Maybe it can be moved so wrenches can be connected
 

stonyloam

Vice Admiral
Joined
Mar 13, 2009
Messages
5,827
Have you retorqued the two clamping screws (55 ft lb)? Could be where some of the play is coming from.
 

Stinnett21

Chief Petty Officer
Joined
Jun 24, 2012
Messages
557
I'm starting to think the holes weren't drilled correctly per template. They just don't align. I have to turn the bell housing nearly all the way to be able to get a socket on one side. The pic in my original post is with the helm basically straight as I recall. I think my only options are what stonyloam and harringtondav suggested, that is bending a wrench or somehow accessing from inside. Yes I have torqued the clamping screws on the gimbal, thanks for suggesting. Through the holes I can see play at the steering arm but the swivel shaft appears to stay with the drive when turned so I believe most of the play is at the arm. I suspect Bondo may be right in that this may not help anyway but just thought I would try. Being in Kentucky I've got a few months to mess with it. This forum has been a huge help. Thanks to all.
 

Stinnett21

Chief Petty Officer
Joined
Jun 24, 2012
Messages
557
I've managed to bend a wrench and I will see if it works tomorrow when I visit the boat. Just so I don't screw something up, torque is set at dry conditions correct? In other words without penetration oil, anti sieze, etc.? So if had previously sprayed penetrating oil on this setup maybe I should stop at 55 lb-ft? The last thing I want to do is break something.
 

alldodge

Moderator
Staff member
Joined
Mar 8, 2009
Messages
42,621
You should be fine, or just set your elbow and torque it
 

harringtondav

Commander
Joined
May 26, 2018
Messages
2,442
First, follow stonyloam 's advice. The two clamping bolts visible at the top of the gimbal ring are a slop source. You'll need to push your drive max port and starboard to access the nyloc nuts in front of the ring. 55 ft lb as stated. Recommended recheck frequently. I retorque mine every couple years, and get more tightening each time. Aluminum on steel joint

The steering arm clamp bolt spec is 60 ft lb. Steel on steel, or iron on steel. You won't hurt it with a bent box end wrench unless you get carried away with a cheater pipe.
 

Stinnett21

Chief Petty Officer
Joined
Jun 24, 2012
Messages
557
Job done. Torqued all three. All went well. Thanks for the great input.
 
Top