Transom replacement checklist. Starcraft PM160

MassillonBuckeye

Chief Petty Officer
Joined
Jul 26, 2010
Messages
400
1. 3/4" exterior grade plywood. 1 sheet enough?
1. West Systems epoxy? How much approx?
2. Biaxial cloth?
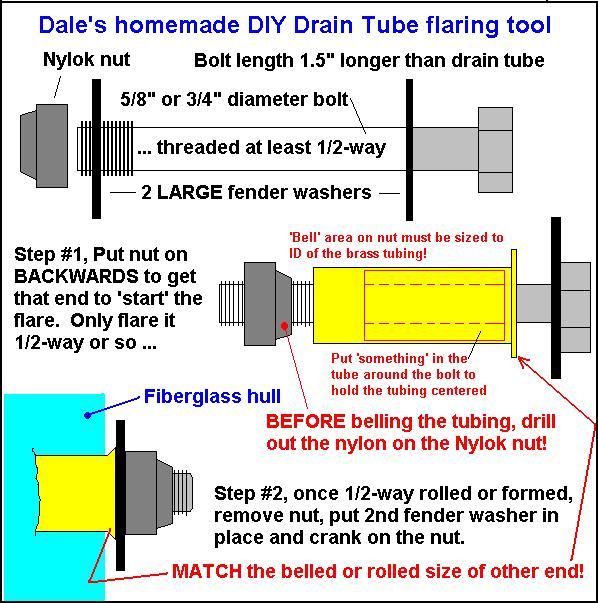
3. Drain tube and flanging tool(homeade?)
4. tube of 5200 for through hulls and sealing splashwell. Gas and oil drips a bit from motor so has to be resistant.
5. hardware?
6. Beer
7. ???

Anything else anyone would like to add to make the job go smoother? In the planning stages here obviously. I've ran through some threads and have the general idea of how it's going to go down. The wood in the transom on this thing doesn't go all the way to the bottom of the hull so I'm thinking I'll be able to use 1 4x8 sheet of plywood but I haven't done any measurements yet so I'm not sure. The gas and oil also hastened the rot in the middle of the transom there under the motor. Is this epoxy and 5200 going to stand up to some petroleum products? I'll be more careful than the last guy and wipe it out regularly, but I can't get the motor to stop leaking a bit for some reason. I plan on starting in a week or two and will be posting plenty of pictures!

Under splashwell:
starcraft+030.jpg


Gas/rot under motor:
IMG_00089.jpg


IMG_00086.jpg
 
Last edited:

MassillonBuckeye

Chief Petty Officer
Joined
Jul 26, 2010
Messages
400
Re: Transom replacement checklist. Starcraft PM160

Nothing to add? No, "I wish I would have done THIS" or "I wish I would have had THIS item when I did mine"? Thoughts? Tips(I've worked very little with wood). Encouragement? Discouragement??! :) Cmon guys, I know its not a big job but what are some of the pitfalls? Anything wrong with using Gorilla Glue to join the 2 pieces of ply?
 
Last edited:

Woodonglass

Supreme Mariner
Joined
Dec 29, 2009
Messages
25,929
Re: Transom replacement checklist. Starcraft PM160

1 sheet should be plenty as long as your stern is not to wide and deep. Ext. Grade NO Pressure Treated!!:eek:
Epoxy is impervious to gas and oil as is 5200. I always use Titebond III wood glue to laminate my plywood. When cured it's 100% waterproof. But if you already have the epoxy just use it. It's a great glue too! If not then you can seal the wood with an old time recipe of Boiled linseed oil, mineral spirits and polyurethane varnish equal equal parts mixed and saturated on the wood and let dry 48 hrs and then paint with Rustoleum . No need for Biax cloth with the epoxy. You can use it if you want but really no need for it. You will need to coat the epoxy with something to protect it. Most use Rustoleum Pro Oil Based Paint. 2-3 coats. Stainless Steel hardware is preferred. Aluminum Drain tubes and here's how to make a crimping tool..

FlaringTool.jpg
 
Last edited:

captainnate

Petty Officer 2nd Class
Joined
Apr 19, 2011
Messages
195
Re: Transom replacement checklist. Starcraft PM160

I am also working on my transom. You can check out what I've done so for if you would like; there should be a link in my signature. I am using 2 sheets of 3/4" plywood sandwiched together (standard for my type/size of boat). I used Titebond and screws to laminate the wood together. I just sealed the wood with a recipe of linseed oil, varnish, and mineral spirits. I'm now in the process of putting multiple coats of rustoleum on the transom wood.

I'm confused about the drain tube? Don't you already have a drain hole?
 

SigSaurP229

Commander
Joined
Oct 1, 2008
Messages
2,123
Re: Transom replacement checklist. Starcraft PM160

You are over thinking it.

If I am correct and this is a Tin hull Starcraft you don't need biax cloth or anything else.

You can use one sheet if you piece the transom together like they did from the factory but most here buy two pieces of 3/4" Arauco grade ply.

I used Titebond III glue to hold mine together with clamp it together everywhere and keep it tight as the glue will expand as it dries.

I would cut to full dimensions first then go ahead and glue and clamp the two pieces together then make the final cut and cut both pieces together so that they are perfectly symetrical for final installation.

Make sure it is tight no more than 1/16" gap on either side the tighter the better.

When you reinstall go ahead and over drill all of the holes just slightly then fill them all with Epoxy resin.

Put four coats of Epoxy resin on each side making sure to hit all of the edges everytime you epoxy.

After you are done epoxying make sure to either Spar Varnish or paint the transom with and exterior UV protected porch paint as epoxy has no UV resistance.

For final install make sure you coat each bolt with 3m 5200 and tighten it all down.


If you do it this way you will have a transom that will long outlast yourself and your children.

If you epoxy resin and porch paint or Spar Varnish that transom will withstand pretty much anything you throw at it.


Helpful tip try to get it out in one piece if possible so you will have a good template if not buy carboard and make a template.
 
Last edited:

Streetgang

Petty Officer 1st Class
Joined
Oct 13, 2012
Messages
251
Re: Transom replacement checklist. Starcraft PM160

Hello Bucknuts,

Here is my .02 for what its worth.

You mentioned West epoxy and if that particular brand is your choice, which was mine here is what I found.

Use 105 Resin, 126.6 fl oz. can
Use 207 Hardener, 42.2 fl oz can
This is Wests barrier coating epoxy which is what you want. It has uv additives and no amine. You still need to coat it on any exposed faces with paint or varnish.

This size did 3 coats on both sides of my deck and transom, plus 6 coats on edges. It is also a good mix to use on any penetrations you make in the wood to seal against moisture as it soaks in quite well.

Buy the pumps !

Use the special foam rollers
Use a smaller throw away plastic roller tray 4" wide.
syringes are handy to put product into penetrations

Get a copy o their User Manual, product guide 002-950 which is free from the vendor you chose, or you might get it online at West website.

I was able to put 3 coats on decking and transom same day. Wait till it "tacks up" and recoat.

I'm a bit partial to 4200 which isnt permanent but seems most guys here swim in 5200.

Good luck
 

Watermann

Starmada Splash of the Year 2014
Joined
Jan 12, 2013
Messages
13,822
Re: Transom replacement checklist. Starcraft PM160

"Bucknuts" :joyous:

Sounds like you have the grasp on the job at hand and some good advice to boot. Just to give you another way of doing up the sealing of your fresh transom wood. I say only use the marine grade 3/4" ply (7 layer & no voids) and you should only need one sheet. I cut my ply down to the correct height and then used Titebond Poly glue (same as gorilla) with epoxy like strength it is strong.

Here is another option for you that costs half the money. I didn't use epoxy, I thought about it, but using a product that relies on something else to cover it from the sun so it doesn't fail means your right back to paint and varnish after spending on the epoxy. My steps were after cutting, dry fitting, sanding and hole drilling was to use oil based Zinnser primer x 2 coats, Rusto oil base paint x 2 coats and topped it off with 3 coats of Helmsman spar urethane varnish. The leather brown Ruso paint looks like a liquid chocolate bar that people can't resist touching, sorta like a nice new granite counter top draws all of the hands.

After seeing the factory 1978 transom (4 layer 3/4") come out with nothing on it but maybe 1 coat of paint and it was just starting to get punky. What I put on the vastly superior marine ply it should outlast me and my son.

Now your leaky motor. You didn't supply a pic of it but a glimpse of black must mean a Merc? The leaks under the motor cover are not only messy but a fire hazard having gas leaking. Most of the time these leaks are from tilting the motor and some fuel spills out into the lower motor cover from the carb throats. The air box over the carbs may be a 2 piece that has a gasket that needs to be there with some non hardening gasket sealer. At the bottom of the air box there should be a small rubber line that goes from the nipple on the airbox to a nipple on the the powerhead so the fuel then moves into the combustion chamber to be burned when you start her up.

Oh yeah 5200 on anything you don't ever want to remove again and marine silicon/4200 on things you do, like through the hull fittings that some time down the line could get rotten or break.
 

jigngrub

Fleet Admiral
Joined
Mar 19, 2011
Messages
8,155
Re: Transom replacement checklist. Starcraft PM160

You're not a minute too soon on replacing that transom!

I also agree on the "no cloth " for epoxy, it could actually cause problems by making you transom too thick/fat for your Z channel at the bottom and your transom on the top.

Whatever you apply the epoxy with (chip brushes, rollers, etc.) buy extra and lots of them, you'll probably only get one use out of each one.

Rum instead of beer.:D
 

MassillonBuckeye

Chief Petty Officer
Joined
Jul 26, 2010
Messages
400
Re: Transom replacement checklist. Starcraft PM160

Crappie tourney over(didn't weigh :*( ) and gearing up for the tear down! In regards to my tilt/trim(Merc type A I believe, 2 pistons), the manual says to turn the control valve Full In(clockwise) before removing the hoses.. Remove hydraulic hoses. Cap end of hoses. Install plugs in threaded holes of pump from where hoses were removed. Remove pump mounting bolts and remove pump.

Then for re-installing it says: NOTE: Make certain that pump control knob is turned full left(counterclockwise)before uncapping valve parts. Secure to boat, reconnect hoses to pump, then reconnect pump harness.

I'm confused? At which point do I turn the valve? Whats going to happen when I turn the valve full left? And I assume I do all this with the motor in the Full Down position? Thank you :) Pics/progress coming soon!
 

Watermann

Starmada Splash of the Year 2014
Joined
Jan 12, 2013
Messages
13,822
Re: Transom replacement checklist. Starcraft PM160

Welcome back and hey don't worry about re installation things right now, it's tear down time!
 

MassillonBuckeye

Chief Petty Officer
Joined
Jul 26, 2010
Messages
400
Re: Transom replacement checklist. Starcraft PM160

Welcome back and hey don't worry about re installation things right now, it's tear down time!

Good point.

First bump in the road.. These bolts they used to bolt the motor to the boat.. Best way to address these? Got a round head bolt and a round plastic(?) nut with a threaded insert?

transom+017.JPG


transom+008.JPG


It doesn't help that its way up under the splashwell and almost at the end of my blind reach.
 
Last edited:

MassillonBuckeye

Chief Petty Officer
Joined
Jul 26, 2010
Messages
400
Re: Transom replacement checklist. Starcraft PM160

I'm thinking i'm going to get a pair of needlenose hot and sink them into the plastic so I can turn it? The edges are tapered so I doubt I'll be able to get vise-grips or anthing like that on it.. That or I'll dremmel two flat surfaces onto that bolt, which is under the motor, which has the tilt/trim already disconnected. Man. This sucks already! lol :)
 
Last edited:

jigngrub

Fleet Admiral
Joined
Mar 19, 2011
Messages
8,155
Re: Transom replacement checklist. Starcraft PM160

I'd chomp down on them with a good pair of vice grips first... and if they get too insolent I'd grind the heads off of the carrige bolts on the outside, that'll teach them.

Those are actually good tamperproof bolts to have to keep someone from stealing your motor and there must be a tool to take them off with, but I don't know what it is.
 
Last edited:

MassillonBuckeye

Chief Petty Officer
Joined
Jul 26, 2010
Messages
400
Re: Transom replacement checklist. Starcraft PM160

I'd chomp down on them with a good pair of vice grips first... and if they get too insolent I'd grind the heads off of the carrige bolts on the outside, that'll teach them.

Those are actually good tamperproof bolts to have to keep someone from stealing your motor and there must be a tool to take them off with, but I don't know what it is.
Didn't think about the tamper factor. Hmm
Yeah, i've been searching all afternoon and can't find anything close. Was searching "threaded washer" "starcraft bolts" etc with no good results.
 
Last edited:

MassillonBuckeye

Chief Petty Officer
Joined
Jul 26, 2010
Messages
400
Re: Transom replacement checklist. Starcraft PM160

Turns out those washers are metal which makes a bit more sense. So it looks like I'm going to have to cut some edges or a slot into the head of the carriage bolt and hope I can turn it against that nut on the back.. Or grind the head off I spose. It's just in a bad spot under te motor now that I have the trim off. It would be a nightmare to remove the back casting platform to get to the back of that bolt.. Lots of rivets and screws some I think are under the carpet in places. Boy do I need some encouragement! I didn't think it was gonna be easy but.. !!!
 
Last edited:

MassillonBuckeye

Chief Petty Officer
Joined
Jul 26, 2010
Messages
400
Re: Transom replacement checklist. Starcraft PM160

Got the bolt heads cut off, wasn't as big a deal as I thought. Need to finish my motor stand tomorrow then the motor comes off. Took a corner cap off and was pleasantly surprised there was no tab of metal to bend back or cut off in the corner. Yay :)
 

Watermann

Starmada Splash of the Year 2014
Joined
Jan 12, 2013
Messages
13,822
Re: Transom replacement checklist. Starcraft PM160

Oh man those were some odd ball looking bolts. Good times when something goes easy. Oh and I had to do the cutting. I know all about the hard fight against tough bolts, seems every one I ran up against on the Chief was wanting a fight. Most broke off and when finesse didn't work the breaker bar always wins.

Keep the tear down momentum going and you'll be done before the snow flies.
 

MassillonBuckeye

Chief Petty Officer
Joined
Jul 26, 2010
Messages
400
Re: Transom replacement checklist. Starcraft PM160

Started on the snaps that are screwed into the transom and those are stripping.. Have a feeling I'm gonna be drilling a lot of them out.. Or maybe invest in a nice easy-out? Hmm.
 

MassillonBuckeye

Chief Petty Officer
Joined
Jul 26, 2010
Messages
400
Re: Transom replacement checklist. Starcraft PM160

Got the motor off. Need to get a few screws out and try to pull the wood up and out of the skin. Easy out is not working, had to drill the screws and nails. Anyone ever have luck with those things? I've tried on maybe 20 screws over the years and never seem to get an easy out to work.
 

Watermann

Starmada Splash of the Year 2014
Joined
Jan 12, 2013
Messages
13,822
Re: Transom replacement checklist. Starcraft PM160

Nothing is ever easy for me, we must have the same luck.
 
Top