Trim gauge not working even though sender is new

Classic88

Cadet
Joined
Apr 12, 2019
Messages
9
I have just done the bellows job on my 1988 alpha one 4.3. I put new trim sender and limit units on the back, but in trying to calibrate them, I’m finding that the gauge is not working. I should add that most of the gauges are not working on this boat! Any advice on how to troubleshoot? Many thanks.
 

alldodge

Moderator
Staff member
Joined
Mar 8, 2009
Messages
43,339
For this gauge and others like fuel and temp, need 12V and a ground at the gauge. The sender wire comes off the sense lead (brown/white) and goes to the sender. The other end of the sender goes to ground.

With 12V and ground on the gauge, ground the sense lead connection, this should peg the gauge
 

wellcraft-classic210

Master Chief Petty Officer
Joined
Sep 22, 2010
Messages
839
Check your 12 volt supply and also ground connections to and from the battery. The ground wire often goes to a motor mount on the starboard side.
 

Classic88

Cadet
Joined
Apr 12, 2019
Messages
9
Thanks for the replies.
so, there is power reaching the instruments because they light up and one of the gauges (fuel) does seem to work. I think all the others are dead. I tried connecting ground and the sender wire, and nothing...
is it possible that all the gauges have just died of old age, or should I be looking for other answers? Any help appreciated- I’d prefer not to replace them all!
 

achris

More fish than mountain goat
Joined
May 19, 2004
Messages
27,468
...is it possible that all the gauges have just died of old age, or should I be looking for other answers?

I'd be 'looking for other answers'....

Understanding how something works is usually the best way to finding out what's wrong...

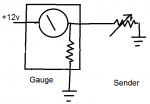
Gauges are very simple. Oil pressure, water temperature, fuel level and trim are all voltmeters. They measure the differential drop between a known fixed resistance (inside the gauge) against the variable resistance of the sender.

Much like this....

Click image for larger version  Name:	gauge1.png Views:	1 Size:	4.6 KB ID:	10733911

So, you see you need a 12v source (for the purple wire, via the key switch), a ground (black wire, hard to ground) and a 'sender' wire. For oil pressure, that is a light blue, for water temp a tan, trim is brown/white and fuel should be pink, but is usually whatever colour the installer had laying around. :facepalm:

The only one that is different is the tachometer, that's a pulse counter and can't be tested as I outline below. Just ensure the tacho has a good power and ground, and that the sender lead is good all the way to the points side of the coil.

Merc have historically used sender with a resistance range of 33 to 240.
To test a gauge you can either do as I did and build a test box with a potentiometer and resistors, or just ground the sender terminal. Most choose the second option. So, get yourself a length of wire with a crocodile clip on one end and bare at the other. Clip the clip to a known good ground, turn the key ON, and touch the other end of your lead to the 'S' terminal on the gauge. If the 12v and ground are good, the gauge should pin to high or full. If you're unsure of the source and ground, use a test light between the power and ground terminals of the gauge.

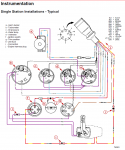
Here's a coloured diagram of an instrument panel. You may not have the alarm buzzer in your cluster, so ignore it...

Click image for larger version  Name:	instrument.PNG Views:	1 Size:	140.3 KB ID:	10733912

Chris.......
 

alldodge

Moderator
Staff member
Joined
Mar 8, 2009
Messages
43,339
To check the gauge, ground the sense lead on the gauge with the key ON and see if it pegs
 

Classic88

Cadet
Joined
Apr 12, 2019
Messages
9
Thanks for all the great input - and thanks especially to Chris for the amazing tutorial. I haven’t got to the bottom of it yet but am going to have another try. I may be back for some more advice!
 
Top