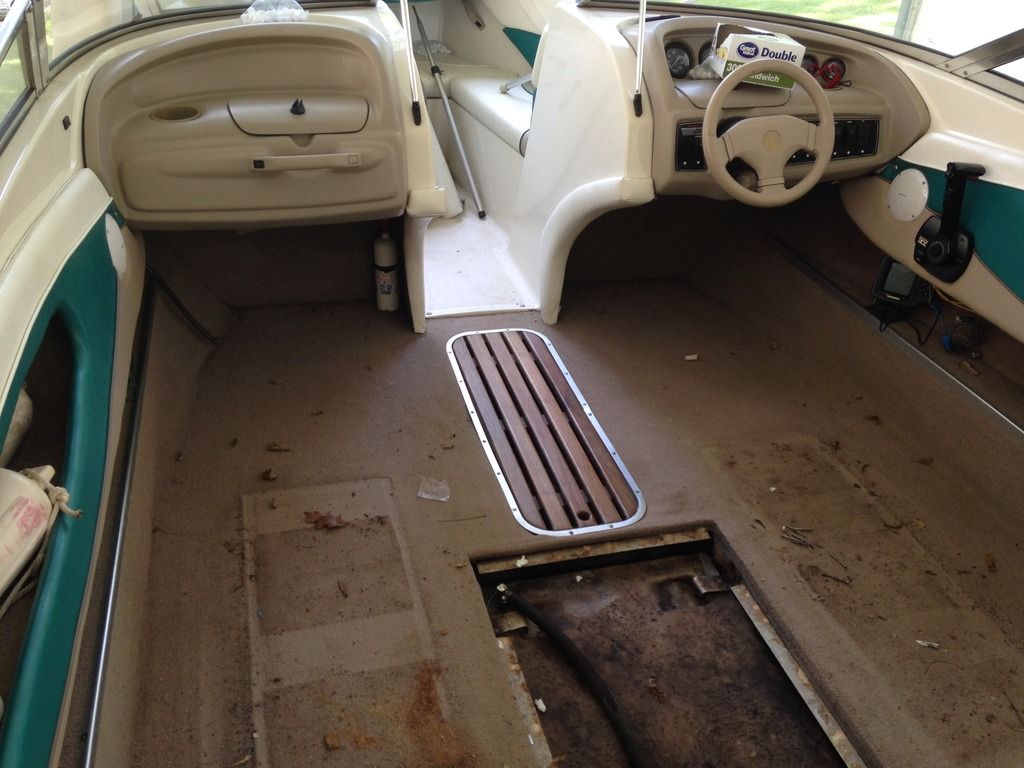
Winter Restoration Project

baccus06

Cadet
Joined
Jan 28, 2014
Messages
29
Looks like this coming winter I'll be rebuilding the entire interior on my 1996 StarCraft 2010. While getting her ready for summer this past weekend, I found that the transom is rotten. I knew the deck needed to be replaced, so I am just assuming the stringers are bad too (might as well at this point, right?) I have zero experience with laying new fiberglass but I work in a cabinet shop and do my own maintenance when I can. I would consider getting rid of the boat but I just bought it last year (first boat I've actually owned) and still owe too much on it. I know there is some really good stuff on here from FriscoBoater that I've watched so I think I can handle it. Anyone in the Madison, WI area that has done this that may be able to offer up some advice/tips for doing this during a Wisconsin winter? I really want to make sure I get all the measurements right before the interior comes out and I realize I screwed up. I'm starting my planning now so in September I can hopefully have the gutting and grinding done before it has to go inside. Not excited about it, but looking forward to the experience.
 

jbcurt00

Moderator
Staff member
Joined
Oct 25, 2011
Messages
25,196
September, IMO, is too far off w/ a rotting transom on a fiberglass boat. Pay up your life insurance & wear PFD's.

You can't know how bad the problem is until you open it up & start taking it apart.

I can't say for SURE 100% that its not safe, but you also can't say it IS safe either. Too big a risk for me & anyone I'd have aboard...

Boat & boat resto safely
 

baccus06

Cadet
Joined
Jan 28, 2014
Messages
29
I'm not planning on running the boat like this, just too busy to start before then. But on another note, does anyone know how using an AZEK type material would work for replacing the wood structure or is wood the better option?
 

jigngrub

Fleet Admiral
Joined
Mar 19, 2011
Messages
8,155

baccus06

Cadet
Joined
Jan 28, 2014
Messages
29
So it's time to start the demo on the boat. I'm working on taking some measurements for the motor mounts so I can pull it out right away. It appears that my front motor mounts are cranked all the way up. I am not sure if they are rotten and starting to sag but they do not sound solid when tapped on. Where should I plan to get them so I will still have adjustability? I want to make sure I can get the motor aligned right once I get it back in.
 

baccus06

Cadet
Joined
Jan 28, 2014
Messages
29
Here is the pictures of the boat. Have to rebuild it because I wouldn't feel right selling it to someone with a bad transom and owe to much on it to tell someone it needs rebuilding. So here is our project.

2013-06-04_15-54-40_70_zps5afde155.jpg


2013-06-04_15-53-52_558_zpsf257dd15.jpg


2013-06-04_15-52-37_255_zps71d1c4e0.jpg


2013-06-04_15-48-26_682_zpsd1687346.jpg


2013-06-04_15-51-31_883_zpsc34234da.jpg


2013-06-04_15-46-05_153_zpsacc1ea01.jpg


2013-06-04_15-39-07_533_zpsf9841bfa.jpg
 

Woodonglass

Supreme Mariner
Joined
Dec 29, 2009
Messages
25,930
I'm afraid you'll find that you're in for more than just a transom replacement. Typically when the transom and motor mount are gone so too are the stringers and bulkheads. Have you found any soft spots in the floor/deck?
 

baccus06

Cadet
Joined
Jan 28, 2014
Messages
29
Yea I already am planning on replacing everything. I didn't look the boat over nearly as well as I thought since I missed the delaminating transom, but I'm learning from my very costly mistake. I am hoping for the best but expecting the worst. I don't want to pull the engine until I have all the measurements I need. I may pay someone to put in the new transom and reinstall the engine/drive components, but haven't decided yet as that is well down the road. I really need some pointers on what to measure as far as the engine mounts go.
 

bigdirty

Senior Chief Petty Officer
Joined
Oct 4, 2013
Messages
652
Nice looking boat, looks as though you take care of her, its unfortunate the previous owner didnt from the sounds of things... As for the measurements, they are around here somewhere.. I wouldn't bother doing too much measuring with the motor/drive in place; it will be difficult to do, and likely wont be accurate anyway, as you say the motor mounts are sounding and looking rough..

I tried to explain this to a friend earlier this summer; He took the motor out of his boat to do some work on it. One lag bolt stripped as he removed it, (the two that hold the engine mount to the boat) so upon re-installing it in the boat he put a longer lag bolt in, on a different angle, and cranked it down. The drive wouldn't even START IN THE COUPLER the motor was so far out of alignment. He kept saying "I put it back in just like it came out, same spot, didnt touch adjustment nuts" Well guess what, his 'soft' engine mounts allowed the motor to sink a bit on one side when he drove in the longer lag bolt. My $.02, yank it all out, measure and draw a pic of what is left/existing, and use it for reference only. If you are doing the transom, the intermediate assembly will end up possibly in a slightly different location anyway.
 
Last edited:

Rickmerrill

Senior Chief Petty Officer
Joined
Mar 13, 2014
Messages
686
Agree with Bigdirty, you won't loose anything by taking the engine out first and it will be a lot easier to to make the measurements with it out. Here is how I did mine (it's long sorry). You want to measure from places that remain throughout the rebuild. I marked the center of the MM adjustment studs on top of both supports. These are 22.5" apart on small blocks. Then I marked the center of the hull half way between those two points using a plumb bob, put a straight edge across the supports and recorded the height. I ran a tape measure from the outside edge of the transom thru the drain hole and marked and recorded that. Now there is an "x marks the spot" on the hull to recreate height, distance apart and centerline. Then I went back and made the same measurements from the top of the deck for height just in case. When I installed them I leveled the bottom of the hull by adjusting the trailer and positioned them level/plumb/parallel and set the height. Ideally the MM adjustments should be half way, that will give you some leeway either way. I wonder if yours were adjusted as something moved or if they've always been that way? A little off front to back or left to right is ok, you'll do a preliminary alignment before you install the lags. That's just my way, I hope that helped answer your question and everybody feel free to pile on cause what do I know?
 

Watermann

Starmada Splash of the Year 2014
Joined
Jan 12, 2013
Messages
13,827
Man that is a gorgeous looking boat, no wonder you fell for her. Hard lesson learned and shame on the person that sold if to you all rotten. Someone could have been killed or maimed just for a few bucks.

I would rebuild the motor mounts the same height as factory if it were me. You can always add spacer blocks on top of the motor mounts but taking some off once they're built too high is another matter. I had to add spacer blocks to my build, they're lag bolted through the motor mounts into the mounts below plus bedded in 5200.
 

baccus06

Cadet
Joined
Jan 28, 2014
Messages
29
[FONT=&quot]So I finally got started on the boat yesterday. Bad news is the stringers are rotten along with everything else. I was able to get some of the deck out and started on removing foam. It was soaked. There was a bunch of water between the foam and hull. I was expecting the worst, but I am disappointed that it all needs to be replaced. One question. Any ideas on how to get the deck and stuff out from under the bow? The boat has the one piece bow seats/floor thing (not sure what it's called).[/FONT]

http://s28.photobucket.com/user/baccus06/story
 

BevoHoward

Cadet
Joined
Jun 23, 2015
Messages
23
Well, it looks like your seats, cushions, and trim panels are all in good shape. Really everything looks above average. Even the trailer looks nice. At least ya have that going for ya. I feel for ya. I sure do. But--you really do have one beautiful boat there. She's a real head turner.

This is a great example to those of us who are somewhat new at this. I never would have bet in a million years their could be that much rot and damage under that beautiful interior. No way.
 

52FordF2

Petty Officer 1st Class
Joined
May 31, 2013
Messages
372
For the front bow section if you don't decapitate you will need to do what I did. Craw under there and grind, then slide a new wood Fiber glassed piece under before the stringers are in place.
Be sure to support (front bow area) it if you need to get into the bow area before the new piece is in place. May crack the original bow section some or a lot. Don't let children climb in there.
Until I have the stringers in and tabbed to new piece I would still be careful on climbing into bow area.
 

baccus06

Cadet
Joined
Jan 28, 2014
Messages
29
When you say bow area, are you saying that the bow section needs to be supported if walking on it or support under the hull?
 

Woodonglass

Supreme Mariner
Joined
Dec 29, 2009
Messages
25,930
Welcome Back Baccus06!! Use the IMG Code in photo bucket and paste it into your thread like this...
Makes it easier for us to see your pics. I'd recommend removing the entire cap of your boat. In order to replace the transom you're gunna need to do something to get total access to it, and the bow section as well.
 

baccus06

Cadet
Joined
Jan 28, 2014
Messages
29
Thanks for the picture tip. I was trying to share all the pictures from day 1 of demo with a link to photo bucket. I'll try it again next time I add them. How difficult would it be to remove the entire cap? I'm new to this and not sure how that would work.
 

Woodonglass

Supreme Mariner
Joined
Dec 29, 2009
Messages
25,930
It's not a "Snap" but it's not that hard either. You remove the rubber insert from the rub rail, then drill out all the rivets then lift it off. You may have to cut it free in some spots if the MFG glued it down but that's not bad either. Like I said. Your gunna have to do something to get to the transom.
 

baccus06

Cadet
Joined
Jan 28, 2014
Messages
29
I guess that doesn't seem so bad. It'll just take some room and a little more elbow grease.
 

52FordF2

Petty Officer 1st Class
Joined
May 31, 2013
Messages
372
It would be easier. Its a PITA :facepalm: trying to bed and tab the stringers in on your belly while stretching under the bow area.
You don't wanta :facepalm: see me doing it.
If you could train a nine year old to do it that would be perfect. Do they have PPE that size?

If you remove the stringers and wood support from under the bow floor, all you have left is a gel coated fiber glassed skin. Some front bow section are strong enough to support weight by themselves, Mine did not, it started to crack will need to repair that later.
 
Last edited:
Top