Rewiring electric start and lights 1963 johnson 40hp

grumpyguy

Seaman Apprentice
Joined
May 22, 2015
Messages
32
Hi all,

I've never rewired a boat for electric start and lights so I'm wondering couple of things:

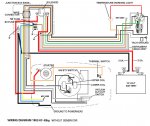
1) What are the best connectors to use? Obviously the ignition switch and lights connectors will be predetermined but what about at the connection to the harness from the outboard?
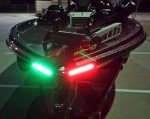
2) Where can I get information about converting the lights to LED from bulb. Is there (I hope) and easy adapter so I don't have to redo all of the lights.
3) What works best as a sheath for the wiring extending from the lights/ignition at the front to the back of the boat to protect the wires from the elements and weather.
4) what gauge and type of wire should I be using?

Thanks!

Rob
 

Chris1956

Supreme Mariner
Joined
Mar 25, 2004
Messages
28,389
Rob, Is that a magneto ignition? Does it have electric shift? Normally ring connectors are used for the wiring harness. It is best to crimp and solder them and then cover with shrink tube. Sometimes OMC used knife connectors.

Wires can be taped together or you can use some of that split plastic wire wrap. The starter solenoid takes about 3A to energize, so the wiring can be 14Ga or so. Marine grade stranded (and tinned) wire is best. You would need wires for +12VDC, ground, starter solenoid, Ign killer or ign power. Some of those motors had an overheat light. The ones with generators sometimes had wires to power an ammeter.

Not sure about converting bulbs to LED.
 

newhamburgboating

Petty Officer 2nd Class
Joined
Mar 6, 2013
Messages
111
No Title

You are over thinking the LED lights. If the wire is in good shape, just cut the wire at your current light and put on an entire LED fixture. I bought an LED strip light for the bow that comes with both colors. and 3M sticks to the front of the boat. The back light should be a piece of cake to do the same thing.
 

Attachments

  • photo222126.jpg
    photo222126.jpg
    14.1 KB · Views: 0

gm280

Supreme Mariner
Joined
Jun 26, 2011
Messages
14,605
If your replacement LED strips or bulbs are listed as 12 volt, there is nothing you need to do for them to work properly. They already have the proper resistors inline to control the current... So use quality marine wire and ring terminals for the connections and crimp, solder and shrink tube the connections and happy boating...
 

grumpyguy

Seaman Apprentice
Joined
May 22, 2015
Messages
32
Thanks for all the helpful responses.

The motor is a Johnson rds-25D so yes it is a magneto start and no generator. Not electric shift either and it does have an over heat light.

I've seen the LED replacement lights but I want to keep the oriignal light that came wiht the boat. It's a 1970 Crestliner Mustang and its very 70's.

I did find bulbs for sale on this site that are LED but just snap into the regular build socket. I'm only doing this to reduce battery drain.

I was thinking of soldering any connections and using shrink wrap so thanks for the conformation.

Never heard of marine wire so I'll have to source that as well.

All the existing wiring is there and connected but it looks like carp and poorly connected (just electric tape and weather worn at that). I want to make it nice, neat and tight so I don't get any hassles from it while on long trips in very secluded ares of Ontario.

I just need a wiring diagram for the thing. All I can find is diagrams for the motor that includes the generator.

Thanks again,

Rob
 

Chris1956

Supreme Mariner
Joined
Mar 25, 2004
Messages
28,389
I would think the maxrules web site would have a wiring diaghram for that motor. Realistically, the wiring is point to point from the dashboard to the external square box. Run wires from square box for ground and +12VDC from battery to ign switch, and starter solenoid, overheat light and engine kill from ign switch to square box. You need a magneto-type ign switch, and use the ign switch accessory pole to power the overheat light.
 

grumpyguy

Seaman Apprentice
Joined
May 22, 2015
Messages
32
Thanks to both of you for the replies

Chris1956 - the boat is completely original. Steering wheel, ignition, overheat indicator, light switch and the controls. Like I said very 70's. All of it appears to be in good shape as well.

Tim thanks for the link to the wrapping AND its homedepot.ca so I know I can get it!

One thing that troubles me is that there is no kill switch on this thing. Hard would it be to wire that up? I'm thinking not to hard - I just need something to break the circuit but what wire do I run through the kill switch?

Thanks again

Rob
 

Chris1956

Supreme Mariner
Joined
Mar 25, 2004
Messages
28,389
A kill switch would not be hard to install. You want to ground the point wires. If I remember correctly, you need to pull both point wires to the ign key and connect them to the M terminals. When the key is off the M terminals are connected together. That is exactly the wiring for a kill switch, although I am not sure of the advantage of having one.
 

grumpyguy

Seaman Apprentice
Joined
May 22, 2015
Messages
32
ok so the electrical is a disaster. Needs to be redone from the ignition switch back. Upon opening the junction box there was more rust on the solenoid posts than anything else.

So here's the questions:

1) the solenoid box is an aluminum box (2 half shells) held together with 2 thumb screws on the outside.They mate together metal to metal with a lip on the rim of one that the other lip fits into. There don't appear to be any seals in the lip and the wires run from the bottom of it and again no seals. Is this correct? It would seem that give the location where water would gather (rain) it seems to me that some sort of seal(s) should be on this box.

2) Should I be having a preference for the type of metal the nuts and washers etc are made of. I already picked up a marine grade connector set but everything attached to the solenoid is toast except for the bronze nuts.

3) And (let's start the different view points now) should I use die electric grease on the parts (connecters, nuts et al.) before I assemble them or coat the after the connection is set up. Very confusing topic for something as every day as grease. I am inclined to coat the connections after the connection is finished due to the grease being non-conductive.

4) I'll be using silicone to mount (no screw holes thank you) a piece of marine grade or pressure treated wood onto the transom so I have something to mount the junction box to. Considering the the screws mount from inside the junction box into the wood, I'm wondering what metal these screws should be made of (considering we are mating aluminum and marine/treated wood).

5) should I be replacing the battery cables? They do look old but may be fine when I cut them back. The terminals connecters are the typical black and red type. Does the paint on there impede current flow?

Thanks for the input

Rob
 

NicoPags

Petty Officer 1st Class
Joined
Mar 24, 2014
Messages
217
Stainless steel screws and don't mate pressure treat on aluminum unless you want super speed oxidizing(due to copper additives). Use a double sided mounting tape to mount. Imo silicone looses integrity to fast. And yes go with your instinct with the grease. For electrical connection stainless steel or gold plated not to mention you said the bronze terminals are all in great shape boats from 70's right hint ;)
 
Last edited:

Chris1956

Supreme Mariner
Joined
Mar 25, 2004
Messages
28,389
Silicone will stick the board to the transom, until you hit the first wave. Doubleface tape will fail during the first spray or rainstorm. Drill two small holes in the transom, fill them with silicone and screw the box to the transom with SS or brass/bronze wood screws. That is the only thing that will hold the connection box.

There was no seal between the box and it's cover.

Stainless steel or bronze/brass are the best components to use in salt water. Use a sensitive meter to check for voltage drop at the starter, when cranking. Usually the starter battery if good, will drop to 8.5V when cranking, minimum.
 

grumpyguy

Seaman Apprentice
Joined
May 22, 2015
Messages
32
Thanks for the help and responses so far.

As I was redoing the wiring in the boat it became clear that the wiring in the engine harness is unusable. Its green under the plastic coating, brittle and the plastic coating on some wires has split and the entire harness outside of the engine cover is damp and and almost moldy.

Should I throw this thing away?

How time consuming is it to rewire one of these engines?
 

F_R

Supreme Mariner
Joined
Jul 7, 2006
Messages
28,226
No Title

www.nymarine.ca has some wiring cables. Check with them.
Do not connect your lights & stuff to the motor. Run their own dedicated wiring direct from the battery
Mount your junction box with some thought concerning bilge water, keep it as high as possible.
If you want to coat the connections, use Liquid Lectric Tape, or shrink tubing
Direct replacement LED bulbs are easy to find. Auto parts stores or RV stores are good place to look
Here is your wiring diagram
 

Attachments

  • photo225488.jpg
    photo225488.jpg
    193.9 KB · Views: 4
Last edited:

grumpyguy

Seaman Apprentice
Joined
May 22, 2015
Messages
32
www.nymarine.ca has some wiring cables. Check with them.
Do not connect your lights & stuff to the motor. Run their own dedicated wiring direct from the battery
Mount your junction box with some thought concerning bilge water, keep it as high as possible.
If you want to coat the connections, use Liquid Lectric Tape, or shrink tubing
Direct replacement LED bulbs are easy to find. Auto parts stores or RV stores are good place to look
Here is your wiring diagram

this diagram is very helpful thank you.

Would you know what gauge the wires are (other than the battery wires which are marked as 3)?


Thanks again!
 

F_R

Supreme Mariner
Joined
Jul 7, 2006
Messages
28,226
Green 10GA
White 16
black 18
tan 20

If you don't plan to ever install a generator, you don't need 10 for the green. 16 is adequate.

Truthfully, when I do a rewire job, I use 16 for everything unless heavier is specifically called for (like the green one). There is no harm in using heavier wire than needed, other than cost. Advantage is it is more durable than thin stuff.
 
Top