zdziarskih
Cadet
- Joined
- Sep 6, 2014
- Messages
- 28
Good afternoon all,
I recently completed this and decided to post it in one spot, complete with pictures and everything that I went through during the process. I used bits and pieces found all over the internet to do it. I am mechanically inclined and enjoyed doing the work myself. Total time beginning to end was 4 hours minus the cleanup of my tools. So below is how I went about it.
Tools needed:
Harmonic Balancer Puller (Harbor Freight one worked fine)
9/16" Socket
1/2"Socket
7/16" Socket
3/4" Socket
Extensions for the socket wrenches
prybar
The Right Stuff Gasket Maker(autozone)
Timing Cover, New Seal and Gasket
and some other tools I can't think of")
Process:
I cut out the engine compartment a while back to give me access to the engine... I have the box hinged and carpeted and is fully functional when put back together. Here is a shot before I started.

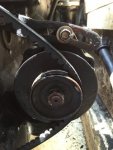
Loosen the alternator bolt seen in the picture in order to relieve tension on the belt

Remove the 4 bolts in the Water Circulation pulley. Note: You will need to hold the pulley with a strap wrench or something in order to remove these bolts


At this point, you should have the engine supported. I choose to support it with an engine hoist and also supported under the oil pan with some 2x4's

Engine supported under the pan

Remove the Right side engine mount

Remove the left side engine mount

One shot I did not get was taking the mount off from the bottom of the hull. I believe the bolts are 3/4" and should come out fairly easy with an extension. I took the mount out and cleaned it up before putting it back in.
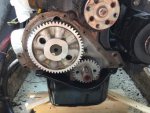
Next was to take off the harmonic balancer pulley. This was a pain until the "POP" happened. I had to hold the pulley with the strap and crank down on the bolt until it broke free... Once it broke free, the pulley came off fairly easy. There is a key-way on the top, don't lose the key-way!

Once off, it should now look like this. See the Key-way on top of the shaft?

Now remove the timing cover and all remenants of the gasket on the block (I believe there is 9-10 bolts holding the cover in place). The oil pan gasket does meet with the timing cover on this engine, this is where the "The Right Stuff" gasket maker is used if you decide to do this job with the engine in the boat. Cut the old gasket at the block on both sides of the oil pan, clean the surface and prep for the new gasket maker. I used about 4-5 mm seamless line of gasket maker from the one side of the block to the other...

Once the gasket maker stuff is set in place, I put the timing cover on but KEPT THE COVER ABOVE THE GASKET MAKER BELOW WHEN SETTING ON. This worked for me because when I put the 2 bottom bolts back on the timing cover to snug it down, I saw the gasket stuff squeeze out the 3 bottom holes of the timing cover. That ensured me of a nice snug gasket to the oil pan.
This is what it looked like with the timing cover back on..

The next step, I greased up the shaft for the Harmonic Balancer, put some gasket maker stuff on the key-way(read somewhere that it can leak..) and grabbed a small block of wood. I used the block of wood and 3lb hammer and put the balancer back on... it didn't take much force at all so I felt comfortable to a point... I guess it is the only way to do it on these engines... I put the balancer on until the grooves lined up with the upper pulley and pulley on the alternator... once everything looked square, we were all good.
Once that is all set, everything goes on in reverse oder you removed it. Here are 2 pics of the completed job. One thing I noticed was the hoist over the 4 hour period come down slightly, so I had to lift the engine up a bit to have the mounts meet the block again. I checked alignment after I was done and nothing changed.


Well, I hope this helps someone in the future. If you have any questions, please do ask.
Thanks,
Harry
I recently completed this and decided to post it in one spot, complete with pictures and everything that I went through during the process. I used bits and pieces found all over the internet to do it. I am mechanically inclined and enjoyed doing the work myself. Total time beginning to end was 4 hours minus the cleanup of my tools. So below is how I went about it.
Tools needed:
Harmonic Balancer Puller (Harbor Freight one worked fine)
9/16" Socket
1/2"Socket
7/16" Socket
3/4" Socket
Extensions for the socket wrenches
prybar
The Right Stuff Gasket Maker(autozone)
Timing Cover, New Seal and Gasket
and some other tools I can't think of
Process:
I cut out the engine compartment a while back to give me access to the engine... I have the box hinged and carpeted and is fully functional when put back together. Here is a shot before I started.
Loosen the alternator bolt seen in the picture in order to relieve tension on the belt
Remove the 4 bolts in the Water Circulation pulley. Note: You will need to hold the pulley with a strap wrench or something in order to remove these bolts
At this point, you should have the engine supported. I choose to support it with an engine hoist and also supported under the oil pan with some 2x4's
Engine supported under the pan
Remove the Right side engine mount
Remove the left side engine mount
One shot I did not get was taking the mount off from the bottom of the hull. I believe the bolts are 3/4" and should come out fairly easy with an extension. I took the mount out and cleaned it up before putting it back in.
Next was to take off the harmonic balancer pulley. This was a pain until the "POP" happened. I had to hold the pulley with the strap and crank down on the bolt until it broke free... Once it broke free, the pulley came off fairly easy. There is a key-way on the top, don't lose the key-way!
Once off, it should now look like this. See the Key-way on top of the shaft?
Now remove the timing cover and all remenants of the gasket on the block (I believe there is 9-10 bolts holding the cover in place). The oil pan gasket does meet with the timing cover on this engine, this is where the "The Right Stuff" gasket maker is used if you decide to do this job with the engine in the boat. Cut the old gasket at the block on both sides of the oil pan, clean the surface and prep for the new gasket maker. I used about 4-5 mm seamless line of gasket maker from the one side of the block to the other...
Once the gasket maker stuff is set in place, I put the timing cover on but KEPT THE COVER ABOVE THE GASKET MAKER BELOW WHEN SETTING ON. This worked for me because when I put the 2 bottom bolts back on the timing cover to snug it down, I saw the gasket stuff squeeze out the 3 bottom holes of the timing cover. That ensured me of a nice snug gasket to the oil pan.
This is what it looked like with the timing cover back on..
The next step, I greased up the shaft for the Harmonic Balancer, put some gasket maker stuff on the key-way(read somewhere that it can leak..) and grabbed a small block of wood. I used the block of wood and 3lb hammer and put the balancer back on... it didn't take much force at all so I felt comfortable to a point... I guess it is the only way to do it on these engines... I put the balancer on until the grooves lined up with the upper pulley and pulley on the alternator... once everything looked square, we were all good.
Once that is all set, everything goes on in reverse oder you removed it. Here are 2 pics of the completed job. One thing I noticed was the hoist over the 4 hour period come down slightly, so I had to lift the engine up a bit to have the mounts meet the block again. I checked alignment after I was done and nothing changed.
Well, I hope this helps someone in the future. If you have any questions, please do ask.
Thanks,
Harry