Old 3 point hydro build...

Chinewalker

Fleet Admiral
Joined
Aug 19, 2001
Messages
8,902
No Title

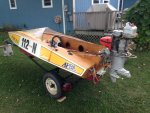
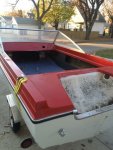
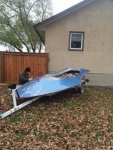
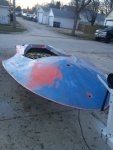
I think I may have a work-around for several of your issues. The low transom, regardless of whether you use a jack plate or not, will be a liability when it comes to water coming over the transom. If you build some coamings into the hull, and integrate them into a taller transom, you can effectively raise the height at which water would have to come up to to be an issue. Running the coamings full length of the cockpit would also tie the transom into the hull, add rigidity to the hull, and make for an overall more stable boat with less flex issues.

Something along these lines:
 

Attachments

  • photo232971.jpg
    photo232971.jpg
    79.9 KB · Views: 0

Chinewalker

Fleet Admiral
Joined
Aug 19, 2001
Messages
8,902
One thing to keep in mind with your seating arrangement. A boat of this type, low sides, fast, inherently unstable, will likely spit you out at some point. It will ride very flat, not bow up as with most boats. Your likelihood of coming out of the boat at some point is more a matter of when, not if. You don't want a seat that will restrain you too much, as you will want to fall freely if the boat is rolling or coming to a sudden stop (stuffed wave). You don't want your legs too far under the foredeck, either, as that might end up with you caught inside the boat if it goes over. A working kill switch, attached to your life jacket, is a MUST. A sturdily mounted steering wheel and throttle will be needed, too, as that's what you'll be using to keep yourself in the boat via a firm grip! And, I can assure you, 2-3 hours in this boat will be exhausting! Heck, a half hour will likely be stretching your limits of endurance!
 

mr 88

Commander
Joined
Nov 3, 2010
Messages
2,232
As Chinewalker mentioned your idea of seating in this hull should be thrown out. To the best of my knowledge you kneel in that hull. A hard foam pad secured to the floor is all your going to need. Everything else he posted above is spot on. Owning a couple hydro's 40 years ago ,neither of them had seats,kneel and go. I never got thrown out of one but witnessed my buddy getting pitched out of his on a slight turn.
 
Last edited:

Suprathepeg

Petty Officer 1st Class
Joined
May 25, 2015
Messages
259
This boat came from whatever factory with actual back to back seats. I'm planning on reducing that to two seats, they will need to be decent because the guy I'm building it with has MS so kneeling won't be possible for him. The PO ran this thing miles up and down the river. It's not nearly as small as the little racing type hydros the cockpit is about 4'x8'. I agree though that some sort of coming is a good idea, once I have the jack plate mocked up I'll start working on that.

Definitely a kill switch is a must, as will be wearing a life jacket! This boat has a wider footprint than my Maxum 1700 so I hope it's not too unstable.
 

Suprathepeg

Petty Officer 1st Class
Joined
May 25, 2015
Messages
259
No Title

Got the donor stripped and the motor on a stand. It looks like the motor doesn't have an alternator or stator. Good for weight but bad for my dreams of a stereo...
 

Attachments

  • photo233023.jpeg
    photo233023.jpeg
    62.6 KB · Views: 0
  • photo233024.jpeg
    photo233024.jpeg
    68.7 KB · Views: 0

Chinewalker

Fleet Admiral
Joined
Aug 19, 2001
Messages
8,902
Got the donor stripped and the motor on a stand. It looks like the motor doesn't have an alternator or stator. Good for weight but bad for my dreams of a stereo...

Are you sure it doesn't have an alternator? If there are two yellow wires emanating from under the flywheel and running to a small square metal gizmo with potting in it, then you have a charging system. The yellow wires run from the alternator ring and the potted gizmo is the rectifier.
 

Suprathepeg

Petty Officer 1st Class
Joined
May 25, 2015
Messages
259
Yea no stater or rectifier. Its the base of the base 50hp models from 1967. This weekend I picked up a couple more 50 mercs and confirmed that it does not have a stator or rectifier like the newer ones I just picked up.
 

Suprathepeg

Petty Officer 1st Class
Joined
May 25, 2015
Messages
259
No Title

It's been a busy weekend. I grabbed a couple more merc 500s for good money.

Also got some seats! I think I overpaid by a bit but $80 Canadian pesos got these.

They're fishing seats but they look so period correct for the boat that I could t resist. I think I'm gonna use the red color for the upper hull color. I'm pretty stoked.
 

Attachments

  • photo233196.jpeg
    photo233196.jpeg
    64.9 KB · Views: 0

Suprathepeg

Petty Officer 1st Class
Joined
May 25, 2015
Messages
259
No Title

Yesterday we float tested the boat to see how it would handle some weight. We loaded it with about 330lbs of weight at the stern or as close to the stern as we could get it. My buddy who is about 210lbs got in it as well and we still had some decent freeboard. It should have no problem carrying a 50, maybe even a 70hp motor.

I started removing the rub rail from the boat, its basically garbage, its hard and breaks easily so I'll need to replace it. Anyone know if something like this is still being made?
 

Attachments

  • photo233374.JPG
    photo233374.JPG
    35 KB · Views: 0
  • photo233375.JPG
    photo233375.JPG
    37.2 KB · Views: 0
  • photo233376.JPG
    photo233376.JPG
    52.8 KB · Views: 0
  • photo233377.JPG
    photo233377.JPG
    34.4 KB · Views: 0
  • photo233378.JPG
    photo233378.JPG
    42 KB · Views: 0

archbuilder

Vice Admiral
Joined
Sep 12, 2009
Messages
5,697
That is an interesting looking rib rail. can you post a pic of where it went on, I'm just curious.
 

Suprathepeg

Petty Officer 1st Class
Joined
May 25, 2015
Messages
259
No Title

We separated the hull today, it only took about an hour for the two of us to remove the rub rail, drill out the rivets that held the two clam shells together and the upper and lower came apart really easy. The hulls were only held together by the rivets however there was something like duct sealant between them to keep it all water tight. I think when we rebuild we will use glue and rivets for extra strength. I pulled all the hardware off the top of the boat as well so I just gotta pull the old speedo and a couple switches off the dashboard and we can start sanding. The nice thing about such a small simple boat is there isn't a lot of surface area to sand. Hopefully this will go fast.

It looks like this thing used to be a dark orange originally, I'm going to do red to match the seats this tome around for the top of the boat with some silver accent somewhere.

Anyhow the pics show the rivet holes and the boat on its new trailer. The trailer will be a project for when the boat is totally ready to go. Archbuilder the orange area is what was covered by the rub rail. I hope that is enough details for you. I can take some better pics if you want.
 

Attachments

  • photo233427.JPG
    photo233427.JPG
    85.8 KB · Views: 0
  • photo233428.JPG
    photo233428.JPG
    62.3 KB · Views: 0
  • photo233429.JPG
    photo233429.JPG
    80.8 KB · Views: 0

Suprathepeg

Petty Officer 1st Class
Joined
May 25, 2015
Messages
259
No Title

I also took apart the old mercontrol box that came with the first merc 500 that I bought for this thing. I don't know if I'm going to use this one or not. I also have a really cool looking chrome one that has a ball on the end from a console boat that looks really cool too. Anyhow I took it totally apart and cleaned the parts with dish soap. I think I'm going to get the case and handles sand blasted so I can repaint them. The grease on the internal parts is all gummy and sticky so I'm going to degrease them before putting it all back together.

I really like how cool the old control boxes look.
 

Attachments

  • photo233430.JPG
    photo233430.JPG
    45 KB · Views: 0
  • photo233431.JPG
    photo233431.JPG
    55.3 KB · Views: 0
  • photo233432.JPG
    photo233432.JPG
    57.6 KB · Views: 0
  • photo233433.JPG
    photo233433.JPG
    62.5 KB · Views: 0
  • photo233434.JPG
    photo233434.JPG
    66 KB · Views: 0
  • photo233435.JPG
    photo233435.JPG
    70.6 KB · Views: 0

Suprathepeg

Petty Officer 1st Class
Joined
May 25, 2015
Messages
259
No Title

Finally today I started to take inventory of all the gear case parts I have. I got two gear cases in pieces with the first 500 that I picked up. Hopefully I have all the pieces to put them both back into service or at the very least get one working. In the first pic you can see there is a broken ring on the drive gear assembly. Hopefully this is an easy part to replace?

Otherwise the gears look really good, hopefully just new bearings and seals and away we go.
 

Attachments

  • photo233436.JPG
    photo233436.JPG
    54.2 KB · Views: 0
  • photo233437.JPG
    photo233437.JPG
    69.2 KB · Views: 0
  • photo233438.JPG
    photo233438.JPG
    48.7 KB · Views: 0
  • photo233439.JPG
    photo233439.JPG
    66.3 KB · Views: 0
  • photo233440.JPG
    photo233440.JPG
    68.6 KB · Views: 0
  • photo233441.JPG
    photo233441.JPG
    74.1 KB · Views: 0
  • photo233442.JPG
    photo233442.JPG
    60.2 KB · Views: 0

archbuilder

Vice Admiral
Joined
Sep 12, 2009
Messages
5,697
I would try Iboats for the rub rail, its nice to use them since they host the forum for free. If not, there used to be an online place that specializes in rub rails. I can't remember the name, but I'm sure you will find them if you google rub rails.
 

Suprathepeg

Petty Officer 1st Class
Joined
May 25, 2015
Messages
259
No Title

Started on the transom and jack plate today. Transom is 1pc of 3/4 and two pieces of 1/2" ply laminated with PL Premium. I'm probably not going to be working on fitting the transom for a couple weeks so I can wait till these parts dry.
 

Attachments

  • photo233761.jpeg
    photo233761.jpeg
    51.4 KB · Views: 0
  • photo233762.jpeg
    photo233762.jpeg
    55.4 KB · Views: 0
  • photo233763.jpeg
    photo233763.jpeg
    68 KB · Views: 0

Suprathepeg

Petty Officer 1st Class
Joined
May 25, 2015
Messages
259
No Title

Well it's been a good weekend.

Got most of the cap paint scraped off, should be done tomorrow.

Most important, I picked up another 20hp, that's 40% more power! Grabbed a 700 triple, good compression but I'll need to do some work to it yet. 70hp and a 1.64 :1 gear case means I should easily be able to hit 50+ MPH!

Yippeeee
 

Attachments

  • photo233851.jpeg
    photo233851.jpeg
    62.7 KB · Views: 0
  • photo233852.jpeg
    photo233852.jpeg
    71.3 KB · Views: 0
  • photo233853.jpeg
    photo233853.jpeg
    70.6 KB · Views: 0

archbuilder

Vice Admiral
Joined
Sep 12, 2009
Messages
5,697
sounds like the paint wasn't on there very good? Looks like you have some sanding in your future! 70 hp seems like a lot for that hull, but I haven't ever owned anything like that.
 

Suprathepeg

Petty Officer 1st Class
Joined
May 25, 2015
Messages
259
Yea who knows, it was obviously prepped, primed and painted and cleared, but 20+ years in the sun and weather will take its toll on a paint job for sure, most car clear coats peel under those conditions. It was a pretty slick metallic blue back in the day. We basically peeled the paint and clear off with razor blades it took about 4 hours but it was faster than sanding it off. I wanted to use a belt sander but Mark wouldn't let me... :-(

The merc 700 triple is a cool motor, it uses all the running gear that the 35-50 hp units use but with a larger power head and taller 1.64:1 gears, so its a 10mph faster motor right out of the box. The 500 weighs 180lbs and the 70 weighs 190, pretty much the same weight for a lot more power and speed. In order to get the 500 to hit the 50mph mark I would need to rebuild the power head for more RPM, external reeds and new carbs. The 700 is good to go out of the box, plus it has a lot more torque as well to get out of the hole. The goal is 50mph with this little monster.
 

Suprathepeg

Petty Officer 1st Class
Joined
May 25, 2015
Messages
259
No Title

Got the floor and transom out tonight! Only took about 20 minutes. Geese I don't know why all you guys complain about this being so hard?

Well I'm off to grab another 70 merc ttyl!
 

Attachments

  • photo233899.jpeg
    photo233899.jpeg
    57.2 KB · Views: 0
  • photo233900.jpeg
    photo233900.jpeg
    70 KB · Views: 0
  • photo233901.jpeg
    photo233901.jpeg
    73.1 KB · Views: 0
  • photo233902.jpeg
    photo233902.jpeg
    75.4 KB · Views: 0
Top