Force 125 Motor Won't Start but Turns Over

mikemlittle

Cadet
Joined
Jul 8, 2018
Messages
25
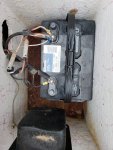
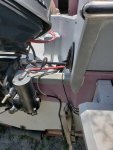
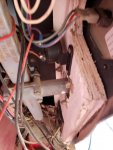
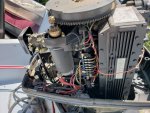
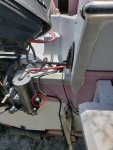
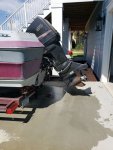
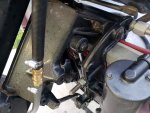
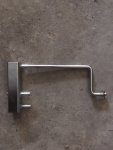
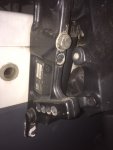
My FIL gave us a 1989 Maxum Force 125. I replaced the battery, ignition switch, fuel lines, spark plugs, and tried to get it to start. The motor turns over but doesn't start. I know it's getting fuel because the carbs are leaking a bit (sat for 7 years and most likely needs gaskets). Is there anything else I should be considering since the motor won't start? The motor looks good for the most part and fuel lines & carbs look very clean. There is something wonky with the wiring.. I think.. unless force outboards were wired to the battery like this. Also, the dash has a placard that says safety lanyard must be attached to the driver. Currently it isn't attached to anything. Could this be a reason it won't start?
 

Attachments

  • photo295139.jpg
    photo295139.jpg
    406.7 KB · Views: 1
  • photo295140.jpg
    photo295140.jpg
    362.6 KB · Views: 1
  • photo295141.jpg
    photo295141.jpg
    268.4 KB · Views: 1
  • photo295142.jpg
    photo295142.jpg
    483.2 KB · Views: 1

Tassie 1

Chief Petty Officer
Joined
Apr 13, 2018
Messages
584
Check for spark
compression test motor,
check fuel pump etc
clean carbs

buy outboard repair manual
 

mikemlittle

Cadet
Joined
Jul 8, 2018
Messages
25
Check for spark
compression test motor,
check fuel pump etc
clean carbs

buy outboard repair manual

No spark at plugs.. does the cutoff switch have anything to do with it? Placard has a warning about using the switch and I have a 3 prong switch.. but no idea where it goes...
 

Jiggz

Captain
Joined
Oct 23, 2009
Messages
3,909
The safety lanyard is also called the, "Kill Switch". Although it states that it needs to be attached to the operator when boating, the other end is the more important one to focus on. Make sure it is set accordingly meaning it should be inserted to the switch. This will allow the ignition system to operate properly.

Another thing to check is to make sure you follow proper starting procedures: (cooling water connected)
-Prime the primer bulb until firm
-Place remote throttle in high idle position. Depending on style there are two methods for this. One, there is a push button at the center of the remote throttle, push in and push lever forward. Second, pull lever outward and push forward. This allows high rpm in neutral.
-Engage choke by pushing in the ignition switch and then turn over to turn on and start. Hold for no more than 15 seconds at a time. If the motor "coughs", try resetting and start again without choking.
- Do not choke more than two times or you will flood the carbs.
 

jerryjerry05

Supreme Mariner
Joined
May 7, 2008
Messages
18,119
The 3 prong switch is for the trim/tilt.
You can tell by the color of the wires, blue/up green/down red is power.
How about a pic of the other side of the dash?
Show where the kill switch goes.
If it doesn't have anything attached then that's probably your problem.
 

mikemlittle

Cadet
Joined
Jul 8, 2018
Messages
25
The safety lanyard is also called the, "Kill Switch". Although it states that it needs to be attached to the operator when boating, the other end is the more important one to focus on. Make sure it is set accordingly meaning it should be inserted to the switch. This will allow the ignition system to operate properly.

Another thing to check is to make sure you follow proper starting procedures: (cooling water connected)
-Prime the primer bulb until firm
-Place remote throttle in high idle position. Depending on style there are two methods for this. One, there is a push button at the center of the remote throttle, push in and push lever forward. Second, pull lever outward and push forward. This allows high rpm in neutral.
-Engage choke by pushing in the ignition switch and then turn over to turn on and start. Hold for no more than 15 seconds at a time. If the motor "coughs", try resetting and start again without choking.
- Do not choke more than two times or you will flood the carbs.

I connected the kill switch lanyard and the motor started right up. Actually seems to run pretty well other than some fuel coming from the carbs...stuck float or bad gasket?

I still have the issue of nothing else electrical working. I can't even tilt the motor up or down. It's currently in the up position and when I flip the switch nothing happens. No relays click, no motor sound.. nothing. I traced all the wires to make sure everything was in OK condition and it seemed fine. Have no checked all fuses but checked most of them under the dash and all are intact non-corroded and overall good condition. Rocker switches on the dash are pretty much dead and need to be replaced, but I replaced the Trim switch and still nothing. Any ideas?
 

jerryjerry05

Supreme Mariner
Joined
May 7, 2008
Messages
18,119
Your pic shows there are 3 hot leads hooked to the battery.
One is the hot lead to the motor.
The other 2 one should lead to the fuse panel under the dash.
The 2nd could be a lead for a depth finder or some accessory that was added later.

The T@T is powered off the hot lead to the motor it's connected at the hot terminal of the solenoid..
It should have a circuit breaker that might not be letting the power through?
 

mikemlittle

Cadet
Joined
Jul 8, 2018
Messages
25
Your pic shows there are 3 hot leads hooked to the battery.
One is the hot lead to the motor.
The other 2 one should lead to the fuse panel under the dash.
The 2nd could be a lead for a depth finder or some accessory that was added later.

The T@T is powered off the hot lead to the motor it's connected at the hot terminal of the solenoid..
It should have a circuit breaker that might not be letting the power through?

Hey Jerry.. there is a depth finder.. I went through and cleaned a bunch of the terminals and the depth finder and tilt motor now work. However, the motor tilted up a bit, then down then stopped. I can hear the motor still running so it's getting power now.. just isn't moving the motor. It sat for 6-7 years so I imagine maybe no fluid?
 

jerryjerry05

Supreme Mariner
Joined
May 7, 2008
Messages
18,119
Yes no fluid could be the problem.
It needs to be in the down position to fill.
30w oil is what's supposed to be used in the T@T

Loosening the front hyd. line will allow the motor to lower.
Just don't be to heavy handed and strip the fitting.
Use a line wrench.

Will it go down?
It's possible the pivot points are seized and will need help?
A small propane torch and a grease gun.
DO NOT ADD GREASE.
The old grease is pretty much solid and adding new will just make the zerks pop out.
They are just pressed in and will come out easily.

Heat the area starting at the fittings and work your way around the whole area.
You can't hurt anything on the pivots.

The kingpin area is probably gunked up too.
The top and bottom have plastic bushings so don't over heat that area.
 

mikemlittle

Cadet
Joined
Jul 8, 2018
Messages
25
Yes no fluid could be the problem.
It needs to be in the down position to fill.
30w oil is what's supposed to be used in the T@T

Loosening the front hyd. line will allow the motor to lower.
Just don't be to heavy handed and strip the fitting.
Use a line wrench.

Will it go down?
It's possible the pivot points are seized and will need help?
A small propane torch and a grease gun.
DO NOT ADD GREASE.
The old grease is pretty much solid and adding new will just make the zerks pop out.
They are just pressed in and will come out easily.

Heat the area starting at the fittings and work your way around the whole area.
You can't hurt anything on the pivots.

The kingpin area is probably gunked up too.
The top and bottom have plastic bushings so don't over heat that area.

So I removed the fill fitting... the one circled in red in the photo and fluid streams out lightly.. does this indicate that it actually is full with fluid? As far as removing the front hyd line... which one is that exactly? The bottom front of the pump says manual release but no idea what that means or how to operate it..
 

Attachments

  • photo295483.jpg
    photo295483.jpg
    480 KB · Views: 0

Jiggz

Captain
Joined
Oct 23, 2009
Messages
3,909
Looks like it is full of fluid. So the next step is to help the T&T system, since the system hasn't moved for the longest time. While having a person tilt the motor, you will need to manually raise the motor to help the system loosen up.

It's probably the cylinders are all rusted by now. You can also do the same on the way down. Do this a couple of times, and it should be able to do the same without help as soon as it is loose enough.
 

jerryjerry05

Supreme Mariner
Joined
May 7, 2008
Messages
18,119
The "manual release" ??
Where did/does it say manual release?

If it does say that?? don't touch it.
There is no manual release on that style pump.
The tiny snap rings are holding in the seals that keep the drive from lowering on it's own.
Again DON'T touch. You can do more damage by taking them apart.

IF?? you find the problem is the seals that's addressed in another one of the top 3 posts.
It's not easy to fix but can be done with the right instructions. (top 3 posts)
The front line the one you can touch first is the one to loosen to make it drop.

There are test procedures in one of the top 3 posts.
But you'll need to get the drive all the way up to do them.
The fittings can be gotten at Auto Zone or most auto parts stores.
 

mikemlittle

Cadet
Joined
Jul 8, 2018
Messages
25
The "manual release" ??
Where did/does it say manual release?

If it does say that?? don't touch it.
There is no manual release on that style pump.
The tiny snap rings are holding in the seals that keep the drive from lowering on it's own.
Again DON'T touch. You can do more damage by taking them apart.

IF?? you find the problem is the seals that's addressed in another one of the top 3 posts.
It's not easy to fix but can be done with the right instructions. (top 3 posts)
The front line the one you can touch first is the one to loosen to make it drop.

There are test procedures in one of the top 3 posts.
But you'll need to get the drive all the way up to do them.
The fittings can be gotten at Auto Zone or most auto parts stores.

I started with loosening a line... I tried to move it again and it sounded like there was air in the system. So I ran it about 20 seconds and the motor tilted all the way up then down. I actually thought the motor was in the up position but apparently it was down? Is this completely down? Because this is as far down as the motor will go..
 

Attachments

  • photo295662.jpg
    photo295662.jpg
    1.1 MB · Views: 0

altitude 411

Petty Officer 3rd Class
Joined
May 24, 2018
Messages
78
I started with loosening a line... I tried to move it again and it sounded like there was air in the system. So I ran it about 20 seconds and the motor tilted all the way up then down. I actually thought the motor was in the up position but apparently it was down? Is this completely down? Because this is as far down as the motor will go..

No, it will go down much further. Perpendicular with the back of the boat. Looks like you have your tilt stop bracket still in the motor? (red arrow in photo). You need to raise it up slightly then pull the cotter pin on the right side of the shinny stainless bracket and pull it out (left side) of the tilt stop holes and then you motor will come down. DONT FORGET to raise your motor up at the boat ramp when you pull your boat out of the water.
 

Attachments

  • photo295668.jpg
    photo295668.jpg
    1.5 MB · Views: 0

mikemlittle

Cadet
Joined
Jul 8, 2018
Messages
25
No, it will go down much further. Perpendicular with the back of the boat. Looks like you have your tilt stop bracket still in the motor? (red arrow in photo). You need to raise it up slightly then pull the cotter pin on the right side of the shinny stainless bracket and pull it out (left side) of the tilt stop holes and then you motor will come down. DONT FORGET to raise your motor up at the boat ramp when you pull your boat out of the water.

I went down and tried to see what you were talking about... again, I'm trying to read up on this and figure things out... first boat. But I don't know what the tilt stop bracket is..
 

mikemlittle

Cadet
Joined
Jul 8, 2018
Messages
25
I went down and tried to see what you were talking about... again, I'm trying to read up on this and figure things out... first boat. But I don't know what the tilt stop bracket is..

Here are some closer pics..
 

Attachments

  • photo295673.jpg
    photo295673.jpg
    604.5 KB · Views: 0
  • photo295674.jpg
    photo295674.jpg
    889.9 KB · Views: 0

mikemlittle

Cadet
Joined
Jul 8, 2018
Messages
25
Here are some closer pics..
 

Attachments

  • photo295673.jpg
    photo295673.jpg
    604.5 KB · Views: 0
  • photo295674.jpg
    photo295674.jpg
    889.9 KB · Views: 0

altitude 411

Petty Officer 3rd Class
Joined
May 24, 2018
Messages
78
Ok. there is something that looks like this bracket (see Photo 1) it is blocking your motor from being able to tilt down. I've pointed red arrows at both of these things on your boat (photo 3) that need to be removed before your tilt will come down fully. (Photo 2) shows my boat with all holes open to allow this to happen. these are brackets to travel to and from the lake so your motor skeg doesn't drag on the pavement while your trailering the boat. Make sure your motor is up and resting on this bracket before you trailer the boat.
 

Attachments

  • photo295676.jpg
    photo295676.jpg
    100.8 KB · Views: 0
  • photo295677.jpg
    photo295677.jpg
    83.1 KB · Views: 0
  • photo295678.jpg
    photo295678.jpg
    881.2 KB · Views: 0

jerryjerry05

Supreme Mariner
Joined
May 7, 2008
Messages
18,119
That's a trailering bracket.
Usually held in by a cotter key.

This is needed so you don't blow the hyd. system.
The bouncing up and down can ruin the system.
 
Top