1984 sport craft adventurer complete restoration

iplayonline

Cadet
Joined
Apr 26, 2009
Messages
25
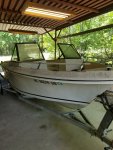
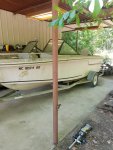
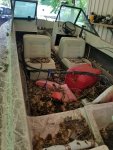
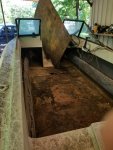
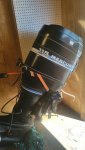
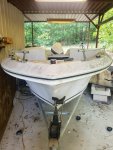
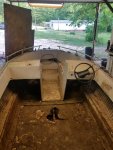
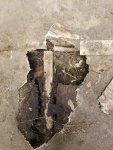
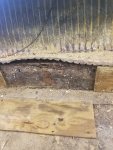
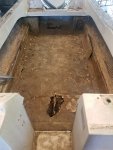
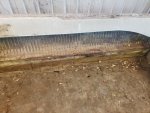
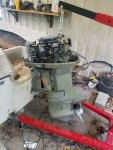
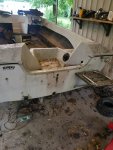
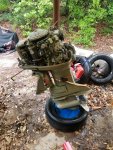
Havent messed with boats in about 10 years. Got into mini bikes and go karts cause they were a cheaper hobby. I took this sport craft adventurer in on a trade for a mini bike and a go kart. Wasnt really sure of its condition, but i knew i wasnt out much if it needed a lot of work. Finally got a chance to tear it down today and of course its got rot. Probably rotted down to the stringers and transom. Im a person who likes to restore things so im going to do a complete restoration on it. It has a 85hp johnson on it, guy said it works, i also picked up a 115 mercury on another trade. Not sure if i want to put it on this boat, or save it for a pontoon. Any advice other than sell it or trash it is much appreciated.
 

Attachments

  • photo311531.jpg
    photo311531.jpg
    1.7 MB · Views: 0
  • photo311532.jpg
    photo311532.jpg
    1.9 MB · Views: 0
  • photo311533.jpg
    photo311533.jpg
    1.5 MB · Views: 0
  • photo311534.jpg
    photo311534.jpg
    1.3 MB · Views: 0
  • photo311535.jpg
    photo311535.jpg
    779.6 KB · Views: 0

gm280

Supreme Mariner
Joined
Jun 26, 2011
Messages
14,605
So if your mind is made up, and that is a good thing approaching this type project, let's get going!

For what it's worth, rot is typical in older boats. I would be amazingly surprised if it didn't have rot. And you are exactly at the same condition most other boat projects start out at in these forums.

First thing to do is clean it out...obviously. And then take as many pictures as you can from every angle and position. While that sounds pretty odd, you will certainly refer back to those pictures down the road. Second thing to do, is make a sketch of the boat on some type graph paper and measure the beam from the transom to the bow. I did that at about one foot intervals and marked those measurements on the sketch.

And then it is demolition time. The fun begins. You probably have rotted transom, floor and stringers. So everything has to be removed. Gut the entire boat. Post your progress and ask questions and these forums will help you do this project. JMHO
 

Scott Danforth

Grumpy Vintage Moderator still playing with boats
Staff member
Joined
Jul 23, 2011
Messages
50,417
any fiberglass boat older than 15 years will be suspect for rot unless the design is 100% wood free.

nearly every boat from the 80's is wood-heavy in construction

every boat that has its own eco system from rotting leaves and debris will have rot.

however you have come to the right place for guidance on rebuilding it.
 

kcassells

Fleet Admiral
Joined
Oct 16, 2012
Messages
8,738
Wo...….Scott you ended on a positive note!
Anything is possible I guess. :eek:
 

Redtruck12

Petty Officer 1st Class
Joined
Jan 25, 2018
Messages
344
You will probably want to look into building some type of support system so you’re Hull doesn’t distort before you get too far into it
 

iplayonline

Cadet
Joined
Apr 26, 2009
Messages
25
Thanks for the advice guys. I definitely intend to take many measurements and pictures prior to complete disassembly. I actually want to set up a few of my go pros and take some videos. Im off tomorrow, so while my son takes his nap im gonna do some more disassembling. Get everything ready to take it apart.
 

chevymaher

Commander
Joined
Mar 29, 2017
Messages
2,934
Yes take pictures of everything. Then make measurements more than you think you will need. And you still will miss something.

I used paint in the computer and put the measurements on the pictures and stored them in a folder. When it was going together I printed the appropriate ones for use.

And those are nice when you sitting in the bare hull confused going DUH WTF.
 

iplayonline

Cadet
Joined
Apr 26, 2009
Messages
25
A little more progress today. I removed 95% of the electricals and carpet, and removed the windsheild. Dug a little deeper into the deck, and the stringers were moosh, as expected, but the fiberglass was solid. Got to get my buddies engine lift and get the motor . Then ill remove the trim and pretty much ready to remove the top cap. Once i get to that stage ill start setting up some go pros to record my progress.
 

Attachments

  • photo311649.jpg
    photo311649.jpg
    1.3 MB · Views: 0
  • photo311650.jpg
    photo311650.jpg
    1.2 MB · Views: 0
  • photo311651.jpg
    photo311651.jpg
    1.3 MB · Views: 0
  • photo311652.jpg
    photo311652.jpg
    1.5 MB · Views: 0
  • photo311653.jpg
    photo311653.jpg
    1.4 MB · Views: 0
  • photo311654.jpg
    photo311654.jpg
    1.6 MB · Views: 0

Redtruck12

Petty Officer 1st Class
Joined
Jan 25, 2018
Messages
344
The fibreglass should still be intact.
once you get to that point take lots of pictures and lots of measurements.
post a few pictures and guys on here will lead you through next steps
 

Redtruck12

Petty Officer 1st Class
Joined
Jan 25, 2018
Messages
344
The fibreglass should still be intact.
once you get to that point take lots of pictures and lots of measurements.
post a few pictures and guys on here will lead you through next steps
 

kcassells

Fleet Admiral
Joined
Oct 16, 2012
Messages
8,738
Put up some pics. Stringers go front to back and bulkheads side to side completely. Until you get to the bilge area. You should stick to the basic install from mfg and you can modify anything to your liking from there.
Google boat stringers just to get a general feel for layups.
 

iplayonline

Cadet
Joined
Apr 26, 2009
Messages
25
Pulled the motor off today getting ready to seperate the top cap next weekend. Any tips on separating it are much appreciated.
 

Attachments

  • photo312338.jpg
    photo312338.jpg
    1.4 MB · Views: 0
  • photo312339.jpg
    photo312339.jpg
    1.1 MB · Views: 0
  • photo312340.jpg
    photo312340.jpg
    1.8 MB · Views: 0

kcassells

Fleet Admiral
Joined
Oct 16, 2012
Messages
8,738
Might be a toughy regarding splash well area. May need to cut that area out separately for the rest to lift up. No biggy easy repair. Save all the cuts to see if they can go back in later after fit.
Remove all the rub rail and save it. Take a lot of measures. Also make a cradle prior to taking off the cap so the mold does not go out of shape. Replacing top back will be a nightmare if you don't.
 
Top