Is this dog ok? Johnson 1955 RD-17 25hp sneezing & gears

Tim Frank

Vice Admiral
Joined
Jul 29, 2008
Messages
5,346
Spent the last couple hours working on it. Using a tape measure on each side I get near perfect measurements, or as perfect as a tape measure can be. Surprising, because I've definitely hit the motor on the ground a few times backing up my driveway.

:eek: A tape measure? As FR said, a surface plate and depth gauge would be a minimum required.

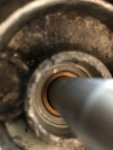
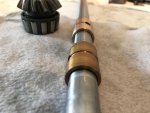
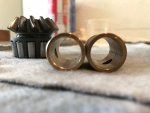
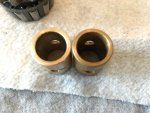
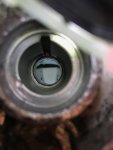
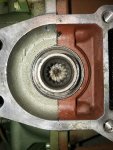
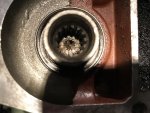
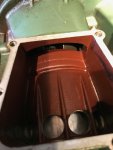
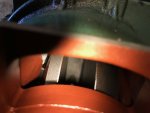
I went ahead and pulled the top oil retainer to access the shaft bushing and found that all the friction and binding was occurring at the bushing. The new one is so tight against the shaft that it's difficult to turn by hand. That bushing also directs the shaft about 1/8" off center from the pinion gear splines. This offset is parallel to the prop shaft, which means the lower unit isn't bent side to side at least, but perhaps front to back. I went ahead and tried the old bushing which has about 1/32" play in it, and everything feels very smooth with no major friction. I'm going to just re-install the old one.
.

The smooth feeling is due to the drive shaft wearing away the bushing because of a severe misalignment between the crank splines and the pinion gear splines.You now have what old-time machinists affectionately call a "rattling fit" (there is another term that they sometimes use which is not suitable for these forums...:) )between the driveshaft and bushing. Of course things are smooth with the old bushing, it is at least 1/32" O-S.

That wear will continue and possible accelerate...the next time you check, that bushing will be even more over size and the stress on the driveshaft will be even greater....I do not know when metal fatigue will cause a failure, but you may find out.
IMO, reassembling a known misaligned outboard drive is a landmine waiting to be stepped on.....and Murphy says that it will be miles from home when it goes off. :)
 

osaga

Cadet
Joined
Jun 5, 2016
Messages
28
So, what should I do send the LU to NASA for for refurbishment? My options are, a slightly loose, smooth as silk fit with the slightly worn old bushing, or a tight as hell fit with a new bushing. I did put some 600 grit on a spindle, chucked it up to my drill and smoothed out the id of the new bushing, which made a big difference in getting the shaft to align with the pinion, but my preference is still to just use the old bushing. It's not a coast guard cutter, just a fair weather lake boat and it's doing great for a 64 year old outboard.
 

Joe Reeves

Supreme Mariner
Joined
Feb 24, 2002
Messages
13,262
Frankly I would say "Do as whatever you feel like". It's your engine... BUT... has it been determined if the actual lower unit gearcase is bent, warped, out of line, whatever.... or is it the long exhaust housing?

Whatever it is that turns out to be bent, while you're using it in this questionable condition... keep a eye out for a good used part of the same design... they're out there ya'know!
 

Tim Frank

Vice Admiral
Joined
Jul 29, 2008
Messages
5,346
1955 RD-17 Sea Horse 25hp

I had an issue with the engine "sneezing" and jerking violently under load and at idle. I believe the issue loosened the upper shift linkage because the forward gear wouldn't engage and left me stranded yesterday up the Willamette.

As FR suggests...what you do about it is up to you.
If you choose to ignore it, it you may find yourself up the Willamette again; just do not forget to take a paddle. :)

A competent machine shop should be able to realign things...or get a good used unit.
....or just take your chances,
 

osaga

Cadet
Joined
Jun 5, 2016
Messages
28
Attached are some photos of the old and new bushings in case it helps you all to feel better about this original bushing that I like. Keep in mind that the drive shaft isn't bent (no wobble), and if the LU housing is bent, it would have to be (very slightly) bent the long way not side to side. Also attached is a photo of the machined area where the bushing sits at the top of the LU just below the impeller. Notice that it appears to have been machined offset to the original casting, not necessarily indicative of a factory defect but the offset is in the same direction as the shaft misalignment at the pinion gear using the new tight bushing. Also, I have flipped and rotated the bushing to rule it out as the culprit as well. Regardless, because the old bushing is not overly worn I believe this slop could be considered within a reasonable tolerance. Just my amateur opinion, but the machine shop thought the same despite my reluctance to agree with that opinion when I was there yesterday.
 

Attachments

  • photo313180.jpg
    photo313180.jpg
    1.6 MB · Views: 0
  • photo313181.jpg
    photo313181.jpg
    1.5 MB · Views: 0
  • photo313182.jpg
    photo313182.jpg
    1.3 MB · Views: 0
  • photo313183.jpg
    photo313183.jpg
    1.7 MB · Views: 0
  • photo313184.jpg
    photo313184.jpg
    1.5 MB · Views: 0
  • photo313188.jpg
    photo313188.jpg
    224.9 KB · Views: 0
Last edited:

osaga

Cadet
Joined
Jun 5, 2016
Messages
28
Lower unit is back together, it feels smooth but I'll be mindful of any indication of the driveshaft rattling as I use it. I'll also keep an eye to ebay for a good LU assembly. Thanks for the help with it.

I moved on to tackling the slop in the shift linkage, which was the initial cause of the gear slippage that left me stranded. After taking the powerhead off it was obvious that the shifter rod connecting clip had broken. See attached photo. Notice in the photo that you can see bits of the lower crankshaft seal to the left.

After inspecting the underside of the powerhead I removed the remainder of the original lower crankshaft seal. Fortunately it was made with brass and easy to pry out. However, I also noticed that there appears to be a hole in the drive shaft receiving end of the crank. Has anyone encountered this before? It's not rusty so it seems like it was made this way. I took the lower side cover off to inspect the crankshaft, it's difficult to see but it looks pretty clean inside.

Lastly, how much pressure is inside the crank area? I'm now worried about the upper crank seal and the hole in the crank. The drive shaft does have an o-ring on it that fits inside that receiving end of the crank. Is that good enough to seal it against whatever pressure is inside the crank case?

Thanks again
 

Attachments

  • photo313390.jpg
    photo313390.jpg
    2 MB · Views: 0
  • photo313391.jpg
    photo313391.jpg
    335.7 KB · Views: 0
  • photo313392.jpg
    photo313392.jpg
    1.5 MB · Views: 0
  • photo313393.jpg
    photo313393.jpg
    747.9 KB · Views: 0
  • photo313394.jpg
    photo313394.jpg
    1.5 MB · Views: 0
  • photo313395.jpg
    photo313395.jpg
    1.6 MB · Views: 0
Last edited:

osaga

Cadet
Joined
Jun 5, 2016
Messages
28
Any advice on the hole in the bottom of the crankshaft? Manufacturing defect? Oil port? Should I pull the crankcase apart to inspect? Pack the hole with some grease? Putty? A blend of grease and putty?
 

osaga

Cadet
Joined
Jun 5, 2016
Messages
28
After looking at the photo more closely, I'm guessing that it's not a hole at all, I think what i'm seeing are thin pieces of metal shavings/waste material from the original machining process? I'll give the crank shaft a good blow to confirm that the void inside there is just a space and not actually a hole.

As for the lower seal, I found that there were two types of crank seals used by OMC, and what I have is the inferior type prone to breakage. The old part number for this crappy seal is 303804, and the new part number is 321467, but it's still crappy. Hopefully the new ones are ethanol resistant. In case anyone reads this in the future, it's interesting to note that you can switch to the better "carbon seal" that was used after 1955, however you have to replace the lower crank shaft bearing and disassemble the crank case to do so. Antique Outboard Motor Club has good information about this.
 

osaga

Cadet
Joined
Jun 5, 2016
Messages
28
Nearing the end of my questions. So far I've rebuilt the magneto with new points, condensers, coils, plug wires, nkg non-resistor screw-on plug boots, and plugs. Rebuilt the lower unit with new clutch dog, forward gear, all seals, 3m sealant, impeller, impeller plate, and shift rod bushing. Replaced the upper shift rod and broken linkage components, replaced the lower crank shaft seal, and powerhead to lower housing gasket. Replaced the fuel lines, rebuilt the dual pressure fuel line connectors. Cleaned and rebuilt the carburetors with new gaskets etc. At this point I've put a lot of time and about $300 of new parts on it.

My question is: Is there anything else I should do to this motor while I'm at it as a preventative measure? Any commonly occurring issues I'm unaware of that I should address? I don't see any seepage from the head gasket and a compression test yields 90 pounds on each cylinder. All the bearings seems good, and I detect no looseness at the flywheel.

Thanks again for the help, couldn't do it without this forum
 

geoffwga1

Petty Officer 1st Class
Joined
Aug 8, 2010
Messages
395
The shifter dog is shot... replace it.

The gear would cause a new dog to wear quickly..... have a machine shop dress up the worn areas evenly on both worn lobes , that is if their charges are less than a new gear... otherwise, replace the gear too.

The jerking violently you speak of at a high rpm was due to the engine jumping out of and back into gear.

The condition/wear that exists on that dog is usually caused by shifting into gear slowly, thinking one is taking it easy on the lower unit parts... nothing could be further from the truth as that allows the lobes on the dog to clash many times with each other before the dog lobes actually engages the lobes of the gear.

The proper manner of shifting into gear, whether it's forward or reverse is to SNAP it in gear as fast as possible. Think about it!

NOTE: Examine the new shifter dog thoroughly. Some can be installed in either direction... HOWEVER... many must be installed in one direction only. There may be small print inscribed stating "Prop End"... or there may be score marks on one face of the dog which indicates the forward end of the dog. A shifter dog so marked and installed backwards will have the unit jumping out of gear immediately even if everything else is perfect.

The spitting back condition is normally due to a lean fuel setting of the carburetor... wrong jets, jets installed wrong, adjustable needle valve adjusted improperly, air leak at carburetor to intake manifold gasket, something of that nature.It is not an ignition problem.

The dog is toast ,there is nothing you can do with it without removing way too much metal.The gear on the other hand not so much.I have had several successes(IE no failures) redressing the faces of the gear with my Dremel,try to ensure you remove as close as possible the same amount on each thrust face of the gear and you should be good.
 

F_R

Supreme Mariner
Joined
Jul 7, 2006
Messages
28,226
Any advice on the hole in the bottom of the crankshaft? Manufacturing defect? Oil port? Should I pull the crankcase apart to inspect? Pack the hole with some grease? Putty? A blend of grease and putty?

The hole is simply a result of broaching the splines in the crank. They start out with a round hole, then force a "broach" or form tool into that round hole under tremendous pressure to create the spline "teeth". The broach pushes metal ahead of it, which you are seeing piled up in there, appearing to be a hole. All is well in there.
 

osaga

Cadet
Joined
Jun 5, 2016
Messages
28
Thanks again for all the advice. I'm happy to report that the engine runs better than it did before, no issues with it jumping out of gear and it starts and idles much better now too. Replacing the lower crankshaft seal made a huge difference. I used to have to crank it quite a bit with the electric start to get it going, and the low speed adjustment also used to be ineffectual. Had I known about it I would have replaced that seal years ago.

Unfortunately, I found that the lower unit is leaking even though I recently went through it with all new seals. It appears to be leaking around the shift rod. I did replace replace the shift rod bushing and o-ring, yet still she leaks. Should I bother taking another go at it? Is it somewhat common to have a leaky LU?
 

oldboat1

Fleet Admiral
Joined
Apr 3, 2002
Messages
9,612
IMO, difficulties fine tuning the low speed mix is a canary in the coal mine -- but doesn't tell you exactly what the problem is, unfortunately. Usually points to a piece of flotsam still in the carb. Glad to see you got it handled.

How do you know the shift rod seal is leaking? Any chance it's just unburned fuel or carbon debris? Pressure testing can confirm (l.u. removed and some soapy water sprayed around the area.)
 

osaga

Cadet
Joined
Jun 5, 2016
Messages
28
I spoke too soon, as oldboat suggested the l.u. wasn't leaking after all. There was an accumulation of oil/water gel around the shift rod and after tipping the unit upside-down more milky oil came out from that area. However, after draining and refilling the l.u. oil which was clean, it hadn't been leaking after all. So everything's starting, running great and shifting smoothly, with no leaks!

Here's a photo of the boat from last summer. 1956 14' mahogany ply run-about made in Everett Washington by Morris/Bryant.
 

Attachments

  • photo314622.jpg
    photo314622.jpg
    1.4 MB · Views: 0

osaga

Cadet
Joined
Jun 5, 2016
Messages
28
Well that photo is a bit older than I thought but she looks the same. I can recommend Bristol epoxy varnish, 7 years and holding up well.
 
Last edited:
Top