Mercruiser 170/470 - 1st time doing Impeller, Seawater Pump replacement

JMO1

Seaman Apprentice
Joined
Jun 26, 2019
Messages
39
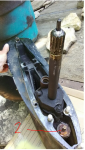
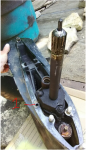
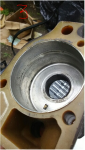
This motor is on a 1980 Century boat. The motor is the original motor on the boat. I've been having trouble with it overheating since I towed a stranded boat back to their dock. The tow was about a 1/3 mile through shallow, sandy water. My plan is to replace the sea water pump and the impeller on the lower unit.

I've never done this before, so I've studied up online. From what I've found, the replacement kit I'm thinking will fit the bill is [h=1]Mercruiser New OEM Sea Water Pump Repair Kit 46-807151A14[/h]
Also, I'm hoping this video is the process I need to follow, and all this work appears to be on the lower unit, by removing the lower unit, and nothing required in the engine itself.

https://www.youtube.com/watch?v=UkOWt7TlKAg


The serial number of my Engine is 5581049 and the Stern Drive is 5521930 if that helps you know my exact year\model.

If you have any tips or confirmation of the process, please let me know.


Thanks,
Jon
 
Joined
Jun 9, 2019
Messages
25
I have a alpha one gen 2 and just finished mine yesterday for the first time. I have experience working on cars, but first time on a boat. As a first timer I can say It is not bad at all. However, my engine is newer. Yours is 39 years old. So I would expect some difficulty in removing some bolts and separating the lower unit. I would expect nearly every rubber part needs replacing if regular maintenence was not done. I would expect all anodes need replacing as well. Make sure you have some good penetrating spray (Kroils or other). Get a friend to help you put the lower unit back on. For me that was the most difficult part. Good luck.
 

JMO1

Seaman Apprentice
Joined
Jun 26, 2019
Messages
39
Thanks Guys,

I was able to remove the lower unit this past weekend, and have a couple of follow-up questions.

I seem to be missing the Oil Seal altogether, I saw no signs of this on either the upper or lower unit housing. I know one of the videos I watched noted this as a gear case oil seal. If this correct, and if so, does this seal come with the replace and/or rebuild kits? I will mark this with a #1 in the attached image.

For #2 image, I was able to pull off the corroded washer and plan to clean this area up and replace the washer with a stainless steel washer. I see this Spindle has a "receiver tube" in the upper housing, I have no idea what this spindle is and if it's okay to clean this up as much as possible or if this corrosion points to a bigger issue.

Also, not sure if I should go with a Rebuild kit or a Repair Kit, image #3 has a closeup of my Water Pump Cup.
 

Attachments

  • What is this - 2.PNG
    What is this - 2.PNG
    644.2 KB · Views: 0
  • Oil Seal -1.PNG
    Oil Seal -1.PNG
    646.3 KB · Views: 0
  • Water Pump Cup -3.PNG
    Water Pump Cup -3.PNG
    552 KB · Views: 0

achris

More fish than mountain goat
Joined
May 19, 2004
Messages
27,468
image #1 Gear oil 'quad' seal (between the boxes)... Probably still stuck to the underside of the top housing... New one comes with a repair kit.

image #2 That washer should be stainless anyway. Maybe a PO has lost it and put a steel washer in. That 'spindle' is a spline, and that's your shift shaft. You need it to shift gear... And when you put the upper housing back on the lower housing, they MUST be aligned correctly. With the drive in forward gear, (rotate that shift shaft CW while turning the prop CCW until it 'locks', then hold it there, some people use a length of buggie cord), the intermediate shift shaft (the one in the upper housing) must point straight ahead. Now lower the top housing onto the bottom housing and button it up....

Then, after you've done the uni and gimbal bearing service, and inspected the uni bellows, you can put the drive back on the boat....

image #3. get a piece of fine emery and see if those marks will polish out. If they do, reuse that housing and cup. If not, replace them.... If in doubt, replace them, compared to an engine, they're cheap!

Chris........
 

nola mike

Vice Admiral
Joined
Apr 22, 2009
Messages
5,681
Did you just remove the gear housing from the drive or the whole lower unit from the boat and then split the drive?
 

Bt Doctur

Supreme Mariner
Joined
Aug 29, 2004
Messages
19,445
It is imperative that you line up and connect the upper brass shoe to the lower splined shaft correctly .If you try to just tighten the nuts and draw it together you will damage the drive. If you need a manual ASK. if you need advice ASK
BEFORE YOU DAMAGE SOMETHING
 

BudL1te

Seaman
Joined
Jun 8, 2012
Messages
63
Not real sure but it looked like the o-ring was right there on the lower half where it belongs, looked to me from the picture that it was flattened out, last one I did I thought there was an indent in the metal for the o-ring?

Maybe someone could confirm this?
 

JMO1

Seaman Apprentice
Joined
Jun 26, 2019
Messages
39
Thanks guys,

achris - I see the Bearing below the Water Pump lower housing, I'm assuming that's what the "gimball bearing" you're talking about. I'm not sure how to inspect the uni bellows. If you have a link or more details on this, that would be good.

Also, I'm not sure how I'll be able to spin the Shift Shaft once I have the lower gear housing back up into place, I thought if I had the remote in full forward, I'd be able to sort of jiggle the lower gear housing back up into place while rotating the prop counter-clockwise.

nola mike - I just removed the gear housing, the rest of the motor and drive are on the boat, so my process will be to put the gear housing back up into the drive with the drive and motor still on the boat.

budL1te - I think you're talking about the lower half of the water pump housing. If so, the O Ring on the outer side is in place and seems fine, and on the inside of this circle, there is a seal with flanges on both the top and the bottom that seems ok too.
 

achris

More fish than mountain goat
Joined
May 19, 2004
Messages
27,468
Thanks guys,

achris - I see the Bearing below the Water Pump lower housing, I'm assuming that's what the "gimbal bearing" you're talking about. I'm not sure how to inspect the uni bellows. If you have a link or more details on this, that would be good.

Nope, the bearing below the water pump is the 'lower drive shaft bearing'. The gimbal bearing is in the gimbal housing and supports/guides the stern drive unit yoke... If you didn't pull the entire drive (you should have) then you can't see the gimbal bearing (or the unis or the inside of the uni bellows), which is why we pull the drive, complete.

Also, I'm not sure how I'll be able to spin the Shift Shaft once I have the lower gear housing back up into place, I thought if I had the remote in full forward, I'd be able to sort of jiggle the lower gear housing back up into place while rotating the prop counter-clockwise.

You get the lower housing into forward gear BEFORE you present it to the upper housing... Then 'lock' it in forward gear by holding pressure on the prop, usually with bungy cord wrapped around it and up the starboard side of the drive...

nola mike - I just removed the gear housing, the rest of the motor and drive are on the boat, so my process will be to put the gear housing back up into the drive with the drive and motor still on the boat.

I would eally suggest you remove the upper form the boat before you attempt to put the lower on. Several reasons, it's very easy to miss the water tube if you try with the upper still on, and it will give you a chance to check and grease the gimbal bearing and uni joints, check the engine alignment and inspect the inside of the uni joint bellows. You can also inspect the condition of the upper shift shaft seal and the shift slide....

budL1te - I think you're talking about the lower half of the water pump housing. If so, the O Ring on the outer side is in place and seems fine, and on the inside of this circle, there is a seal with flanges on both the top and the bottom that seems ok too.

Not sure what you're referring to here...:noidea:

Chris.......
 
Top